Recovery menu Android in Russian: how to enter and exit, decoding
Android recovery menu - what purpose is it intended for and what advantages does it provide? This is a question that is considered relevant for users of this OS. There is a special boot mode here that starts the recovery operation. The article presents the features and advantages of the mode, as well as options for its use.
Android Recovery Menu - decryption
A similar program is a recovery mode for the Android system. The factory version has limited functionality. But you can still perform a reset and subsequent restoration of settings and firmware.
There are certain important items in the program menu. Each of them is responsible for performing its own function:
- Install zip from sdcard. Responsible for installing an archive with previously completed updates onto the phone’s built-in memory card.
- Wipe data/factory reset. With its help, you can completely clean the installed system partition and return them to their original position.
- Wipe cache partition. Used to clear the cache. It should be activated when replacing the smartphone firmware.
- Backup and restore. Responsible for backing up the OS and restoring a special backup.
- Mounts and storage. Ensures the operation of built-in partitions and monitors the correct installation and connection.
- Special additional settings and descriptions responsible for processes such as rebooting, deleting cache and resetting settings.
This Android recovery menu is not presented in Russian, so you need to know its decoding, know what mode and other words mean. Used by competent users or programmers. The selection of items is carried out by scrolling, that is, by turning the volume down or moving the volume up.
Step by step description of the reset process
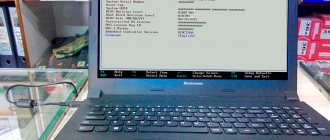
After turning on the computer device in this way, a menu for selecting actions appears on the screen, in which from the presented items you must use System Recovery or OneKey Recovery (depending on the model). Next, a special task selection menu appears with two items.
We assume that the user did not create his own backup copy, so we select the option to restore the Lenovo system from the original backup for the G50 model. After this, you need to agree to the warnings about starting the reset and deleting all user data. Next, the recovery process itself starts, and upon completion, you will need to click the “Finish” button, after which you can also select a reboot in manual mode, since an automatic restart option is simply not provided here.
But that's not all. The next step in Lenovo system recovery involves entering data and selecting options, just as you would when installing an operating system. But on IdeaPad devices you do not need to perform such actions. On these devices, the reboot will be performed automatically after the reset is completed, and you will end up with a “clean” system, as it was when you purchased the laptop.
How to enter the Recovery menu?
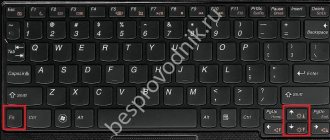
To enter the program, you will need to press a certain key combination. Which buttons need to be pressed depends on the brand of smartphone:
- Samsung - turn on, additionally increase the volume and Home;
- LG - activation and reduction of volume;
- Google Nexus, as well as HTC - turn on the phone, the button is quieter, immediately after that you need to click on Recovery;
- Gadgets Lenovo, Motorola - turn on, increase volume and Home;
- Sony - power, and after the vibration signal you need to press and hold the volume up.
These combination systems are the same for entering the regular menu and the custom one. They can also be used if necessary to activate recovery.
This is typical for a situation where the phone does not boot. If you cannot log in using the standard method, it is advisable to find official instructions and check that the authorization is correct.
Via computer
If operating via a computer, USB cable debugging is required. You need to go to settings, select the line for developers and then click on debugging. If this mode has been deactivated, the presented method cannot be used. Here you need to use ADB Run, a working device and a cable. After this, the user must perform the following actions:
- The device connects to the PC.
- The ADB Run program starts.
- In the menu you need to press item 4, then 3.
If everything is done correctly, the special device will automatically reboot. This will open up the ability to carry out the required processes.
If you have any questions, please let us know
Ask a Question
Lenovo Software/OneKey Rescue System on Lenovo Laptops
This article will focus on Lenovo OneKey Rescue 7.0
, previously there were versions One Key Rescue 6.0 and One Key Rescue 4.65.
There are three options for installing the program (each option is selected during the installation process of the program): 1. Clean installation. All disk partitions will be deleted and a new disk layout will be created. The first partition is C, it contains the version of Windows installed on your computer, the size of this partition can be set independently when installing Lenovo OneKey Rescue, I make it 100Gb, that’s enough for me))). If desired, you can install, for example, Windows XP on drive C and, if necessary, restore the system; with one click of the NOVO button, the Lenovo OneKey program will automatically restore Windows 7 while all files on drive D will remain intact. The second partition is D, this partition contains your files (photos, videos, etc.). When you reinstall the system or replace it with another, these files remain intact. IF YOU DO NOT CHANGE THE SIZES OF SECTIONS C and D, and do not format D. All remaining space is allocated to it, with the exception of the hidden partition necessary for the program to work. The third partition is the system partition (there is no partition letter), necessary for the program to work. This hidden partition takes up approximately 10Gb to 20Gb, on my 500Gb disk the partition took up 13.71Gb, the partition cannot be modified or deleted otherwise OneKey Rescue recovery will not work. 2. Installation on existing markings. In order for OKR to work properly, the hidden partition must be “pressed” to the end of the disk, have an NTFS file system and a size of at least 14Gb. 3. Restoring Recovery Partition. Required if OneKey Rescue malfunctions. Now let's proceed directly to installing OneKey Rescue. I want to say right away that the program itself belongs to the category of “engineering” and is not supplied with Lenovo laptops. You can download it at the end of this article. After downloading the ISO image of OneKey Rescue, you need to burn it to some kind of media. I will tell you how to create a bootable USB flash drive with the OKR image. We will record it on a flash drive, because not all netbooks are equipped with a CD drive, and installing OKR is possible on netbooks as well. To record, we will use the UltraISO Premium Edition program (Download). 1) Run the program as administrator 2) On the File tab, select Open
3) Open the OKR7.iso file 4) Next, in the
Bootstrap
, select
Burn hard disk image
5) Make sure that the Disk Drive item contains the letter of your flash drive (in theory should install automatically) 6) Click the
Format
, format the flash drive in FAT format 7) After that, with a clear conscience))) click the
Burn
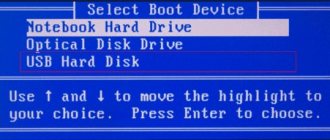
Now you have a flash drive with a recorded OneKey Rescue boot disk. We restart the computer, select the USB flash drive as the bootloader in the BIOS, or when turning it on, press F12 and also select the USB flash drive in the BOOT menu, after which the program installation process will begin. During the installation process, a window will appear with a choice of installation options
In the program window, press the Ctrl + Left Shift + O keys, a command line window will open. Now you need to find out what letter OKR is located under, if everything was done according to the standard and did not install programs that create virtual drives, then the letter OKR should be G or F. We check this: in the open command line we type DIR G: - a list of folders should appear, in it the ONEKEY folder must be present. If it doesn’t work, try another letter, and so on until the result is achieved. Happened?! At the command line, type: G: DIR - press enter CD ONEKEYOSIMAGE - enter OSIMAGE.EXE /FB - enter We wait about 10 - 15 minutes, depending on the size of your system. All. Now you can restore the system as if from a factory image. The advantages of this method are obvious; in the event of a system failure, reinstallation will take no more than 10 - 20 minutes, unlike a complete installation from scratch, the only disadvantage is the occupied hard drive space for backups, but with the current size of HARD DRIVE this is not so sad. You can download OneKey Rescue 7.0 from the link below:
Instructions from
new format_c
for Lenovo G500 and similar ones on ssd or unpartitioned hdd
Conditions:
Lenovo G500 laptop, ssd or hdd are new, unpartitioned, or “for demolition” of the system and everything that may lie there.
Instructions for the youngest children for installing OKR7 on G500 laptops
1. Boot from the same engineering boot disc OKR7 (iso), select the 1st installation option, CLEAR PARTITION.
The program will partition the disk.
2. When requesting a volume for drive C, enter the volume in MB.
(I’ll say right away: 100,000 MB is fairy tales for small children. 83.9 GB work fine for me. So you can safely ignore 100,000 MB and write so much that there’s enough for Windows 7 and new clothes, and save a little for yourself to fill your desktop).
3. When asking for a language, select in numbers your native language, which you speak by default.
Next, the program will install itself and ask you to press any key to shutdown on the command line - Press any button, the PC will shut down.
How to exit the recovery menu?
If a situation arises when the user has completed the necessary manipulations using the program and cannot exit, he needs to follow the following instructions:
- Go to the Reboot menu;
- The system tab is selected.
If after this you cannot exit, and the smartphone running on Android does not go into normal operating mode, but returns to the standard menu, you should press and hold the power button for a while. The optimal time here is 10 seconds, then everything starts working.
After this, you need to remove the battery and put it back in after the gadget is completely discharged. The Android device is connected to the PC, to software called ADB RUN. You need to find the Manual Command button in the menu. Click on the adb reboot normal command, but you should know that it does not work everywhere.
Other ways to fix system problems
If you need to use System Restore to fix problems but find that it is disabled, you will have to fix the system problems you are experiencing in a different way.
If the problems were caused by a recent update, you can remove it from Windows Update or revert to a previous "build" of Windows 10. This will eliminate the hassle that usually comes with an OS update and problems with your software and hardware.
If you installed software or hardware drivers and the problem started after that, you can go to the control panel to remove that software or hardware driver.
What to do if the Recovery menu does not open?
On certain devices there is no custom rollback menu in Russian. Accordingly, you won’t be able to get into the software if nothing opens. In this situation, you need to install it. When the No Command notification appears, you can judge that there are problems with startup and login. To fix the problem, you need to quickly press activation and volume up.
If the gadget refuses to boot in this mode, the cause may be a software error. It can only be eliminated by installing a custom Recovery. When this does not help, the user will only have to call the feedback form or contact the service center. There is a possibility that the device is damaged, and settings can be made using software methods.
Option 3: Manual recovery using bootrec.exe.
Bootrec.exe /FixMbr
The /FixMbr switch writes a Windows 7-compatible master boot record to the system partition. This switch does not overwrite the existing partition table. This option should be used to troubleshoot problems with MBR corruption or if you need to remove non-standard code from the MBR.
Bootrec.exe /FixBoot
The /FixBoot switch writes a new boot sector to the system partition using a boot sector that is compatible with Windows 7. Use this switch if at least one of the following conditions is true.
- The Windows 7 boot sector has been replaced by a non-standard boot sector - The boot sector is corrupted - After installing Windows 7, an earlier version of the Windows operating system was installed on your computer. In this case, the Windows NT Boot Loader (NTLDR) is used instead of Windows Boot Manager (Bootmgr.exe) to start the computer.
Bootrec.exe /RebuildBcd
The /RebuildBcd switch searches all drives for installed operating systems that are compatible with Windows 7. Additionally, this option allows you to select the installed systems that you want to add to the boot configuration data store. This option should be used if you need to perform a complete rebuild of the boot configuration data.
If you don’t remember the value you need, you can simply enter:
Bootrec.exe
and the utility will display help on the available command line switches.
Source
How to put your Android device into Recovery mode
Android users are familiar with the concept of recovery - a special mode of device operation, like BIOS or UEFI on desktop computers. Like the latter, recovery allows you to carry out non-system manipulations with the device: reflash, reset data, make backup copies, etc. However, not everyone knows how to enter recovery mode on their device. Today we will try to fill this gap.
Restoring Windows 7: all ways to solve problems with the OS
How to restore Windows 7 on a laptop, a black screen appears when booting, the recovery environment does not work, I deleted all hidden partitions, there is no original disk with Windows 7.
I spent a lot of time, tell me what to do now, or at least how to insure myself against such situations in the future, preferably without using paid data backup programs.
How to enter recovery mode
There are 3 main methods to enter this mode: key combination, loading using ADB and third-party applications. Let's look at them in order.
Some devices (for example, Sony 2012 model series) do not have stock recovery!
Method 1: Keyboard shortcuts
The easiest way. To use it, do the following.
- Turn off your device.
- Further actions depend on which manufacturer of your device. For most devices (for example, LG, Xiaomi, Asus, Pixel/Nexus and Chinese B-brands), simultaneously pressing one of the volume buttons along with the power button will work. Let us also mention special non-standard cases.
- Samsung. Press and hold the Home+Volume Up+Power buttons and release when recovery starts.
- Sony. Turn on the device. When the Sony logo lights up (for some models, when the notification indicator lights up), press “Volume Down”. If it doesn’t work – “Volume Up”. On the newest models, you need to click on the logo. Also try turning it on, holding down “Power”, releasing it after vibrations and frequently pressing the “Volume Up” button.
- Lenovo and the latest Motorola. Press “Volume Plus” + “Volume Minus” and “Power On” at the same time.
- In recovery, control is done using the volume buttons to navigate through menu items and the power button to confirm.
If none of the above combinations work, try the following methods.
Method 2: ADB
Android Debug Bridge is a multifunctional tool that will help us put the phone into Recovery mode.
- Download ADB. Unpack the archive to the path C:adb.
Launch Command Prompt - the method depends on your version of Windows. When it opens, enter the command cd c:adb .
adb reboot recovery
After it, the phone (tablet) will automatically reboot and begin loading into recovery mode. If this does not happen, try entering the following commands sequentially:
adb shell reboot recovery
If it still doesn't work, the following:
adb reboot —bnr_recovery
This option is quite cumbersome, but gives an almost guaranteed positive result.
Method 3: Terminal Emulator (Root only)
You can put the device into recovery mode using the built-in Android command line, which can be accessed by installing an emulator application. Unfortunately, only owners of rooted phones or tablets can use this method.
- Launch the application. When the window loads, enter the su command.
Then the reboot recovery command.
After some time, your device will reboot into recovery mode.
Fast, efficient and does not require a computer or turning off the device.
Method 4: Quick Reboot Pro (Root only)
A faster and more convenient alternative to entering a command in the terminal is an application with the same functionality - for example, Quick Reboot Pro. Like the option with terminal commands, this will only work on devices with installed root rights.
- Launch the program. After reading the user agreement, click Next.
In the application's working window, click on "Recovery Mode".
Confirm your choice by clicking “Yes”.
Also give the app permission to use root access.
The device will reboot into recovery mode.
This is also a simple method, but the application contains advertising. In addition to Quick Reboot Pro, there are similar alternatives in the Play Store.
The methods described above for entering recovery mode are the most common. Due to the policies of Google, owners and distributors of Android, access to recovery mode without root rights is possible only in the first two ways described above.
Thank the author and share the article on social networks.
Creating a custom backup
In principle, you can take care of creating a backup in advance, and it is not at all necessary to use Windows tools for this. Such tools are also available in the built-in utility.
For example, for Windows 8.1, you can initially select to launch the pre-installed OneKey Recovery application from the list of programs, after which you either agree to save a copy in the section offered by the utility itself, or specify a different path.
To launch a system rollback from a user backup when calling the recovery tool described above, when selecting a recovery task, you will need to specify not the original copy, but your own, using the browse button to access it and select the Backup.wsi file. In this case, unlike the first option, neither disk partitions nor user data will be deleted.
Reset Hard Reset on Lenovo
Surely you will agree that a Lenovo phone is one of the best options for mobile gadgets. It works on Android and is quite reliable, and it’s quite inexpensive. Nevertheless, no matter which Lenovo model you choose, sooner or later there will be failures in the operation of the initially made installations. This is quite logical, since any technique is not ideal. This can happen due to an ill-considered installation of third-party software, or simply if you have not updated it for a long time. In such a situation, the question arises: how to reset settings on Lenovo? Don't worry, everything is quite possible to do! Resetting to factory settings on a phone is no more difficult than on a computer.
What do we do if there is a need to reset all settings on a computer or laptop? If a tough and decisive measure is needed, then we reinstall the operating system by going into Bios. This is a safe but radical method - reinstalling the OS via BIOS leads to the loss of all data. You could try to do this on Lenovo if you have a laptop manufactured by this company. For example, lenovo g50, lenovo a2020, lenovo g580, lenovo b590, b50, g50-45, S 40-40, etc.
Restoring factory settings on a Lenovo phone or tablet is also called Hard Reset. With its help, you can completely reset all parameters, but remember that the stored information will be deleted and will not come back.
In what cases is it necessary to reset the BIOS?
Usually, as I wrote above, the computer does not start due to incorrect settings in UEFI. For example, the RAM frequency is higher than the processor's memory controller can allow. RAM voltage is too high. Or insufficient voltage for the CPU is also a factor in unstable loading of the operating system.
It happens that you adjusted the RAM timings and lowered CAS Latency too low. As a result, the PC stopped working, even Windows won’t load. In this case, restoring the BIOS to default helps.
Another very common reason is an elementary accident. Some button was accidentally pressed and the system disk was no longer bootable.
A person starts looking for information on the Internet to restore Windows via Bios, goes into it, but doesn’t understand what to do there. It's easier to return all parameters to standard settings.
One of the most popular cases is a “password-protected” computer or laptop. Oh yes, this also happens, because you can forget your password. Resetting the BIOS settings will solve this problem too.
Have you updated the motherboard BIOS to check that the new firmware is up to date? - will also have to be reset. Although, in theory, it is automatically reset. However, I can assume that not always.
You have changed computer components, updated # the processor - as a result, the PC does not see the new device or frequent crashes occur.
If you know of other cases where intervention in the settings will be required, please write in the comments! Thank you!
What is BIOS/UEFI anyway? I'll tell you in simple words.
The basic input and output system is a literal translation. In simple words, this is an internal “operating system” that is built into the motherboard. It is located in a microcircuit that is soldered onto the motherboard PCB.
UEFI is a more advanced version, with a bunch of additional settings, decent design and the ability to control the mouse.
Both perform one role: monitoring PC performance. This is to say in simple terms. Thanks to BIOS/UEFI settings, you can increase performance by 10%, 20% or more. It all depends on the “stuffing” of your home computer.
I will say this - by overclocking my Ryzen 5 2600 to 4 GHz and raising the RAM frequency to 3200 MHz, I got an increase of about 18%.
You can find out the version of your BIOS in the AIDA 64 program or inside the BIOS itself.
What methods are there to return the BIOS/UEFI to factory settings?
In total, as far as I know, there are 5 methods. Yes, I made a mistake, FIVE!
I read material from different sites, only 3 methods are described everywhere. But what to do if the motherboard becomes unusable?
Let's say you were flashing the BIOS, and at that moment the power was turned off. In this case, the motherboard will become “bricked” and, alas, resetting it to zero will not help.
Reset BIOS/UEFI via programmer.
An unpopular, but necessary option when the motherboard has turned into a “brick”. A special programmer is used to attach to the BIOS microcircuit (chip) and roll out new firmware. In essence, this is not a reset, but I am sure that it is possible to apply factory settings.
There is only one conclusion: you need to have a stable power supply or a UPS. ????
Resetting the Bios in service centers - replacing the chip.
To be honest? I just needed to find a reason. Surely there have been such cases when replacing the BIOS chip was necessary. By the way, this often happens with laptops.
The chip itself could have failed, maybe it was shorted by something or electrocuted. At the service center they will unsolder it and solder in a new one - I don’t know if this is considered a return to the factory BIOS settings, but I was obliged to mention this option.
How to reset the BIOS using a 2032 battery?
Elementary! Follow these steps in this quick recovery guide:
- Turn off the computer.
- Turn off the Power Supply (press the OFF button on the back cover of the power supply). If there is no button, simply unplug the power cord.
- We press the PC start button - this is necessary to discharge the capacitors.
- Open the side cover of the case.
- Remove the 2032 format battery for 5-10 minutes.
- After the specified time has passed, insert it back and start your home computer.
And now a few words about why this happens. This battery powers the BIOS chip, allowing you to save the settings even when the PC is deprived of electricity. In other words, there is nothing to maintain energy in the chip, because the battery has been removed, and accordingly all the settings are formatted, automatically “pushing up” the standard values.
By the way, on some laptops and old motherboards, the battery is soldered to the wires. In this case, simply remove them from the socket where they are connected. Just don’t forget which connector it was, since laptops are more difficult to understand than desktop computers.
And before the procedure, disconnect the battery and unplug the wire from the outlet.
How to reset the BIOS quickly using a CLRTC/CLR CMOS jumper.
CLRTC is found mainly in boards from Asus. In other cases, this Jumper, or as we call it, a jumper, is called CLR CMOS.
The jumper can also be called CLCMOS, Clear CMOS, Cl_CMOS, Clear Rtc, in general there are many designations, but the essence is the same. By bridging the contacts, we deprive the BIOS chip of power supply and it is reset to factory settings.
Typically, this jumper is located at the bottom of the motherboard, under the aforementioned 2032 battery.
What needs to be done to reset Bios via the CLRTC/CLR CMOS jumper:
- Turn off computer.
- Turn off power to the power supply.
- Find the jumper.
- Take something metal - a screwdriver works great.
- Close the contacts for a couple of seconds.
The main thing is to be careful not to damage the tracks on the motherboard's printed circuit board, and not to short-circuit anything unnecessary!
When to do a Hard Reset on Lenovo
The need to return all factory settings of the phone arises in the following cases:
- The device started to work slowly.
- When loading certain applications (or any), the system freezes seriously.
- The phone is infected with a virus.
There are two main ways to reset Lenovo. The first of them involves working in the phone menu, and the second involves using physical buttons. We will talk in more detail about how to do a hard reset using each of them.
Methods to restore the operating system
There are several methods in total, and each of them is not very complicated. You can use any of the proposed solutions to try to restore normal operation of the OS.
Important! Personal files will not be deleted during a system rollback. Only some programs that were recently installed can be removed.
When the computer is running
If the system starts and you can get to the desktop, then a rollback is easy. To do this, go to the Windows Start menu and write “recovery” in the search bar. Next, in the search results, select the “System Restore” component. A new window will open in which you need to click the “Next” button. Select the desired restore point and once again confirm your intentions using the “Finish” button. A warning will appear; you need to ignore it using the “Yes” button. After this, the recovery of the Windows operating system will start. If everything goes well, a corresponding message will appear.
Safe mode
If the Windows system on your Lenovo laptop does not boot as usual, you can try to restore it using the Safe Mode menu. The algorithm of actions looks like this:
- When the system boots, press the F8 button. A menu should open with a selection of options, in which you need to select “Safe Mode”.
- Complete all the steps from the previous paragraph, i.e. use the System Restore tool.
Factory reset via menu
A complete reset via the phone menu is possible as follows:
- Go to the “Settings” section.
- We find the item “Restore and reset”.
- Click on “Reset”.
Before performing a factory reset, the BIOS will ask you if you are sure of your actions. After all, if the system did not do this, it would be possible to reset all Lenovo settings by mistake. If you reset Lenovo consciously, then confirm your actions, and after a few minutes the smartphone will reboot, after which the presets will be reset automatically.
The first time the smartphone turns on takes a long time, but don’t worry - this is how it should be. When it turns on, indicate your wishes regarding the basic parameters of the device’s operation and check whether the newly configured gadget works correctly.
What other ways are there to restore Windows 7?
There is another little-known way to restore Windows 7 boot after a failure, and I’ll tell you about it. At first glance, it may seem difficult to many, but nevertheless it often helps me out.
The fact is, friends, that a very large part of the problems due to which you cannot boot Windows 7 lie in registry errors. And Windows 7 would not be Windows 7 if it did not have a mechanism that protects registry files. Such a mechanism exists and creates backup copies of the registry in the RegBack folder every 10 days, regardless of whether you have system recovery enabled or not.
If you cannot solve problems loading Windows 7, you should try replacing the existing (and apparently damaged) registry files from the Config folder with archived files from the RegBack folder. To do this, we will have to boot the computer from the Windows 7 installation disk or the Windows 7 recovery disk.
Boot into the recovery environment and select the command line.
We type in it - notepad, we get into Notepad, then File and Open.
We go into the real explorer, click My Computer. Now we need the system drive C:, pay attention, the drive letters here may be mixed up, but I think you can recognize the system drive C: by the Windows and Program Files system folders located inside.
We go to the folder C:\Windows\System32\Config, here are the active registry files, specify the File Type - All files and see our registry files, we also see the RegBack folder, in which every 10 days the Task Scheduler makes a backup copy of the registry keys.
So, we will replace the current registry files from the Config folder with backup registry files from the RegBack folder. So, first of all, let’s delete from the C:\Windows\System32\Config folder the files SAM, SECURITY, SOFTWARE, DEFAULT, SYSTEM, which are responsible for all registry hives (my advice is to copy the registry hives somewhere before deleting, just in case).
In their place, let's copy and paste files with the same names, but from the backup copy, that is, from the RegBack folder.
Note: The SAM, SECURITY, SOFTWARE, DEFAULT, SYSTEM files cannot be deleted all together; delete them one by one. Then copy the same files from the RegBack folder in their place.
Friends, if this does not help, use Windows 7 file integrity recovery; if the operating system does not boot, it is done in exactly the same way as in Windows 8.
What else do we have left of Windows 7 recovery tools?
I hope our article on how to restore Windows 7 system helped you.
Source
Reset to factory settings via buttons
Now we reset Lenovo to factory settings in a different way. We will use physical buttons. This method of returning to the original system data is especially relevant if the BIOS is infected with a virus and you cannot even turn on the gadget. This reset Lenovo is done as follows:
- Press and hold the volume button and the power button at the same time. We hold them for about 10 seconds.
- After this time, you will see the Android logo on the screen. This means that the buttons can be released.
- After a while, Recovery will open, and using the volume down and up buttons, select the item we need - Wipe Data. This will allow you to do a Hard Reset of all settings.
- The BIOS will again ask if you are sure that all data has been deleted. We agree, pressing the volume up button and restoring the system.
- After rebooting and setting the settings, the phone works like new.
How to roll back settings on a Lenovo tablet?
You already know how to return the system to its original state on Lenovo phones. But what if you want to reset the software of your Lenovo 30 or 7600 tablet? This task is easy to complete! All you have to do is do the same as with a smartphone. The tablet settings also have a factory reset function, and as you know, the volume and power buttons on these gadgets are similar. The only difference is the location - the power button is usually on top, not on the side.
Thus, you can reset the system on any Lenovo mobile device, and you will not be afraid of any software failures.
How to run Lenovo system recovery using built-in tool?
Now let's move on to considering the reset process. First, let's look at system recovery on the Lenovo IdeaPad, Essentials, and models like the G50.
On all such devices, next to the power button or on the side panel there is an additional button, which is responsible for calling the system reset tool without using any removable media or tools from an existing working or even damaged operating system. To begin system recovery on the Lenovo G50 or other similar models, you first need to turn off the laptop completely, and then press the same Novo Button instead of the power button to launch the built-in tool.
Lenovo A760
Lenovo A760 is a budget smartphone with very impressive specifications. The phone is equipped with a 4-core Qualcomm Snapdragon MSM8225Q processor, each of the cores operating at a frequency of 1.2 GHz, 1 GB of RAM and 4 GB of internal memory. If necessary, the smartphone can be equipped with a MicroSD memory card with a capacity of up to 32 GB, and a 2000 mAh battery.
Login to recovery for Lenovo a760
To enter recovery, do the following:
Then simultaneously hold down the “Power”, “Volume +” and “Volume -” buttons.
When the Lenovo logo appears on the screen and then the screen goes dark, release the buttons
Wait for the recovery to load.
Navigation using the “Volume +” and “Volume -” buttons, confirmation “Power”
Factory reset (wipe)
Resetting to factory settings is carried out through recovery.
Enter recovery
Select wipe data/factory reset
In the next menu - Yes - delete all user data
The phone will reset the phone and the first menu will be displayed. Now select reboot system now to reboot.
Reset to factory settings (Method No. 2)
Resetting your Lenovo A760 smartphone is as follows:
Press and hold the "Volume -" button and the "Power" button
After the backlight turns on, release the buttons
After a while a menu will appear
Use the volume buttons to select “5. Erase Userdata" and confirm the selection with the "Power on" button
In the next menu, click "Power" again
After formatting, select “8. Reboot". The smartphone will reboot with default settings
Comments
no comments
If some advice helped you or, on the contrary, did not help you, then do not be lazy - register and vote. By doing this you will help other users and us. Well, or just click on the advertisement, this will also make us happy and in this way you can thank us. Also, only registered users can leave comments and make changes to the database. By registering, you can add new devices or add notes to existing ones.
You can register or login on this page
How to activate the recovery partition?
Make the recovery partition active
- Open an elevated command prompt according to the instructions. Type diskpart and press Enter.
- Type the following commands in sequence and press Enter after each one. disk list. select disk 0 (the disk where the recovery partition is located), list the partition. ...
- Type exit again to exit the command prompt. Restart your computer.
8 Jan 2021
How to log into Recovery
Disconnect the charger or USB cable from your device!
1. The most common method.
- Turn off your smartphone.
- Hold down the center button (home) .
This method is suitable for many modern Samsung smartphones and tablets.
2. Center key + volume down + power on .
3. Volume up + power .
4. Volume down + power (suitable for most HTC).
5. Center key + power .
Rare ways to log into Recovery
Some manufacturers have clever ways to enter the recovery menu.
So, for Lenovo, to enter Recovery you need:
- Uncheck Fast boot the next time you turn on .
- Turn off your smartphone.
- the Power , Volume+ and Volume- buttons .
- When the logo appears, release the Power and continue to hold both Volume keys.
- After the robot appears, release all keys and briefly press the Power .
To call the Recovery menu on Sony :
- Turn off your device.
- Turn on.
- When the logo appears or the power indicator turns on, hold down either Volume+ or Volume-, or tap on the logo on the display.
To enter Recovery on Fly , you sometimes have to go through a whole ritual:
- Hold Volume+ and Power .
- When the Fly logo appears, release the Power button.
- After the green robot appears, release the Volume + key.
- Briefly press the Power button.
Keep in mind! The recovery menu may be missing. Naturally, in this case it is impossible to enter it.