Few people know that you can update your computer's BIOS. However, this can be done, and in some cases even necessary. For example, if you replaced the processor on a laptop and the motherboard does not interact with it correctly. Or you have experienced problems connecting your equipment. And also, if you have already installed the firmware update and noticed a lot of shortcomings. In all these cases, installing the latest stable BIOS firmware will help you. The article will tell you how to quickly update the BIOS on a Lenovo G580 laptop. But you should understand that the update process will be similar on other laptop models and personal computers.
Why update the BIOS
Many novice users mindlessly install new software without understanding the purpose of such a process. Before updating the BIOS on a Lenovo IdeaPad laptop or other models, you need to clearly understand the reason for this step. If the system is working correctly, it is better not to touch anything. If the software is loaded incorrectly, problems may arise that did not exist before.
It is recommended to flash the BIOS of a Lenovo laptop in the following cases:
- During the work, serious errors appeared, which the developers eliminated in the new version of the software.
- You are planning to install new hardware that is not supported by the previous BIOS version. For example, you might have installed a new processor, motherboard, or graphics card that needs an upgrade.
- The old version lacks some functions that are very necessary and appeared in the new software.
- Improving the level of security and eliminating vulnerabilities that were previously in effect. In this case, you need to update the Bios on your laptop to protect the device from potential hacking.
However, there are situations where firmware is not recommended. It is better not to take risks if the motherboard is damaged or the system is unstable.
Now you know how to reflash a Lenovo laptop and what is needed for this. The easiest way is to update the software using the official application. If this fails, you can always use the capabilities of Windows and follow the instructions in the ReadMe file. At the same time, do not rush to complete the work. Act only when absolutely necessary.
In the comments, share whether you had to do this kind of work, whether you were able to update the Bios on your Lenovo laptop, and what method was used.
How to enter and configure the BIOS of a LENOVO G500, G505 laptop to install WINDOWS from a flash drive or disk
Let's look at how you can enter the BIOS of a Lenovo G500/G505 laptop to configure it to install the Windows 7 or Windows 8 operating system from a USB drive (flash drive) or disk.
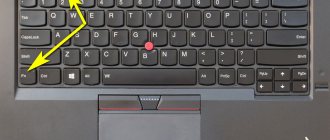
We turn on the laptop. The flash drive or disk must already be installed in the USB port or CD/DVD drive, respectively. To get into the laptop BIOS, you must frequently press the “Fn” + “F2” button combination during boot.
Our laptop model has the Windows 8 operating system installed, so you may be put straight into the BIOS, or problems may arise. Problems usually arise if the Windows operating system was not shut down correctly.
To enter the BIOS in this case, you need to wait until the operating system starts loading - the loading icon appears on the screen and starts spinning. See the image below.
After this, you need to press and hold the power button on the laptop for about 5 seconds. The laptop will turn off.
Turn on the laptop again. We begin to frequently press the combination of the “Fn” + “F2” buttons. The problem should now be resolved.
After we have entered the BIOS, go to the “Boot” tab of the main menu. If you have a regular flash drive, like ours, then in the first line of “Boot Mode” change the “UEFI” value to the “Legacy Support” value. To do this, press the “Enter” button and select the desired value in the context window that appears.
Now the tab window will change, a new line will appear - “Boot Priority”, in which the default value will be “UEFI First”. We need to change it. To do this, press the “Enter” button. In the context menu window that appears, select the “Legacy First” value.
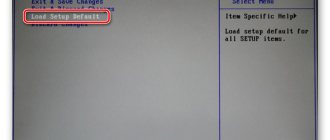
Next, go to the “Exit” tab of the BIOS main menu. Here, with the “Exit Saving Changes” line active (highlighted in white), press the “Enter” button. A context window will appear asking if we really want to exit and save the changes? Press the “Enter” button.
The computer will reboot.
When the system starts booting, we again begin to quickly and often press the combination of the “Fn” + “F2” buttons. We enter the BIOS. Go to the already familiar “Boot” tab of the main menu.
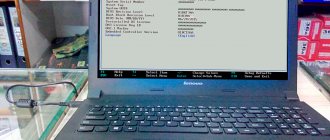
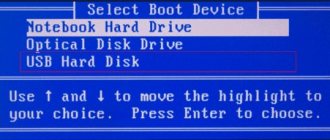
On this page we find a block of lines entitled “Legacy”. This is a list of devices arranged in the order in which the computer will access them when searching for an operating system to boot.
Since we will be loading the operating system from a flash drive, we need to move our flash drive to the first line in the list. Now, as can be seen in the image above, it is on the third line (USB HDD: USB DISK 2.0).
To raise it higher, let’s go to this line and use the “Fn” + “F5” button combination. (The combination of the “Fn” + “F6” buttons lowers the selected device from the list).
Now go to the “Exit” tab of the BIOS main menu and press the “Enter” button twice to save the changes. The laptop reboots again.
But after starting a new boot, the laptop will start using the operating system located on the flash drive.
When using a CD/DVD drive to load the operating system, we carry out all the same steps, only instead of a USB device, in the device queue list, we move the device located in the CD/DVD drive to the first line.
Link to video instructions:
- < Back
Drivers and instructions for laptop Lenovo B560 1.0.0
general information
- Directory of driver download pages for laptops/ultrabooks/netbooks
- If some words in this article are not clear to you, but you really want to know their meanings, we recommend that you familiarize yourself with the topic: Glossary of PC hardware terms (driver, chipset, discrete video card).
- There are often several modifications of laptops with the same model name, and there is a possibility that your laptop may not have an Intel platform, but an AMD one, another Ethernet controller or a video card. In this case, the topic will help you find the correct drivers: How to find a driver for PC hardware using the VEN(VID) and DEV(PID) identifiers.
Links to information on this model
- Driver download page on the manufacturer's website for Lenovo B560
Drivers
Installed in the order provided
Chipset . Intel Chipset Driver for 32-bit and 64-bit versions of Microsoft Windows 7 - Lenovo B560 IN1CHP26WW5.exe. (2.28MB)
Video adapter.
- Intel Onboard Graphics Driver for Microsoft Windows 7 (32-bit) - Lenovo B560 IN2VDO38WW5.exe (37.7MB)
- NVIDIA Display Driver for Microsoft Windows 7 (32-bit) - Lenovo B560 IN3VDO35WW5.exe (74MB)
Storage Intel Matrix Storage Manager Driver for Microsoft Windows 7 (32-bit, 64-bit) - Lenovo B560 IN1SRM30WW5.exe (28.2 MB)
Card reader. Driver for Realtek USB 2.0 card reader for 32-bit and 64-bit versions of Microsoft Windows 7 - Lenovo B560 IN4CAR21WW5.exe (8.5MB)
Input Devices. ELAN Touchpad Driver for 32-bit and 64-bit Microsoft Windows 7 - Lenovo B560 IN4THP09WW5.exe (28.0MB)
Network, communication.
- Atheros Communications AR81Family Gigabit/Fast Ethernet Driver for Microsoft Windows 7 (32-bit and 64-bit) - Lenovo B560 IN6ETN11WW5.exe (4.79MB)
- Intel EchoPeak WiMAX Driver for Microsoft Windows 7 32-bit and 64-bit - Lenovo B560 IN1WLN69WW5.exe (60.6MB)
- Atheros Wireless LAN Driver for Microsoft Windows 7 32-bit and 64-bit - Lenovo B560 IN3WLN13WW5.exe (8.11MB)
- Intel Wireless WiFi Link Driver for Microsoft Windows 7 32-bit and 64-bit - Lenovo B560 IN1WLN67WW5.exe (20.8MB)
- Broadcom Wireless LAN Driver for Microsoft Windows 7 32-bit and 64-bit - Lenovo B560 IN2WLN45WW5.exe (20.1MB)
- Wide Wireless Lan Driver for Microsoft Windows 7 32-bit and 64-bit - Lenovo B560 IN6WLN48WW5.exe (45.7MB)
- Broadcom Bluetooth Driver for Microsoft Windows 7 (32-bit, 64-bit) - Lenovo B560 IN3BTH8WW5.exe (55.5MB)
Sound. Realtek High Definition Audio Driver for Microsoft Windows 7 32-bit and 64-bit - Lenovo B560 IN1AUD6WW5.exe (85.6MB)
Camera. Camera driver for Microsoft Windows 7 32-bit and 64-bit - Lenovo B560 IN1CAM36WW5.exe (19.9MB)
Fingerprint's scanner.
- BioExcess for Microsoft Windows 7 (32-bit and 64-bit) - Lenovo B series laptops cabx06ww.exe (25.4MB)
- EgisTec Fingerprint driver for 32-bit and 64-bit Microsoft Windows 7 - Lenovo B560 IN3FGP05WW5.exe (2.58MB)
Useful programs.
- Lenovo Energy Management for Microsoft Windows 7 (32-bit) - Lenovo B560 IN1EGC47WW5.exe (6.45MB)
- Intel Management Engine Interface Driver for Microsoft Windows 7 32-bit and 64-bit - Lenovo B560 IN1MEI09WW5.exe (9.40MB)