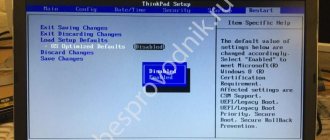
In the “Exit” tab, find the “Load Setup Default” item and confirm the changes. This will load the basic BIOS settings.
Wait until the laptop restarts. This completes the update procedure. Only then can you return to the BIOS again to set all the parameters there for yourself. Read more in the article from another of our authors at the following link:
As you can see, there is nothing difficult about installing the new BIOS version. You just need to make sure that the selected parameters are correct and follow the simple guide. The process itself will not take much time, and even a user who does not have special knowledge or skills can cope with it.
Instructions for updating Bios on a laptop
In recommendations for laptop maintenance, you can find mention of the need to update the BIOS. Few users know why. However, without BIOS it is impossible to work on computers in principle.
BIOS is a basic input/output system that serves as an intermediary between the operating system: Windows, Linux or iOS, and the laptop components. It may contain errors, and updating them will remove them. Installing a new version may be required for another reason. Sometimes manufacturers include support for new memory modules or processors.
How to enter Bios on a laptop
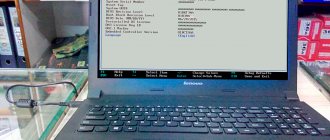
The BIOS starts immediately when turned on. In older models, the letters are clearly visible in the upper left corner of the screen immediately after loading begins. Then they disappear and are replaced by images of the OS launching, since control of the laptop is transferred to it.
First you need to determine the laptop model. Here are typical methods for popular brands:
- ASUS: When turning on, hold down the F2 key.
- Compaq: F10 key.
- DELL: classic DEL, F2, extremely rare - Ctrl-Alt-Enter.
- HP: F2, ESC keys.
- LENOVO: Del, F2.
ACER: also F2, DEL. More exotic keys: Ctrl-Alt-ESC or F1.
A complete list would take up too much space. So if none of these combinations worked, please contact us in the comments below.
If everything worked out for you, a window similar to this should appear.
Don't forget that you must reboot first. The BIOS window is visible only in the first seconds of operation.
By the way, if you press Pause, the letters in the upper left corner freeze on the screen. You can see the version and other BIOS details.
Bios update procedure
- Go to the manufacturer's website and find the support page for your model on the website. It's better to use the search. Any leading brand has a list of laptops of at least a hundred devices of varying vintages. Below, for example, is the ASUS support page.
The support page usually requires you to select the Drivers and Utilities section, then select your operating system. The menu items we need should be called BIOS and BIOS utilities. The first contains information about the latest versions of the basic input/output system, and in - Determine the available BIOS version. Please note that many manufacturers publish a list of changes that the update brings . If the solution to your problem is not in the list, then it is likely that the problem is not in the bios, but in installed programs and operating systems
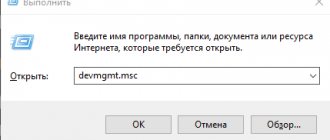
- Now we determine the current BIOS version: launch the MSInfo application, press the Win key and start writing the first letters of the program name. We find the section about BIOS and look at the version.
Assembly 216 has been installed and only 216 is available. If you have an older version than on the manufacturer’s website, then move on. - Download the BIOS update utility.
Previously, only DOS programs were used for firmware. Now everything can be done with a regular application, for example, WinFlash directly from Windows. - Install the program and launch it.
Note. Utility installation files and firmware files are usually supplied in zipped (ZIP) form. They must first be unpacked into a directory created on the C: or D: drive. And only then launch it.
- Download the latest bios from the manufacturer's website. Be sure to remember the directory where you extracted the file.
- During startup, the BIO C update utility immediately asks for the path to the firmware file. We find the directory into which we unpacked it and select it with the mouse.
- Be sure to connect the power supply and make sure that the battery charge is at least 20%. Otherwise, the program will not even start working. If there are power failures, you risk getting a dead piece of iron and plastic instead of a working laptop with an outdated BIOS version.
- In the window of the update utility, in our case WinFlash, we will again see the installed version, and the option from the manufacturer’s website. If they match, the Flash button will be disabled. Otherwise, click on Flash and wait for the procedure to complete.
After rebooting, the laptop will work with the new version of the basic input/output system. There is no need to look for obvious signs of renewal. The changes are usually unnoticeable. You can confirm the fact of the update using the same MSInfo program.
Hotkeys
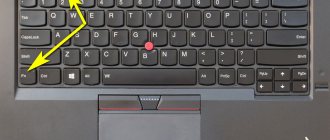
Let's start with the standard method, which is present on any laptop computer. We are talking about special keys programmed to turn on the BIOS. Typically, this button does not depend on the device manufacturer, but on the motherboard model and the installed software version. If you take Lenovo >F2 on the initial startup screen.
If this option does not work, then try the key combination Fn + F2. This is because the system buttons can only be activated using the auxiliary key. You can also find out the exact button on the initial startup screen, where information about the BIOS manufacturer and software version is located:
Important Notes
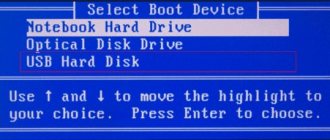
A laptop is a rather closed device in terms of flexibility of settings. Increasing the frequency of the processor or memory will inevitably lead to overheating and premature failure of laptop components. Therefore, you should not have high expectations for BIOS construction projects. The maximum you can do is raise the processor frequency a little, if allowed by the manufacturer, and select a device to boot.
The last feature is useful when you need to boot from a flash drive. For example, this is necessary to fight viruses. In this case, you need to download the boot disk image from the antivirus developer’s website and boot from it. First, you must go into the laptop's BIOS and specify the USB drive as the main boot device.
We warn you - it is better to entrust operations to repair or improve a laptop to professionals . Most failures occur due to incorrect operation of programs in the operating system. BIOS is only an intermediary between the software and hardware of the laptop.
Hotkeys
There is a standard method that is applicable to all computers and laptops - this is by pressing the hot key when the initial screen appears (it is black and contains data about the BIOS and devices) while the system is booting (rebooting). It appears briefly, so you can start pressing this key immediately after activating the power or reboot button.
The key combination depends on the brand of motherboard, and not on the operating system or laptop model. For Lenovo IdeaPad 320, this is the F2 key, or the combination of the key with blue letters Fn (bottom left) + F2 (top row). This method will also work when the Windows 10 lock screen (the screensaver that appears immediately after booting or waking from sleep mode) appears on the monitor.
For devices with other motherboard models, the principle of entering the BIOS is the same, but the keys may be different. To find out which one to press, you need to look at the hint indicated below on the home screen.
This initial screen, which appears for a couple of seconds at boot, can be delayed by pressing the spacebar at the moment of boot.
How to update bios on a laptop
First, you need to find the BIOS file. I will show you how to update the BIOS on an Asus laptop, but again, I repeat, this can be done with another company.
We go to the official website of the manufacturer. For example, we write Asus in Yandex and see the official website, go to:
Let's go to service - support.
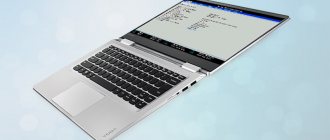
Now, you need to find out the model of your laptop. It is written either on the front of the laptop.
Or on the back cover:
Or else, it can be hidden under the battery and for this you need to remove it.
To search for drivers and BIOS on the site there are two options: search by model and selection by category. We will search by model in the search. Enter the model and click search.
If you entered the correct model, the site will give it to you. Let's move along it.
If you can’t find the model on the website, then go to google.ru and write the laptop model and support.
We choose support or if the site is in English support.
Next are drivers and utilities.
Select your operating system.
Open the bios tab and download the latest version.
Now we need to download the utility.
We also select the latest version and download.
If you do not see the item with the utility, select another version of Windows from the list, because for example, if there is a utility in Windows 8, then sometimes developers are too lazy to put it in Windows 8.1. But if you don't find it, don't be upset, because... in the second method I will show you how to update the BIOS directly in it.
If, when installing the BIOS utility, the message appears: sorry this program only support Asus notebook, then you need to download and install the ATKACPI driver in the same section . You can get it in the utilities section.
After this, the utility should be installed.
You can update bios in two ways:
Updating BIOS using the utility
Let's launch the utility. She will give this message, but don’t be afraid, if you do everything correctly, then nothing bad will happen. Click OK.
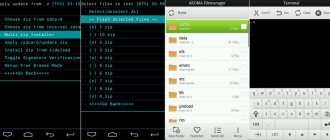
Select BIOS. It is advisable to place the file with the firmware in the root of the disk.
The program will also issue a warning that the battery must be charged, otherwise if the laptop turns off during the firmware, then you will either have to throw out the motherboard or look for a programmer.
After starting the program, information about the current and new BIOS will appear.
My BIOS is already up to date. This is why the following inscription appears:
In this case, you don't need to do anything. But if there is no such sign, then the utility will write that the BIOS is correct and you only need to press the Flash button.
First the BIOS will be erased.
Next comes the update.
And finally, checking for correctness.
And if the verification is successful, the firmware process will be completed.
All is ready. Now reboot your laptop.
Boot from Windows
Windows 10 installed on the Lenovo IdeaPad 320 allows the user to enter the BIOS when the operating system is already loaded. This method is universal for other laptops and computers. To do this, you need to perform several steps in the given sequence:
- Launch the Settings program. This can be done from the Notification Center (the rightmost icon at the bottom of the system tray) by clicking on the “All Settings” quick launch button in it. Other options: from the “This PC” window or right-click on the “START” button (lower left corner).
- In the window that opens, select Recovery from the menu on the left.
- Click the “Reboot Now” button shown in the figure.
- After the system reboots and a special menu opens, you need to select the “Troubleshooting” section.
- Select "Advanced options".
- Click on the button marked with a red arrow in the figure.
This item prompts you to enter the UEFI firmware menu. In fact, this is the same as the BIOS, only with advanced parameters (for example, the ability to control the mouse, a more convenient interface, etc.).
After clicking on the specified item, the computer will reboot and the BIOS (UEFI) settings menu will appear.
All these steps can be replaced with a simpler option. By clicking on the start button, you need to call up the “Shutdown” list and, while holding down the “Shift” key, select the “Reboot” line. When the command is executed, the boot will be interrupted by the appearance of the BIOS software menu. The same thing can be done while on the lock screen.