Among the huge variety of gadgets from various developers, we can highlight Lenovo devices, which have wide functionality and affordable prices. These mobile phones and tablets are ideal for active users of social networks or email.
But to constantly use all the indicated functions, you must have access to the Internet. Unfortunately, it is not always easy to establish a connection. In this article we will describe in detail how to properly establish access to the World Wide Web for Lenovo mobile devices.
It should be noted that a connection to the Internet can be established using 3G or Wi-Fi technology. Since most of the devices from this developer run on the Android operating system, the connection setup is not much different from other devices running on this OS.
3G and 4G connection principle
The fastest and most convenient types of mobile communications are the new generation 3G and 4G standards. The first option is the most common; it provides a stable connection and high Internet speed. Typically, the smartphone automatically switches to the preferred connection. You can see the corresponding icon at the top of the display.
But there are situations when you need to connect manually. To do this we do the following:
- Go to the settings menu and select “Mobile networks”.
- Open the “ Network Mode ” menu and select your preferred network or automatic selection.
The best option would be to choose an automatic connection, since 4G, or LTE, is not yet available in some regions. In addition, sometimes it works unstable and even worse than 3G.
Connect Lenovo to the Internet via Wi-fi
Wi-fi technology has become widespread, thanks to which each of us can connect to the worldwide network not only at home, but also in almost any public place. To establish a connection, you must follow the instructions below:
- Open the settings of the mobile device;
- Select the Wi-fi item;
- Using a slight movement of your finger, set the checkbox for turning on Wi-fi to the active position;
- After the previous simple step, you will see a list of available Internet connection points. Select a connection point;
- Typically, most access points are locked with a password, without which you will not be able to connect to the network. Enter the password (if you don’t know it, try to find an open access point);
- We check the correct connection. To do this, you need to pay attention to the taskbar, where the corresponding checkmark should appear.
Now, using a browser or installed applications, you will be able to find the necessary information or perform any other action.
Using third party programs
We looked at the basic way to distribute Wi-Fi on your phone, but with the help of third-party applications everything can be faster. Some programs even increase the reliability of the connection. This will be useful to the person distributing from a Lenovo phone, since no one will be able to hack it even if they try.
Osmino
Osmino is one of the most popular applications that allows you to create an access point. This application allows you to create a secure point from which you can distribute Wi-Fi in just a couple of clicks.
You no longer need to think about how to distribute the Internet with Lenovo. All that is required is to download a small application, install it and launch it. Immediately after this, the access point settings will open. There you can enter your nickname and desired password, after which you need to click the “Giveaway” button. These actions will start distributing the Internet from your smartphone.
The application is quite lightweight and will work on any company device, including the Lenovo A5000.
Wrong password
As a rule, access points for home or corporate use are password protected; there are several main versions of secure connection WPA and WPA2. This allows you to avoid connecting freebie lovers and secure traffic. Users often make mistakes in previously assigned combinations, which is why the phone does not connect to wi-fi.
The access code must be entered, paying attention to the presence of capital letters. Do not forget that we are entering a password of at least 8 characters, if there are fewer, it means that you have missed the required character. If you have forgotten your password, you can find it through the modem settings.
How to set up Wi-Fi?
The principle of activating the Wi-Fi function on all Lenovo smartphones is no different, so you can use the general instructions presented below. We will present several ways to enable wireless connection.
- Open the notification shade and connect Wi-Fi.
- Go to settings, select the “Wireless networks” section and enable the option. Select the desired access point from the list, enter the password (optional). After this, the connection icon in the lower right corner should turn blue.
Connect Lenovo to the Internet using 3G
To connect using 3G technology you must have a SIM card. Please note that the operator must include the ability to connect to the Internet in your tariff package. In most cases, as soon as you insert a SIM card into your device, the settings are installed automatically. If this does not happen, then you should check whether you have funds on your balance or whether data transfer is enabled.
Have you checked? If you have money in your account and you have enabled data transfer, you can now go directly to manual settings:
- Open the settings of the mobile device, go to “data transfer”, click on “mobile network settings”, and then click on “access points”;
- There are two options here. The point can be set. In this case, all you have to do is activate it. Otherwise, it must be created manually;
- Click on the button to create a new point and fill out the form with all the data necessary to access the Internet, such as “Name”, “Username”, “Password” and “APN”. If you do not know what to enter in the fields, you need to go to the operator’s website and find the necessary information;
- We check whether access has appeared. You can try loading any page in your browser. Notice whether the corresponding icon appears on the taskbar;
- If the Internet is still not available, then try restarting your mobile device and connecting again.
If you were still unable to connect to the network, this means that you entered incorrect data when creating an access point. Try repeating the procedure.
[Total votes: 247 Average: 2.9/5]
How to set up Internet on Lenovo Author DimkaVarlamov average rating 2.9/5 — 247 user ratings
The influence of Internet settings in a modern smartphone
The choice of connection package affects the data transfer speed. To establish what type of connection is being used, just look at the top of the screen displaying the enabled Internet resource: 2G/3G/4G.
Communication standards markings:
- "G" stands for GPRS, which stands for General Packet Radio Service - the slowest standard compared to all others. It is used in GSM, Global System for Mobile Communications, or 2G. The "E" designation is an extension of GPRS - a general purpose packet radio service and is called EDGE, has extended speed data for GSM Evolution. Accordingly, it is slightly faster than GPRS, but still uses the old GSM or 2G.
- “3G” stands for UMTS, that is, Universal Mobile Telecommunications System, and is the successor to GSM and much faster. HSPA, High Speed Packet Access, is a third generation (3G) technology based on UMTS standards, offering faster download speeds.
- The HSPA family of technologies is quite large, covering High Speed Downlink Packet Access (HSDPA), High Speed Uplink Packet Access (HSUPA) and Evolved High Speed Packet Access (HSPA+).
- “4G” is the fourth generation, stands for LTE (Long Term Evolution) and is one of the fastest communication standards.
3G/4G settings for a Lenovo smartphone or tablet
4G Internet is one of the modern standards for Internet access. The service is offered by most cellular operators, however due to its recent introduction into the mobile environment, it is not yet widely available as not all phones allow it.
Review and configuration of the D-Link Dir-320 modem
Typically, the mobile data connection (3G/4G) works as soon as the user inserts the SIM card into the phone.
Important! You need to keep in mind that in Lenovo 2010, Internet setup is performed on the condition that the device can only connect to one high-speed network (3G/4G), so if two SIM cards are used, install a 4G SIM card: Settings > Advanced > Cellular networks > Preferred networks.
Algorithm for obtaining configuration data:
- Before connecting to the Internet on Lenovo, go to the provider’s website and search for “mobile Internet settings.”
- Find a page with a list of settings for mobile connections: APN (access point name), Proxy, port, MCC (mobile country code), MNC (mobile network code), verification type and others. All you have to do is make sure that the values specified by the provider match the data on the phone.
- Go to: System settings > Advanced > Mobile networks > Access point names.
- Click the “Settings” button, select “New APN” and fill in all fields with the information received from the provider.
Infinitely obtaining an IP address
This is a fairly common problem that tablet users encounter when they try to set up the Internet on their gadget. In this case, it is recommended:
- rename the network name. If the previous one was in Cyrillic, then it is advisable to use English characters;
- reboot the router;
- try to enable DHCP in the router settings;
- change the network encryption type and restart the tablet.
- https://wifigid.ru/raznye-nastrojki-telefonov/kak-podklyuchit-planshet-k-internetu-cherez-wi-fi
- https://smartphonus.com/how-to-connect-wi-fi-on-tablet/
- https://tvoirouter.ru/featured/kak-podklyuchit-wifi-na-planshete.html
- https://bezprovodoff.com/wi-fi/nastrojka-wi-fi/kak-nastroit-wifi-na-planshete-android.html
- https://vpautinu.com/planshet_smartfon/android/kak-nastroit-vaj-faj
- tweet
Setting up Wi-Fi on your tablet manually is easy. If the setup is successful, you will be able to use the Internet immediately. If nothing works the first time, it is recommended to delve into the router settings. Step-by-step instructions on how to do this are described above. Everything is so simple that even a beginner can handle it.
Sources used:
SHARE Facebook
Previous articleTransfer data from an old iOS device to a new iPhone, iPad or iPod touch using Quick Start
Next articleWhat is GLONASS in a smartphone, phone and why
Eliminating poor signal levels
Users often encounter unexpected problems with Lenovo. One of them is poor Wi-Fi performance. Due to a weak connection, Lenovo Wi-Fi is poorly received. Many people think that this is due to the fault of Internet providers, but in fact this is not always the case. There are many reasons in the device itself that inhibit transmission.
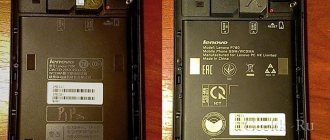
Reasons affecting the slow Internet speed of the Lenovo A5000 smartphone operating according to the GSM 900/1800/1900, 3G standard:
- System failure. Reboot your phone and reconnect to the Wi-Fi network to get maximum internet speed.
- Before turning on 3G on Lenovo, update the browser and operating system of the phone to the latest versions.
- Make sure that there are no conflicts between the wireless router, as this can lead to slower internet speeds on the phone.
- Check background running applications that use the Internet connection and close unnecessary ones.
- Check if connections are being used with DNS settings. If not, you can change these settings on your device.
- Clear browsing history, cache, cookies and other unwanted browser information in a timely manner to get the required speed or switch to others.
Why does not it work
Before diagnosing a faulty wireless connection, try connecting your Lenovo phone to it. To do this you will need:
- Go to the notification curtain (swipe your finger across the screen from top to bottom) and turn on Wi-Fi there.
- Go to the device settings, find “Wireless networks” and enable this option by activating the “toggle switch”.
- In the list of active access points that appears, select the one you need to access the Internet.
- If necessary, enter the previously set password, usually it consists of 8 characters.
This process is almost identical on all Lenovo devices, including smartphones and tablets.
Sometimes it happens that the gadget refuses to work with the access point. There may be several reasons:
- incorrect password;
- router settings failure;
- incorrectly set modem region;
- Incompatibility of b/g/n/ac protocols with cellular. These letters are the four main operating modes of the 802.11 Wi-Fi wireless network.
Let's look at each problem in more detail and try to solve it right away.
Phone as a Wi-Fi hotspot
Each user can turn their Android device into a full-fledged access point. To do this, you need to connect to the mobile Internet, go to “Settings” - “Network and Internet” and go to the “Modem mode / Access point” section.
Here you just need to activate the option, and in a few seconds a new Wi-Fi network will be created.
The owner of the Internet-distributing phone can set his own network name (SSID) and password for the access point.
Connecting to such an access point occurs in the same way as to any other wireless Internet. You need to select the created Wi-Fi network on your computer/laptop, enter the password and wait for the connection.
It is important to note that the enabled access point mode does not allow you to simultaneously use Wi-Fi Internet. Only 2G, 3G or 4G mobile communications are available.
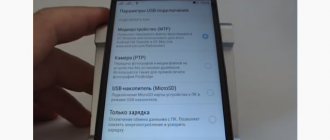
Modem mode on the phone
If a wireless Wi-Fi connection is not suitable for the user (for example, there is no Wi-Fi module on a desktop PC), it is recommended to consider an alternative option. In the device settings, you can enable modem mode to distribute the Internet to your computer in other ways:
- Via USB cable.
- Via Bluetooth wireless protocol.
Each method has its own characteristics. For example, wireless communication is more convenient due to the absence of wires, and the gadget can be left in another room - the radius of information transmission reaches ten meters. However, the connection speed will be low - up to 3 Mbit/s.
Connecting via USB is not so convenient because it limits the location of the smartphone - the device must be in close proximity to the computer. The advantage of this method is simultaneous charging via USB (the built-in battery will not discharge after prolonged use of the Internet), as well as high speed network connection.
Bluetooth modem mode
To use your phone in Bluetooth modem mode, follow these steps:
- Turn on Bluetooth on your phone and computer.
- Allow device discovery on your phone and computer.
- Pair your devices.
- Open your phone's settings and turn on Bluetooth tethering.
- Click the Show Devices button on your computer.
- Right-click on the smartphone name.
- Hover over the “Connect” line and select “Access Point”.
- Start using the Internet.
It is important to note that a wireless connection can quickly drain the battery of a mobile device. We recommend using this method when there is an outlet nearby.
USB modem mode on a smartphone
Each phone has a microUSB (or Type-C) connector for charging the battery, connecting to a computer, transferring files, updating software and creating backup copies. Phone owners can also use a wired connection to access the Internet.
To do this, connect your smartphone to your computer via a working USB cable. Turn on mobile Internet, open your smartphone’s settings and find the “Modem and access point” category. Here it remains to activate the appropriate item to provide the computer with the Internet.
The considered method has an additional advantage - in addition to mobile Internet via USB, you can connect to Wi-Fi networks, using your phone as a wireless signal receiver. This solution is relevant for owners of computers that are not equipped with a WLAN module.
You can use the Internet via USB indefinitely, since the phone’s battery will be constantly charged via the cable. However, it is important to consider possible battery wear - if the phone is used in this mode regularly, the battery capacity may decrease.
Region in the router settings
Another reason why Wi-Fi does not work on Lenovo may be an incorrectly installed communication channel among the router settings. There can be 14 of them in total and the device automatically selects the least noisy one. For example, if a mobile phone only supports 11 channels, then there is a possibility of being left without the Internet.
To make adjustments, you will need to go to the main settings of the router (all data will be on a sticker at the bottom of the device) and change the region from the Russian Federation to the USA. Thus, the number of active channels from 14 possible will be reduced to only 11.
Hidden Network
In order to hide your home network, for example, from neighbors, wireless routers have a function that allows you to hide the broadcast of its name. The following step-by-step instructions will show you how to connect Wi-Fi on a tablet running Android OS.
If the access point does not appear in the list of detected networks and rescanning does not give the desired result, you can go in two ways:
- enable SSID broadcast;
- establish a connection to a hidden network.
In the first case, we do the following:
- go to the router settings from the computer through which you configured it;
- go to the “Wireless Mode” section, where we go to its configuration subsection;
- check the box next to “Enable SSID broadcasting”;
- in the “System Tools” tab, reboot the device;
- we return to the previous section and connect to the access point, as described in it.
In the second case, if you do not want to make your home network visible to all devices within its coverage area, follow these steps:
- turn on Wi-Fi on the tablet (how to do this is described earlier) and go to its settings;
- click on the plus sign icon;
- In the pop-up window, enter the name of the network, its type of protection and the password to establish the connection.
- tap “Open”.