Adjusting screen brightness: all methods
The methods for making the screen brighter on a Lenovo laptop are similar to the methods for other models. The brightness can be adjusted using the keys or using the settings. Here is a list of all the methods you can use to increase screen brightness on a Lenovo laptop:
- Combination of buttons on the keyboard.
- Through the Mobility Center.
- Using power options.
- In some models, you can increase the screen brightness from the Bios menu.
- In case of problems - by installing or updating the driver.
- Also, in case of malfunctions, you can try updating certain variables in the system registry.
Using the keyboard
This is the easiest option on how to adjust the brightness on a Lenovo laptop, in particular increase it. All you need to do is find the keys that have the sun icon on them. One icon is a completely filled sun, the other sun icon is not filled in in the middle. Or there are arrows next to them.
Next, follow the very simple instructions:
- Press the FN function key and do not release it.
- Click the sun buttons several times.
- Depending on which key you press, different adjustments will work: the screen illumination can either be increased or decreased.
However, in some Lenovo models, a different rule applies by default: the FN button does not need to be pressed, the function keys work without it. This setting is set in the BIOS, and can be changed there. But before you do, you might want to check both options.
Windows Mobility Center
Another way to increase brightness on a Lenovo laptop is Windows Mobility Center. You can find it in the settings, or use a simpler method:
- click the second mouse button on the battery icon in the lower right corner (next to the clock);
- select "Windows Mobility Center";
- A small window with parameters will open;
- you can easily adjust the sound, screen and other parameters: both reduce the brightness on a Lenovo laptop and increase it;
- Set it to a level that is comfortable for you.
Power settings
You may not be able to turn up the brightness on your Lenovo laptop because the battery is low. Certain power supply and battery saving settings may affect the display of the picture on the display and prevent it from being enlarged. To change them, you can use the settings menu, power option:
- Right-click on the battery icon in the corner of the screen.
- Select "Power Options".
- Click the "Change power plan settings" link.
- Now you can adjust the operation of your computer when connected to the network and when running on battery power, for example, turn down the brightness on a Lenovo laptop automatically to save battery, or, conversely, increase it.
This setting may look different on different computers, so study in detail all the sub-items of this menu to configure everything as comfortable as possible for yourself.
But keep in mind that if the brightness becomes lower, full illumination will return only when the computer is connected to the network.
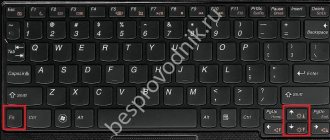
Using buttons
Regardless of who made the gadget, there are special buttons on the keyboard that will help you increase or decrease the brightness on your laptop screen. Traditionally, these buttons are combined with the F function keys; to find the one you need, just look at the symbols. The key that will help make the screen brighter is indicated by an asterisk with a plus, and in order to remove it, you need to find another button with an asterisk and a minus nearby. Pros and cons can be replaced with up/down arrows, but the buttons are always marked with an asterisk.
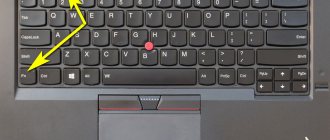
Sometimes these buttons are not located on functional ones, but are combined with arrows. In particular, on Lenovo laptops you need to press Fn+up to make the backlight larger and Fn+down to make it smaller. For other manufacturers (Acer, HP, Asus) these buttons are located on the top. In any case, you need to find the designation, and it is always the same - an “asterisk” with a plus or minus.
Sometimes it happens that you cannot change the screen brightness using the keys. The brightness buttons may not work because the operating system was reinstalled on the laptop and not all drivers were installed. In this case, the assignment of additional keys on the device's keyboard may change or may not work at all. If the backlight does not change, then you can adjust the screen brightness directly through the operating system.
Why the screen brightness cannot be adjusted and how to fix it
If the previous methods did not help you increase or decrease dullness, then there may be some problem or malfunction. This is not necessarily a serious problem - you can fix it with a few simple steps.
If the brightness on the Lenovo z500 laptop has disappeared, you can use the methods described above. But if you see a slider on the screen, but the illumination does not increase, then most likely this is a problem with the driver.
The first method is a temporary solution to the problem:
- Turn off the computer and then, when turned on, open the BIOS menu. Lenovo laptops access the BIOS in different ways, depending on the device. Perhaps this is a button on the side of the computer case, next to the power button. It could also be one of the F buttons on your keyboard.
- When the BIOS entry menu opens, you do not need to do anything there. Just use the FN key + the sun icon buttons you found earlier. Also try pressing these buttons without combining them with FN. If you manage to increase or decrease the brightness on a Lenovo laptop, then you can set it to an acceptable level for yourself.
- Press Enter to restart your computer.
The second way is a permanent solution to the problem:
- Go to the manufacturer's official website in the drivers section and find your model there.
- You need to download drivers for the keyboard or for the video card.
- Even if your model is not listed, you can use universal drivers. The main thing is to respect the bit depth, that is, 32-bit or 64-bit system. You can install the driver itself for an earlier system, for example, Windows 7 or 8.
- Download the drivers and install them.
- Restart your computer.
If this method did not help adjust the brightness on a Lenovo laptop, then you can try changing the variable in the Windows system registry. For this:
- Press Win + R on your keyboard.
- In the window that appears, enter regedit.
- Search the registry by pressing F3.
- Find the FeatureTestControl variable.
- Change its value to 4 Latin letters “ffff”.
- Restart your PC.
If all the described methods did not help to turn on the brightness on a Lenovo laptop, you need to contact a service center. Your problem may be related to a hardware failure - for example, the internal cable has come loose, or the video card is acting up. In this case, qualified specialists will be able to provide you with more assistance. It will be more difficult to solve the problem on your own.
Now you know how to adjust the screen on your laptop, and what to do if you can't change the light level. In case the brightness is not adjustable, just use the instructions above. I hope you find it useful.
Ways to increase brightness for the Windows 10 operating system
In addition to the mobility center , it is worth noting a very simple option for quick brightness control for Tens owners.
- Move the cursor to the notification panel area and left-click on the battery icon;
- A window will appear in which you can see the charge level and reduce or increase the brightness, the intensity of which can be changed by clicking the mouse by 0, 25, 50, 75 and 100%.
There is another way to adjust the brightness and make the display lighter or dimmer, suitable for both a laptop and a desktop PC.
- Using the touchpad or cursor, find and stop on an unoccupied space on the desktop, then right-click;
- A window will open in front of you in which you should click “Display Settings” (by the way, in versions of Windows from XP to 7, this section is called “Screen Resolution”);
- Look for the item “Adjust brightness level”;
- The last step is to hold down the slider with the left mouse button and you can change the backlight to a level that is comfortable for your eyes (by simply controlling the slider to the left or right);
- There are also standard tools for changing the size of text and application icons.
How to increase screen brightness on a laptop in Windows
There are several ways you can change your display settings. Let's look at each of them.
Using Function Keys
The fastest way to configure is to press a specially defined key combination (sometimes just one key for increasing and another for decreasing). Depending on the brand and model of the laptop, the functional buttons to which the brightness settings are assigned may differ. For example, on some Lenovo laptops the F11 and F12 buttons control the display lighting intensity. On most Acer models, the brightness increases by simultaneously pressing Fn + right arrow , and decreases using Fn + left arrow .
You can determine how to turn down the brightness on a laptop using the function buttons experimentally or by reading the instructions. Typically, such keys have special icons in the form of a sun with a plus or minus sign.
If this method does not help and nothing happens when you press the function keys, move on to the next solution to the problem.
Changing brightness through power settings
The instructions on how to reduce the brightness on a laptop with the Windows 7/8 operating system are as follows:
- launch “Control Panel”;
- go to the “Hardware and Sound” tab;
- go to the “Power Options” section;
- at the very bottom, find the line called “Screen brightness”;
- move the slider to the desired position, focusing on the display lighting.
In the Window 10 operating system, this procedure is slightly simplified and looks like this:
- in the tray, find the icon that launches the Notification Center and click on it with the left mouse button;
- at the bottom of the panel that opens, expand additional options if it is hidden;
- Find the area with the sun icon and click on it with the left mouse button.
Each click on this area increases the value by 25%; when it reaches 100%, the next click resets the level to the minimum. The cycle repeats itself in a circle. The minimum level that can be set in this way is 25%.
If you want to set the screen brightness value not a multiple of 25, then do this:
- right-click on the area with the sun and go to parameters;
- in the window that opens, find the “Brightness level” section and use the slider to set the desired value.
Adjustment using hot keys
Many laptop models have function keys on the keyboard designed to adjust brightness. Often, on such buttons you can see a light bulb or sun icon.
To adjust the color rendition, press one of these buttons several times (similar to changing the speaker volume).
Some laptops have a separate hardware switch located between Ctrl and Win.
Often, manufacturers HP, Lenovo, Acer, Samsung, Asus, Dell, Sony Vaio build in options to reduce and increase brightness by simultaneously pressing the Fn key and F1, F2, F3, F5, F6, F8, F12, etc. Also, by default, these can be combinations of the FN button and one of the arrow keys.
Lenovo laptop screen brightness when running on battery
As the “lucky” owner of a Lenovo laptop with an AMD processor (110) and, accordingly, with an AMD Radeon video card on board, I encountered the problem of low brightness when running on battery power , and the settings are set to maximum brightness. In older versions of the Radeon driver (Catalyst Control Center), there was a corresponding item in the settings - disable power saving mode, or set the brightness at the video card driver level. But here’s the problem: in the new versions of the driver, the Radeon developers made everything “friendly and intuitive,” so this item is simply not there. The only thing that was advised on various forums and “question-and-answer” services was to disable saving in setting up the Intel driver, although in the questions everyone clearly states that Radeon graphics (the standard situation for services - if the question is not elementary - call the person asking, throw a bunch of links to anything, and like it’s not we who don’t know – but you’re a fool). Well, at random, a solution, although clumsy, was found. And once again, this method allows you to fix low brightness on Lenovo laptops with a Radeon video card when running on battery power with new driver versions, when all the settings are completely useless.
To fix low brightness in a laptop where there is no corresponding setting in the driver shell and setting using standard Windows tools does not help (maximum brightness was set in all modes and battery saving was disabled wherever possible), you need to go to the Windows Device Manager, find the “Batteries” section and Here you can disable “ACPI-Compatible Battery Management (Microsoft)”.
The clumsiness of this method lies in the fact that in this case Windows stops controlling the brightness completely and the power management icon in the system tray disappears. For me personally, this is not critical, and the changes are not critical either; you can always turn this device back on if you really need it.
Logically, the culprit of the situation is not the video card, but rather the operating system, but the article was written for AMD Radeon video cards (and Lenovo laptops, on which this problem most often occurs), since on others there is the possibility of settings at the driver level that override system settings, or settings Energy saving settings in Windows work correctly. If you know another way to fix the low brightness of a laptop screen when running on battery power in this connection, we will be glad if you voice them in the comments, perhaps this information will help someone else.
Changing the brightness using the buttons on the keyboard
The keyboard shortcuts for adjusting the backlight intensity vary across different device models. Typically, a combination of the Fn button and the up/down arrow is used. One of the function keys (F1-F12) can also be used instead of an arrow. Press two buttons at the same time to increase or decrease brightness by 10%. Some models have separate buttons for settings. In this case, pressing “Fn” will not be required.
Not long ago I encountered one very unpleasant problem - on all my laptops the ability to adjust the screen brightness suddenly disappeared. Be it your favorite Fn keys, or the standard brightness slider in the computer settings. The very concept of “brightness” in the screen settings disappeared and the main working machine was stuck in dark mode.
The way out of this situation, as it turned out, is quite simple - the problem lies in the drivers. After scouring the forums, I managed to find a few ideas that led to a simple solution. For the brightness control to work properly, you need to reinstall the driver... no, not the video card, but the monitor!
How to do this in the easiest way?
That's it, kickbacks are saving our lives again!
When using the DRP program, be sure to work in manual and expert mode! Otherwise, in addition to updating drivers, you will also get a ton of useless programs! To do this, when starting the program, check the “Settings” box, select “Expert Mode”, check the monitor driver box and click “Install” at the bottom of the screen. More details in the screenshot below.
PS: trying to find the cause of such glitches on one of the computers, I noticed that the monitor driver had a digital signature from TeamViewer. It is quite possible that the problem lies precisely in this program - it was installed on each of the computers being repaired. It might be worth contacting their tech. support.
Quite often the question is asked on forums: Why doesn’t brightness adjustment work on a laptop!?
The problem is quite common, trivial at first glance, but in fact very unpleasant. Indeed, in this case, you will have to look either at an overly bright screen (which will instantly hurt your eyes and give you a headache), or at an almost dark one, where you can’t see anything. Today we’ll talk about the most common causes of the problem and what can be done to fix the problem of screen brightness adjustment not working on a laptop.
Increase brightness on a laptop using Power Options
- If Windows 7 is installed: “Start” - “Control Panel” - “Power Options”, otherwise just click “Start” and type “Power Options” in the search bar that appears, this will give you the opportunity to get to the required link.
If the scroll bar on the “Screen Brightness” icon is not active and does not respond to movement manipulations, you should:
- Try another way. In some laptop models, manufacturers have not provided the ability to change the brightness on the laptop with this option, or this option is simply not available;
- Update drivers. After downloading the drivers for the screen, use the existing ones that were originally included with the device, and the drivers must be licensed and do not negatively affect the quality of work. About updating drivers for a PC and laptop, read our article “How to Correctly Install Drivers on a Computer or Laptop”
In this menu, it is possible to make adjustments to the time allocated for dimming the screen - “Setting the power plan”
, here you can select dimming and turning off the display.
After final changes to the parameters, you must save the changes by using the corresponding button to save the settings.
Changing screen lighting settings using the video card driver
Another interesting way to change the display lighting is to adjust it using the video card driver . For our example, we will consider a driver from Nvidia . To open the video card driver settings, you need to right-click on an empty space on the Desktop. A context menu should appear.
In this menu, select the “ NVIDIA Control Panel ” item (it may be different for another video card), after which the video card driver settings panel will open.
Now in this panel you need to go to the “ Video\Adjust color settings for video ” menu.
In the color adjustment menu, you need to go to the column “ 2. How to make color settings ” and select the “ With NVIDIA settings ” switch. By selecting these options, you will be able to adjust four properties, including display brightness . To increase or decrease the brightness of the display, drag the slider towards plus or minus and you will see how the screen backlight changes.
Such programs that regulate screen lighting using the video adapter driver are also available from video card manufacturers Intel and AMD .
Also on the Internet you can find many programs that adjust the display backlight. All such programs work by accessing the video adapter driver. That is, in essence, they do what you can do in the control panel of the video card (in our case Nvidia). The most interesting of all such programs is F.lux . Its main feature is automatic adjustment of the display backlight , which depends on the time of day.
What to do if the brightness cannot be adjusted
1) Update the drivers for the video adapter // roll back the old ones
In most cases, it is not possible to change the brightness due to the fact that the system does not have an up-to-date driver for the video card. This can happen if, for example, after installing or updating the system, you did not download them from the official website (as a result, you are left with the driver that Windows itself installed - it, of course, works, but some options are not available!).
Here you can do the following:
- go to the official website of your device, download the driver for the video adapter, and update it. For information on how to do this entire procedure, see this article: https://ocomp.info/kak-obnovit-drayver-na-videokartu.html
- try to roll back the driver to the old one (which could remain in the system, for example, after updating it). I recommend trying this option first, and if there are no other versions in the system, then try the first one, see the link just above.
Ways to adjust brightness
To begin with, in my opinion, it is worth trying different ways to adjust the brightness. Even if suddenly one of them does not work, this is not a reason not to try the other. In the end, adjusting the brightness is a one-time procedure that does not need to be done very often, and if any of the options works, the problem can be considered solved.
The easiest and fastest option to see what’s going on with the battery and brightness is to click on the “battery” icon in the tray. Next, you will appear in a menu where you can add/subtract current values (see screenshot below).
Battery parameters, power modes, brightness
Most laptops have special function keys (they should have a characteristic icon - ) - if you press them (for example, Fn + F5 as in the example below) - the brightness should change, and a slider should appear on the screen (which can be further adjusted with the mouse. ).
If nothing happens when you press the function keys, I recommend using the recommendations from this article: https://ocomp.info/funktsionalnyie-klavishi-i-fn.html
Example of buttons for changing monitor brightness (FN+F5, FN+F6)
You can change the brightness, saturation, shades, colors, etc. picture parameters in the driver settings for the video card. To enter them, in most cases, just right-click on an empty space on the desktop and select AMD (or IntelHD|nVidia) settings in the menu that appears.
For example, if you have an IntelHD video card (like me), then simply select “Intel Graphics Settings” in the context menu that appears.
Intel Graphics Settings
Then you need to open the “Display/Color Settings” section. After which you can adjust the image quality on the screen in detail (see screenshot below).
Brightness, Contrast, Hue, Saturation - Intel Control Panel
Windows also has power settings that let you set the brightness and run time of your device depending on whether it's plugged in or plugged into a battery.
To open these settings, you must:
- Press the key combination: Win+R
- enter the command: powercfg.cpl
- press Enter
powercfg.cpl - open power settings
Next, in the current power supply scheme, you can move the brightness slider to the desired direction (see screenshot below).
Adjust brightness for battery and network operation
In Windows 10, you can customize your display through the Control Panel. To do this, open the menu: START/Settings/System/Display.
Next, you will have access to the scale and layout, screen resolution, brightness and other parameters (see screenshot below).
Display (START - Settings - System - Display) // Windows 10