Laptops are extremely popular in Russia and other countries. This is due to the fact that laptops are reliable, unpretentious, productive and have an adequate price.
The products of this Chinese manufacturer literally filled all the shelves of computer stores. But along with all the advantages, they have one small disadvantage: in some models it is completely unclear how to enter the BIOS. And this is necessary when installing the system or making any settings. While laptops from other companies respond to keyboard buttons, Lenovo refuses to do so. Especially the G series models. This raises the question: “How to enter the Lenovo G50 BIOS?” Let's try to answer it.
How to configure the BIOS on a Lenovo g50-30 laptop to install WINDOWS 7 from a flash drive?
When installing any version of Windows (xp, 7 or from any media from a flash drive or DVD on a Lenovo ideapad G50-30 or Lenovo ideapad G40-30 laptop, error 0x000000A5 occurs:
The same error will occur when you try to load various test utilities - MHDD, MEMTest, etc. Don’t panic, most likely everything is fine with your laptop - the problem lies in the BIOS version and its settings. If you have a model with Windows 8 pre-installed, you can update the BIOS directly from it and then install Windows 7. But most of the configurations come with FreeDOS pre-installed, in this case you will not be able to update the BIOS and will have to configure the BIOS.
To enter the BIOS on Lenovo G50-30 and G40-30, use the FN+F2 combination when turning on the laptop or the Novo Button. You should see a window showing your laptop model, BIOS version and other information:
You can navigate through the menu using the arrow keys, go to the Boot tab and set the settings as indicated in this photo:
Boot mode = Legacy support Boot Priority = Legacy First, leave the rest as is
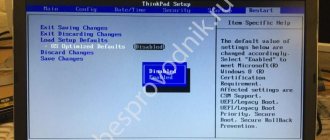
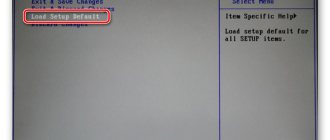
Go to the Exit tab and select in order in the first item, set the desired OS Windows 7, Windows 8 or Other if you want to install another operating system, then select the second item, press Enter and agree to load standard settings. We remember the 3rd point and do not touch it for now.
Go to the Configuration tab and in Usb Mode - select USB 2.0, this is necessary while installing Windows from a flash drive, after installation the setting must be returned back to USB 3.0 and after that we check that all the settings that we changed have the required values, return to the Exit tab and We carry out the 3rd point.
After this, if all the settings are correct, Windows installation will proceed without problems. A small nuance, if you have Windows 8 installed, and you want to install Windows 7, you will probably need to convert the disk partition from GPT to MBR, to do this you need to do the following:
- Boot from the installation USB flash drive or disk with Windows 7
- Press Shift + F10, if the command line does not start, try the combination Shift+Fn+F10
- Enter the commands, one per line and press Enter after each
- diskpart (disk partition utility will start)
- list disk (the command will show a list of disks)
- select disk 0 (select the disk with which we will work; if there are several disks, carefully select the one you need and enter the required number instead of 0)
- clean (delete all partitions)
- convert mbr (we convert our disk to the MBR format, which Windows 7 and older systems understand)
- exit
After exiting the utility, you can continue installing Windows 7.
Methods for entering BIOS
1) Standard hotkeys for login
F2 or F1 button should work
(you need to press immediately after turning on the laptop. Model range: ThinkPad, IdeaPad, 3000 Series, ThinkCentre, ThinkStation).
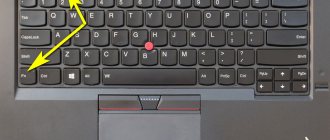
In some models - may require pressing the Fn+F2
(for example, in G50)
.
Addition
. The F12 key (Fn+F12 - enters the Boot Menu) is very rare - to enter the BIOS (Lenovo b590 model). I recommend trying the same.
If you can’t log in this way, read the following recommendations.
2) Special recovery button “with arrow”
Some Lenovo laptop models are equipped with special buttons on the device body for entering the BIOS. We are talking, for example, about these: g505, v580c, b50, b560, g50, g500, g505s, g570, g570e, g580, g700, z500, z580, Z50, B70 and others.
When turned on, they may not react at all to your pressing the F2 buttons. To enter the BIOS, in this case, you need to use the special Recovery button (with an arrow)
. You need to press it instead of the power button (i.e. when the laptop is turned off).
The Recovery button is located
on the device body, next to the power button (on some models this button is located on the side).
After you click on this “arrow” button, the laptop will turn on and you will see a small service menu (usually consisting of several items): Normal startup (normal boot), Bios Setup (BIOS settings), Boot Menu (boot menu, for example, to boot from a flash drive without changing the boot queue), etc.
After your selection Bios Setup
- you will go to the most common BIOS settings (as in other laptops) and can set the necessary parameters.
If you have a blue ThinkVantage button on the device case, then you need to press it immediately after turning on the laptop - while the welcome message is still on and the device manufacturer's brand is shown (see photo below).
4) Hole instead of recovery and ThinkVantage button...
A number of Lenovo laptop models do not have any buttons at all, but have a small hole on the side of the device (usually where the power is connected).
For example, the Lenovo 100 laptop does not have a recovery button (which has an arrow) at all. There is a small hole (next to the hole is the same arrow). The button itself is located in this hole; to press it, you need to use, for example, a paper clip or a knitting needle.
Manufacturers are apparently trying to eliminate accidental button presses - after all, the vast majority of users very rarely have to enter the BIOS.
About some glitches...
1) Some laptop models do not allow you to enter the BIOS if it is running on battery power. I can’t say that this is 100% a glitch - but the setting is very controversial. To check for sure, connect the device to the network and try to enter the BIOS using the methods described above.
2) The Lenovo v580c model sometimes has a very unpleasant glitch: if you cleaned the disk and installed a new Windows, the BIOS login buttons will stop working.
To enter the BIOS again (instructions for advanced users!) - turn off the laptop, then unplug it, remove the battery. Next, remove the cover and take out the small battery from the mat. fees. After 5-10 minutes, assemble the device.
When turned on, the BIOS will be loaded automatically to set basic parameters. You need to open the “Startup” tab: in the “UEFI / Legacy boot” setting there are three parameters (Both, UEFI Only, Legacy Only)
— you need to select “Both”. In the “UEFI / Legacy Boot Priority” item, you need to set “Legacy”. Next, save the settings and reboot the laptop. Everything should work as expected.
Additions on the topic are welcome...
That's all, good luck!
Good day.
Lenovo is one of the most popular laptop manufacturers. By the way, I must tell you (from personal experience), laptops are quite good and reliable. And there is one feature of some models of these laptops - an unusual entrance to the BIOS (and you very often need to enter it, for example, to reinstall Windows).
In this relatively short article I would like to consider these features of the entrance...
Entering BIOS on a Lenovo laptop (step-by-step instructions)
1) Usually, to enter the BIOS on Lenovo laptops (on most models), it is enough to press the F2 button (or Fn+F2) when turning it on.
However, some models may not react to these presses at all (for example, Lenovo Z50, Lenovo G50, and the entire model range: g505, v580c, b50, b560, b590, g50, g500, g505s, g570, g570e, g580, g700 , z500, z580 may not respond to these keys)…
Keys to enter BIOS for different PC and laptop manufacturers
:
2) The above models have a special button on the side panel (usually next to the power cable) (for example, the Lenovo G50 model, see Fig. 2).
To enter the BIOS you need to: turn off the laptop, and then press this button (usually there is an arrow on it, although I admit that on some models there may not be an arrow...).
By the way, an important point. Not all Lenovo laptop models have this service button on the side. For example, on a Lenovo G480 laptop, this button is next to the laptop power button (see Fig. 2.1).
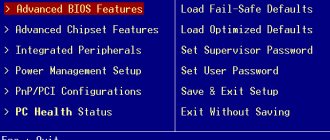
3) If everything was done correctly, the laptop should turn on and a service menu with four items should appear on the screen (see Fig. 3):
Bios Setup (BIOS settings);
Boot Menu (boot menu);
System Recovery (emergency system recovery).
To enter the BIOS, select Bios Setup (BIOS settings and settings).
By the way, maybe someone will need it: in Fig. 4 shows the settings of the BOOT partition of a Lenovo G480 laptop for installing Windows 7 on it:
- Boot Mode:
- Boot Priority:
- USB Boot:
- Boot Device Priority: PLDS DVD RW (this is a drive with a Windows 7 boot disk installed in it, note that it is first on this list), Internal HDD…
Rice. 4. Before installing Windws 7 - setting up BIOS on Lenovo G480
After changing all the settings, do not forget to save them. To do this, in the EXIT section, select “Save and exit”. After rebooting the laptop, Windows 7 installation should begin...
5) There are certain laptop models, such as Lenovo b590 and v580c, where you may need the F12 button to enter the BIOS. By holding down this key immediately after turning on the laptop, you can get to Quick Boot (quick menu) - where you can easily change the boot order of various devices (HDD, CD-Rom, USB).
6) And the F1 key is used relatively rarely. You may need it if you are using a Lenovo b590 laptop. The key must be pressed and held after turning on the device. The BIOS menu itself differs little from the standard one.
And the last thing...
The manufacturer recommends that you sufficiently charge the laptop battery before entering the BIOS. If during the process of setting up and setting parameters in the BIOS, the device turns off abnormally (due to lack of power), there may be problems in the further operation of the laptop.
To be honest, I’m not ready to comment on the last recommendation: I’ve never experienced problems turning off my PC when I was in the BIOS settings...
Good job