03/23/2015 windows | laptops
The Boot Menu can be called up when turned on on most laptops and computers; this menu is a BIOS or UEFI option and allows you to quickly select which drive to boot the computer from this time. In this instruction I will show you how to enter the Boot Menu on popular laptop models and PC motherboards.
The described feature can be useful if you need to boot from a Live CD or bootable flash drive to install Windows and more - it is not necessary to change the boot order in the BIOS; as a rule, selecting the desired boot device in the Boot Menu once is enough. On some laptops, the same menu also gives access to the recovery partition of the laptop.
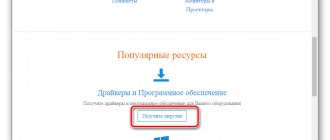
First, I will write general information on entering the Boot Menu, and nuances for laptops with pre-installed Windows 10 and 8.1. And then - specifically for each brand: for laptops Asus, Lenovo, Samsung and others, motherboards Gigabyte, MSI, Intel, etc. Below there is also a video that shows and explains the entrance to such a menu.
Changing the laptop boot order
You need to go into the BIOS again, remembering to first insert the USB flash drive into the laptop. Go to the Boot section. If you did everything correctly, you will see your flash drive in this window.
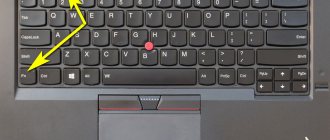
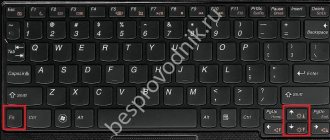
Here you need to set the priority of the flash drive, moving it to the first place in the list. Just press the Fn and F6 keys at the same time. As you can see, the device name has changed its position.
Now click on Exit again and save all changes. The laptop will reboot and start booting from the flash drive. Don't forget to return the protection and make the remaining settings in reverse order after completing the work.
Common problems when installing Windows
The most common among users are two typical mistakes, the admission of which in the process of preparing to install Windows can make the successful implementation of the upcoming event impossible.
Firstly, the wrong choice of format at the stage of formatting the flash drive.
Secondly, using the wrong boot image. Windows installation discs fall into two categories:
- Bootable – designed for a “clean” installation of the operating system;
- non-bootable - they are used primarily to solve various problems and work only from the Windows interface.
Thus, there is nothing super complicated about installing Windows on Lenovo yourself: you just need to consistently follow the relevant recommendations. Follow the instructions you have studied, be careful at every stage, and everything will definitely work out.
Another AWARD (PHOENIX) BIOS option
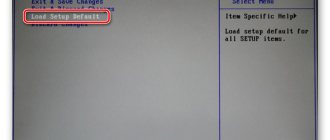
Here we are interested in the Advanced BIOS Features section.
We go to this section and look for the First Boot Device item. Then at this point we set the computer to boot from CDROM.
After you have configured the BIOS, you need to insert a bootable Windows disk into the drive and save the BIOS settings. To do this, press the F10 key, select Yes in the window that appears and press Enter.
Windows installation
The BIOS is configured and the boot device is prepared. Let's proceed directly to installing Windows. To do this, insert a disk or flash drive into the laptop and reboot the device. The laptop will independently “understand” how it needs to boot. As a rule, no additional user action is required. Some models “ask” to press any key to boot from a removable drive - we do this.
We wait for Windows to unpack the files, then select “Full installation”.
Further events can develop according to 2 scenarios:
- if the hard drive is initially partitioned and the file system is formatted in NTFS, proceed with further installation;
- if the system is CDA, first delete the hard drive partitions. To do this, click the “Disk Setup” button and delete partitions one by one.
Here we can divide the free space into several sections. To do this, click the “Create” button, indicate the desired size (preferably 30–60 GB for the system) and confirm your actions. We repeat until we have allocated all the available space on the hard drive.
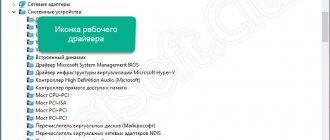
Setting up Windows 8-10 if key combinations don't work
On Windows 8-10, the Boot menu may not turn on when pressing keys or using combinations. The thing is that the process of logging into Boot and BIOS is slightly different. To do this you should:
- Turn on the laptop and let it load the operating system;
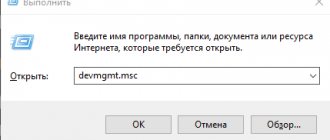
- Next, you need to press the key combination Win + S ;
- Then enter in search "Control Panel" and click on the option that appears;
- Find tab "Power supply";
- Having opened this section, click on "What the power buttons do" on the left side of the screen;
- In the window that opens, you need to uncheck the box next to the inscription Enable Fast Startup (recommended);
- It may be that this item will be blocked by the system, then you need to click on “ Change parameters that are currently unavailable and try again” ;
- After making changes, click on the “Save Changes” ;
- Restart your computer and try again to go to the Boot Menu .
Entering the Boot Menu when reinstalling the operating system is considered a mandatory step, as it allows you to configure media priorities. It’s better to figure out in advance how to go to this menu on Lenovo and avoid errors when loading the OS.
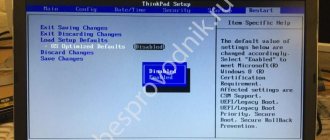
AMI BIOS (BIOS SETUP UTILITY)
After entering the BIOS settings of this type, you will see the following window:
At the top, go to the Boot section and in the Boot Device Priority subsection in the 1st Boot Device item, select the option with CDROM.
All. Our BIOS is configured. Now you need to insert the Windows disk into the drive and exit the BIOS after saving the settings you made. To do this, press the F10 key, select Yes in the dialog box that appears and press Enter.
How to enter the boot menu on a Lenovo laptop
If on laptops that have a Hewlett Packard Bell motherboard, a combination of two keys is used to open the boot menu, then in the Lenovo laptop they went even further.
The F12 key will allow you to open a section on almost all Lenovo devices (not only laptops, but also all-in-one PCs). There is also an alternative option. On some laptops, next to the Power button, there is another interesting arrow button. This is what you should try to press.
On some devices, it allows you to immediately launch a section with several boot menus from the media. This button may also be located at the end of your PC.
There are also laptop models where you need to insert a pin into a special hole. How to do this - watch the video instructions below
What is it and why is it needed
Before you launch the boot menu on a Lenovo laptop, you must understand its purpose. Entering this section, for example, when restarting the OS, is mandatory. This is where download priorities are set.
In simple words, the boot menu is one of the BIOS sections that allows you to set the path from where the operating system will be launched for the first time. It looks like a small window where you can select a USB drive as the primary device, CD / DVD drive or hard drive. The advantage is that in this case you do not need to enter the BIOS. So if you removed the hard drive, then simply select a different source.
A special feature of the menu is that making changes does not affect other BIOS parameters. For example, if you set it to boot from a flash drive through the boot menu, the next time you start it, standard settings will be used, for example, starting from a hard drive. This is very convenient and allows you to avoid constantly changing settings.
It turns out that the boot menu in a Lenovo laptop or other devices can be used to quickly select boot priority without the need to make changes to the main BIOS. If you cannot enter it using the standard method, you can always choose the option of going to the BIOS and selecting the boot order through the Boot menu of the same name.
Knowing what the boot menu on a Lenovo laptop is for, how to call it, and what to do to close it, you can use its capabilities and make the necessary settings. In the comments, tell us if you had any difficulties doing this work, and what other methods of calling the boot menu on a Lenovo laptop you know.
Lenovo S920 smartphone, characteristics of the fast IdeaPhone
Another interesting solution from Lenovo is the Lenovo IdeaPhone S920 smartphone.
- screen: IPS 5.3″, 16 million colors, 1280×720, touch, capacitive, multi-touch;
- Processor: 4-core MTK 6589, 1.2 GHz, PowerVR Series5XT video;
- memory: 1 GB RAM, 4 GB built-in + 32 GB microSDHC, microSD;
- phone type: monoblock, 159 g, 154×77.7×7.9 mm;
- phone charging connector: micro-USB;
- communication type: GSM 900/1800/1900, 3G;
- navigation: GPS, A-GPS;
- interfaces: Wi-Fi, Bluetooth, USB;
- platform: Andro >IdeaPhone S920 boasts two SIM cards, but it is equipped with one radio module, which, for example, does not allow it to download a file on the Internet during a telephone conversation.
The S920's photo quality is very good, but the ideaDesktop doesn't shine with its design. The battery allows the smartphone to work intensively for a day on one charge, which is a very good indicator. The speaker of the phone is high quality and loud.
The Lenovo IdeaPhone S920 isn't an outright bestseller, but it's a good choice for an all-in-one device, highlighted by its good camera, long battery life, and dual-SIM capabilities.
Booting Lenovo from a disk or flash drive
On a Lenovo laptop, booting from disk is performed as follows:
- Inserts into the drive with Windows. Then the laptop reboots. If the device “asks” you to press any button, you should do so.
- When the OS unpacks the files, you must specify “Full installation”.
In this case, there are two options for the development of events. If the disk is partitioned and the file system is formatted in NTFS, you must continue with the installation. In the case when CDA is used, you will have to first delete the partitions in “Disk Settings”.
If you click on “Create”, you will be able to divide the hard disk space that is free of files into several partitions. You will need to indicate the required size (recommended - from 30 to 60 GB), and then confirm your own manipulations. In this way, partitions are created one by one, rationally distributing free space.
Further actions are simple and clear. You will need to select the appropriate section and click on installation. Just follow the instructions that will be displayed one by one on the screen.
Thus, for a Lenovo laptop, booting from a flash drive or disk is simple and straightforward.
Video on the topic
Many users have firmware installed on their PC that is similar to the traditional BIOS. This firmware is usually used for software maintenance of UEFI systems. When trying to install any version of Windows OS on a computer with such firmware, the user may encounter problems installing the system from an external flash drive. In our article we will try to help such users and will look at how you can boot from a USB drive to InsydeH20 Setup Utility rev 5.0. And also what we need for this.