Almost all Lenovo smartphones are powered by MediaTek processors, which means that gadgets with such a chipset always have the Lenovo engineering menu. Today we will tell you how to go there, what it is needed for and how any owner of a Lenovo gadget can use it to their benefit.
You probably already understood from the name that this menu was created in order to configure, test and debug various phone modules. Since it is mainly used for the latter purpose, the average user will not be interested in digging into at least half of these functions.
In addition, we urge you to be careful: if you do not know what exactly you are doing, then it is better not to mess with this setting, as there is a risk of disabling important parameters of the device or even turning it into a “brick”.
Android system menu. Lenovo engineering menu: entry and list of secret codes
How to enter the Lenovo MTK engineering menu
If you are still a complete beginner, then to understand some terms, I recommend that you familiarize yourself with the topics:
Why do we need an engineering menu?
The engineering menu may be needed to test the operation of the touchscreen, display or GPS, adjust microphone parameters, volume, and so on.
- Telephone
- Straight arms and a bright head
1. Set Root rights for your smartphone. This can be done in different ways; the easiest way is to open the FAQ section of your smartphone. for example - theme for P780 -
What are superuser rights?
Root (from the English root - root; read "root"), or superuser - a special account in UNIX-like systems with an identifier (UID, User IDentifier) 0, the owner of which has the right to perform all operations without exception.
Advantages of Root: Having access to the main administrator profile (superuser), you get a number of features that are not available in normal operation.
First of all, obtaining Root makes it possible to remove standard applications imposed by device manufacturers, change themes and shortcuts, and also launch specialized applications that significantly expand the capabilities of the smartphone (usually such applications require Root rights). In addition, it becomes possible to change system files (Recovery image, Bootloader or images displayed during boot), run Linux executable files, install applications to a memory card or transfer program caches to it. In some cases, after modifications to the OS, available only after obtaining Root rights, it is even possible to achieve a small, but still increase in battery life performance.
Disadvantages of Root: As with everything else, gaining Root access has its disadvantages. First of all, the device loses its warranty and in the event of “something like that”, provided that you cannot roll back your “device” to the official firmware, you will have to repair it solely at your own expense.
The rooting procedure is simple - by doing everything in accordance with the descriptions, you can achieve what you want, but if you do not have any experience, the potential risk remains - under unfavorable circumstances, the device may turn into an unusable “brick”.
Another important drawback is that opening Root privileges implies interference with system files and entails the loss of the ability to update over the air (install OTA updates). More precisely, the ability to update may not be lost, but the consequences of the update will be unpredictable. The most harmless of them is the loss of root privileges, but more fatal options are also possible - up to and including obtaining a brick.
Types of Root rights: There are several types of Root rights:
Full Root - permanent rights that remove established restrictions. It is not recommended to update the operating system. Shell Root is similar to Full Root, but without access to the system folder. Temporary Root – temporary Root access. After rebooting the device it disappears.
How to get Root rights? A lot of universal ways and methods of obtaining Root rights on devices running Android are described. Most of them involve the use of special programs and a computer. Among such programs, Universal AndRoot, Unlock Root, z4root, Revolutionary and others are well known, promising to get what you want in “two clicks”. Unfortunately, not all of them can 100% help you achieve what you want, specifically for your mobile device. Moreover, such software can be detected as a virus because it makes changes to the kernel of the Android operating system. In this case, the antivirus is partly right - all these programs are virus exploits that penetrate the system kernel and when downloading or installing them, it is recommended to disable the security software.
Another way to obtain Root rights is to install modified firmware on your smartphone. In this case, all the work has already been done for you by specialists, and all you have to do is choose the firmware that is suitable specifically for your device. By the way, there you will also find various decorations and additions for your smartphone model.
It is worth noting that some phones have protection supplied by the manufacturer - NAND lock. Most often, HTC was guilty of this, so the owners of such devices were out of luck - NAND lock prohibits making any changes to the /system partition (it will not allow anything to be written/deleted to/from the /system partition, even if it is remounted for writing), which is why It is impossible to install the Superuser program in the /system folder.
It is still possible to Root phones with NAND lock, but it will not be fully functional (you can only get Shell root or Temporary Root). You can find out whether your device has NAND lock in the discussion thread for your model in the Android - Devices section.
How to check that root rights have been obtained? It is possible (but not necessary) for an application called Superuser or SuperSU to appear in the list of programs. When running programs that require root privileges, a corresponding request will pop up. Programs that previously did not work, citing lack of rights, are now fully functional. In the terminal emulator, when entering the su command a grid prompt appears: # This verification method depends on the method for obtaining root rights (for example, when using Universal Androot, this verification method is unacceptable). In a terminal emulator, type the command “/system/bin/id”. If you get “uid=0(root) gid=0(root)” in response, then you have achieved what you wanted.
- Now you know why you need to obtain Root rights in the Android operating system. Some users believe that Root is necessary, while others live quite well without it. It’s up to you to decide whether to perform this procedure or not, just don’t forget about the warranty and everything will be fine.
Today, the Android operating system is maximally adapted to the needs of the modern user. A wide range of settings and functions will satisfy almost any request. And yet, sometimes it seems that this is not enough, and you want to expand the functionality of the gadget. This is precisely the opportunity that the engineering menu provides. In this article you will learn how to configure the engineering menu and what it is.
Open from Windows
BIOS can be opened through Windows. It can be useful when the keyboard does not work. Works on Windows 8, 8.1, 10.
Open Start - Settings.
Select Update & Security.
On the Recovery tab, under special boot options, there is a Restart Now button. Click it, the system will reboot and show options for starting Windows.
Select Troubleshoot (Diagnostics) - Advanced Options - UEFI Firmware Options.
If you can't log into Windows but the login screen appears, you can also open the BIOS. Press the power button, hold Shift and click Restart. Special system boot options will open; further steps are described above.
Why do you need a hidden engineering menu in Android?
The engineering menu is a special special application that is hidden from the eyes of the average user and is used by developers to test and set the necessary parameters. It allows specialists to check the operation of various sensors and adjust the operation of system elements.
If you decide to enter the “holy of holies” of developers, then when working with the technical menu of the Android OS, be extremely careful: an error when changing functions can lead to various malfunctions in the operation of the device.
conclusions
Above we have listed the main sections of the engineering menu available on the tested devices. Now let’s summarize what features the user receives during installation:
- Formatting, restoring to factory settings.
- Testing the operation of individual elements of a smartphone or tablet, such as sensors, touch screen sensitivity and calibration accuracy.
- Detailed information about the device and its parts. For example, you can track battery consumption since the last charge and view statistics on the programs used.
- Energy optimization. Alternatively, unnecessary frequency ranges are turned off. In Russia, the standard indicators for working in 2G and 3G networks are 900 and 1800 MHz, while in the USA they are 850 and 1900 MHz.
Purchasing a new smartphone or tablet is a real holiday for many. Each owner expects that the gadget will delight you for many years with its reliable operation and the absence of any problems. Moreover, regardless of who the assembler is and what control system is installed.
However, as often happens, modern mobile devices can hardly be called ideal, since some time after the start of use, issues are identified that the owner wants to correct, in one way or another improving the software part of his mobile assistant to the ideal. Of course, in my understanding. One of the available tools is the Android engineering menu.
Ways to increase volume on Android
Using the settings menu
I want to start with the elementary, despite possible objections. (there's just a little confusion about this, so it's clearly worth noting).
Volume adjustment in Android (when you press the side buttons on the phone body) can be done both for a specific application separately and globally (overall volume). For example, if you are watching a video and turn up the volume, the volume in this particular application will increase, but your call volume will not increase!
A few important points
However, not all mobile devices can log into the Android engineering menu. In order to take advantage of its capabilities, you need to make sure that the gadget meets certain requirements.
Firstly, the central processor must be manufactured by MediaTek (or MTK). On inexpensive Spreadtrum models, for example, SC-6825, popular Snapdragon from Qualcomm, various Tegra NVidia and Intel, trying to launch the Android engineering menu is useless. It is not there. It will not be possible to achieve functionality, even if you carefully install the appropriate application.
Secondly, various modified operating systems, for example, CyanogenMod, popular in some circles, do not allow running the configuration program, since they were originally developed for devices with a Qualcomm processor that do not support the Android engineering menu. In addition, it is highly desirable that the operating system be original or created on a basic basis.
Thirdly, the application itself (file) must be present among the programs, even if hidden from the standard Explorer. Thus, some mobile device manufacturers, after completing the software settings, simply delete the “Android” engineering menu. Descriptions and recommendations for use in this case are useless, which is obvious.
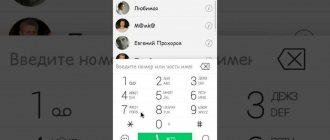
Increasing phone volume through the engineering menu
Now let’s demonstrate how to work with hardware settings using the example of one of the most popular operations and learn how to increase the volume on Android through the engineering menu. So, go to the menu using Mobileuncle MTK Tools or by entering the “magic” code, then find and open the Audio subsection. If you entered the menu through the Mobileuncle Tools program, this subsection will be located in the senior section Engineer Mode, in other cases it is usually located on the Hardware Testing tab.
In the Audio subsection you will have the following options:
- Normal Mode – normal mode that works when a headset is not connected to the device.
- Headset Mode – headset mode that turns on when headphones or speakers are connected to the smartphone.
- LoudSpeaker Mode – loudspeaker mode. Activated when the speakerphone is turned on, provided that a headset is not connected to the device.
- Headset_LoudSpeaker Mode – loudspeaker mode with a connected headset. The same as the previous one, but with headphones or speakers connected.
- Speech Enhancement - this mode is activated when talking on the phone without using the speakerphone.
There may be other settings in the section, for example, Debug Info and Speech Logger, but it is better not to touch them. Select the mode for which you want to change the volume level (let it be Normal Mode), select Type in the list that opens and indicate for which function we will change the volume. The following functions may be available:
- Ring – adjust the volume for incoming calls;
- Media – adjust the speaker volume when playing multimedia;
- Sip – sound settings for Internet calls;
- Sph – sound settings of the conversational speaker;
- Sph2 – sound settings of the second speaker (the option may not be available);
- Mic – change the microphone sensitivity;
- FMR – FM radio volume settings;
- Sid – it is better not to touch this parameter, otherwise problems with the interlocutor’s voice may occur.
Having selected a function, scroll through the current list, set the desired Value (from 0 to 255) and click to apply the new Set settings.
To change the volume level, you can also use preset templates - the Level option. Most phones have seven levels, from 0 to 6. It is advisable not to touch the Max Vol setting, just as you should not set the Value values too high, otherwise the sound in the speakers will begin to wheeze. Other modes in the Audio subsection are configured in a similar way.
Some smartphone and tablet models require a reboot for the new settings to take effect.
Cameras
The smartphone is equipped with two cameras - a 5 MP front camera and a 13 MP main camera with flash. The main camera has a fairly large list of capabilities, including HDR mode, Exposure Bracketing, Portrait, Panorama, Photo on photo and Macro mode. Otherwise we see fairly normal settings.
The front camera doesn't have that many settings, and it doesn't need them. But even the front camera has intelligent backlight and automatic photo correction. Both cameras are capable of recording video, and if the front one records a video with the highest possible VGA resolution, then the main camera is already more advanced and records in Full HD resolution.
In principle, both cameras are not bad. The photo and video quality of the front camera is sufficient for Skype. But the main camera is capable of taking good pictures in sunny weather, especially if you don’t get carried away with viewing photos at 100% scale, otherwise you will notice that the picture is compressed and the noise reduction work is very clearly visible. In addition, the white balance is not always set adequately. As a result, some photos are overexposed.
Examples of photos taken with a Lenovo S850 smartphone using the main camera in automatic mode
Examples of photos taken with a Lenovo S850 smartphone using the front camera in automatic mode
Example of Full HD video shot with a Lenovo S850
What can be configured on a smartphone in the engineering menu
The engineering menu differs on different platforms; in many cases, it only allows you to test some parameters. On Xiaomi Redmi Note 3 Pro and Note 4X, built on Qualcomm chips, the engineering menu allows you to test various functions. These include the screen, sensor, sensors, cameras, sound and microphone, communications, battery, navigation, etc. There is no way to change anything, you can only find out if everything is working correctly.
There are much richer opportunities on the MediaTek platform. In Oukitel U7 Plus (MT6737 chipset), the engineering menu allows you to configure network, sound, communication modules, and other modules. On Redmi Note 2 with MTK Helio X10, the menu was identical, and on other devices with MTK it is not particularly different. We will use his example to describe the possibilities.
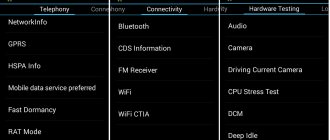
Telephony tab
This section is responsible for setting up a cellular modem. Here, interesting possibilities are provided by the BandMode, Network Selecting and GPRS options.
BandMode
In this menu, you can select communication standards that will be active on the phone when connecting to mobile networks. In the menu item, you can select frequency ranges for each SIM card; if there are two SIM cards, the full list is usually available only on the main one (usually the first one). Once you know exactly which frequencies your operator uses in the region, you can uncheck all the others. This will slightly increase battery life due to the fact that the device will not search for operator towers in these ranges, wasting extra energy on scanning the airwaves.
Sometimes some communication standards (especially LTE) are supported at the chipset and core level, but are disabled in the firmware. By checking the box next to them, you can activate support for these networks. It is worth warning that it does not work everywhere: on the same Redmi Note 2 (Chinese version) TDD-LTE was enabled in this way, but on Oukitel U7 Plus these items are not activated.
Network Selecting
The name speaks for itself: this item is also responsible for selecting networks. Only in this case the user can choose which types of networks to use. The goal is the same as in the previous paragraph: to reduce the load on the cellular modem, thereby reducing battery consumption. You can choose to work only in 2G, 3G, 4G, or combine several standards.
If your operator does not have 3G or 4G at all, these items can be disabled so that the smartphone does not constantly try to search for LTE networks, thereby speeding up battery drain. You can also disable 3G and 4G if you need constant communication (for example, for correspondence over the Internet), but traffic is limited and uncontrolled use of WCDMA and LTE by background processes can quickly waste it.
Despite the name, this item is not interesting because of the GPRS communication settings, which many people no longer need, and it is not recommended for “mere mortals” to change the settings themselves. The main feature is the ability to record the IMEI of the smartphone. In the appropriate item, you can enter the device identification number and click Write to save it.
The ability to write IMEI is often required after an unsuccessful flashing, when it “flies” and the device cannot register in the operator’s network. By copying this code from the smartphone box, you can restore functionality. Attention! illegally changing the IMEI of a smartphone in many countries (including Russia, Ukraine) is a crime! In addition, by rewriting this code to a random one belonging to another subscriber of your operator, communication problems may occur due to a hardware conflict. Therefore, we recommend that you always keep the box or sticker with IMEI in case of unsuccessful firmware. After all, on devices with a non-removable cover, this identifier is not written under the battery.
Charging the battery
Page 6
- Image
- Text
Low battery power
Fully charged
Charging
Your smartphone has a built-in rechargeable battery. For more
information about battery safety, see the “Built-in rechargeable
battery notice” in the
Important Product Information Guide
shipped
with your smartphone. The battery in this product cannot be easily
replaced by users themselves.
2
1
Charge the battery as shown.
Turning on or turning off your smartphone
Turn on: Press and hold the On/Off button until the Lenovo logo appears. Turn off: Press and hold the On/Off button for a few seconds, then tap Power off. Restart: Press and hold the On/Off button for about 10 seconds.
Method 1.
Method 2.
Connect your smartphone to a power outlet using the cable and USB power adapter that comes with your smartphone. Connect your smartphone to a computer using the cable that comes with your smartphone.
Charging the battery
Third Party Applications
If the engineering menu seems too complicated to you, you can use special applications from the Google Play Market. The maximum volume level that is built into the speakers cannot be surpassed with their help, but it is quite possible to remove some restrictions.
Volume Booster GOODEV
Volume Booster GOODEV is a very easy to use application designed only for volume control. You don’t need to expect anything more from it, but it is ready to become an excellent replacement for the usual settings.
Instructions for using Volume Booster GOODEV look like this:
- When you launch the application, you will see a warning that too loud sound is harmful to your hearing. Read it carefully and click “Ok” to continue.
- On the next screen a small window will appear with one slider - “Boost”. By pushing it to maximum, you can increase the volume by 60% of the default volume in the speaker. However, you should not “crank” the setting to the limit, as there is a risk of damaging the speaker.
Amplifier
As the name suggests, the “Sound Booster” application is also responsible for adjusting and enhancing the volume level on the phone. It is also simple and, unlike the previous program, has a translation into Russian. However, “Sound Booster” does not always allow you to get results comparable to Volume Booster GOODEV. Its efficiency is slightly lower.
How to use the application:
- Please read the warning that turning up the volume too much may damage your hearing and will cause wear and tear on your speakers. Click "Ok" to continue.
- To make adjustments, use the sliders under the appropriate headings. The first slider adjusts the overall volume level, and the second one enhances it. Maximum gain is possible up to 60% of the default gain in the speakers.
Display
The smartphone has a 5-inch IPS display with HD resolution. The pixel density is 294 ppi. It is difficult to subjectively discern individual pixels. Brightness varies from 8.7 cd/m2 to 359 cd/m2. At 75% brightness – 273 cd/m2, and at half brightness 180 cd/m2. There is automatic brightness adjustment, which works correctly and smoothly. The contrast is 1:855.
In sunny weather, the brightness of the screen is enough for the information displayed on it to be easily read, and at night a small minimum brightness helps a lot, thanks to which you can read from the phone without straining your eyes. Viewing angles are close to maximum. Subjectively, the screen is excellent for this class of device, the colors are rich with a bias towards cool shades.
Checking the factory calibration shows that the color gamut is slightly different from the sRGB reference. Namely, the green color is shifted towards light green. The gamma curve differs significantly from the reference values. In dark shades it goes higher - making them colder, and in light shades lower - making them warmer. The color temperature is higher than the reference value, thereby proving that the picture on the screen looks cooler.
Engineering menu settings
The options for adjusting parameters and the appearance of the engineering menu may differ depending on the model of smartphone or tablet. Users most often use the menu to adjust the sound, change the camera settings and use the recovery mode.
p, blockquote 29,0,0,0,0 —>
Volume Boost
If your gadget does not ring loudly enough, then in the engineering menu you need to find the Audio item and go to LoudSpeaker Mode. There we select the Ring tab. For all signal levels (1 – 6 Level) we change the values. The numbers are listed in ascending order.
p, blockquote 30,0,0,0,0 —>
In the Max. Vol. increase the value to the maximum. To save the settings, press the SET button.
p, blockquote 31,0,0,0,0 —>
p, blockquote 32,0,0,0,0 —>
Increasing the volume of a telephone conversation
To increase the speaker tone during calls, select Normal mode in the Audio service menu, then open the Sph section. For signal levels (1 – 6 Level) we set values from 100 to 150, and Max. Vol. – 160.
p, blockquote 33,0,0,0,0 —>
p, blockquote 34,0,0,0,0 —>
In the Audio menu you can increase the microphone sensitivity. To do this, select Normal mode, then Mic. For all levels we assign the same microphone sensitivity value. Press the SET button, then reboot and check whether the interlocutor can hear you better.
p, blockquote 35,0,0,1,0 —>
p, blockquote 36,0,0,0,0 —>
Battery: disable unused frequencies
Phones quickly drain battery life running apps, network connections, and maintaining cellular communications. Using the engineering menu, you can increase the battery life.
p, blockquote 37,0,0,0,0 —>
Modern gadgets scan GSM frequencies 850/1900 MHz and 900/1800 MHz. In Russia, 900/1800 MHz operates, so there is no need to scan the network at other frequencies. For the second pair, the radio signal can be turned off, which will save battery power.
p, blockquote 38,0,0,0,0 —>
Open the Band Mode section in Engineer Mode. There we turn off unused frequencies. To do this, uncheck the corresponding boxes: PCS1900 and GSM850.
p, blockquote 40,0,0,0,0 —>
When the smartphone supports 2 SIM cards, open the SIM1 and SIM2 items one by one, and then perform the specified actions in each. Press the SET button to save the settings.
p, blockquote 41,0,0,0,0 —>
p, blockquote 42,0,0,0,0 —>
If the SIM card and phone work in 3G networks, you need to disable the networks that are not used in Russia: WCDMA-CLR-850, WCDMA-800, WCDMA-PCS 1900. Press the SET button again. To enable scanning for networks that you have disabled, you need to return to this menu, then check the boxes.
p, blockquote 43,0,0,0,0 —>
Installing the micro sim card
Page 5
- Image
- Text
A Micro SIM card provided by your carrier is required in order to use cellular services. Install the Micro SIM card as shown.
Step 1.
Step 2.
Step 3.
Insert the SIM eject tool that comes with your smartphone into the hole in the Micro-SIM-card tray. Pull out the Micro-SIM-card tray and position the Micro SIM card into the tray in correct orientation. Carefully insert the tray with the installed Micro SIM card back into the slot.
Only Micro SIM cards work with your smartphone. Always turn off your smartphone first before you insert or remove a Micro SIM card. Insert or remove a Micro SIM card with your smartphone on may damage your Micro SIM card or smartphone permanently.
1
2
1
2
Installing the Micro SIM card
How to restore access to the engineer mode
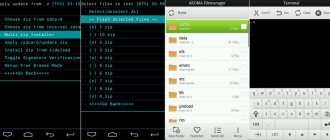
If the manufacturer of the mobile gadget took care of the security of the operating system by prudently removing the configuration program, then it can be reinstalled. To do this, you need to find an installer on the Internet that restores EngineerMode.apk and install it.
We do not indicate the exact name due to the abundance of analogue clones. For example, one of them is called “Engineering Mode”. You can also simply copy the missing file to the system folder located on the path system\app. After this, you can use any method for access: either dialing a number or directly calling from the program interface. Please note that these operations require
Features of the miracle program
Through the engineering menu, despite the ambiguous attitude of gadget owners to this, it makes it possible to solve several important problems. In particular, adjust the sensitivity of the microphone, cure the “childhood disease” manifested in insufficient volume of the system speaker, reduce battery power consumption by disabling scanning of “extra” ranges, and reduce the time it takes the global positioning system receiver to search for satellites. Let's look at the above functions in more detail, since they are the ones that are most in demand.