Posted by: March 7, 2018
Standard smartphone settings are not always enough. Maximize the sound, increase the font size, reduce battery drain - all this can be done only through the engineering menu of the Android OS. This hidden application is in every phone, and it is intended for developers. We will tell you how any user can enter this special mode and change system parameters.
What can be configured
Entering the system engineering menu provides access to a number of settings. Their exact list depends on the model of the mobile device, its hardware characteristics, and the presence of special sensors. Do not forget that changing system parameters yourself can seriously disrupt some OS functions. Proceed carefully and do not change everything at random; before editing, it is better to write down the previous values in order to be able to adjust the smartphone.
The general list of system partitions usually includes the following items:
- Telephony – mobile communications.
- GPRS – mobile internet and SIM card;
- NetworkInfo – check the quality of the cellular network;
- Auto Answer – activation of auto answer to calls;
- HSPA Info – 3G network data;
- CFU Setting – forwarding settings;
- Band Mode – selection of GSM frequencies; unused ones can be turned off to save battery power;
- RAT Mode – setting the priority communication standard;
- Modem Test – test for compatibility with various devices when working as an “access point”;
- Fast Dormancy - saves battery on 3G networks.
- Connectivity – wireless connections.
- Bluetooth – setting up and testing the Bluetooth module for data reception and transmission;
- Wi-Fi – check Wi-Fi operation;
- CDS Information – wireless network parameters;
- FM Receiver – FM module test.
- Hardware testing – testing of hardware characteristics.
- Audio – volume parameters for calls and music, dynamics during a conversation, microphone sensitivity;
- CPU Test – checking the functions of the central processor;
- ChargeBattery – information about the battery;
- Camera – additional photo and video shooting options;
- Mult-Touch – enable response to multiple clicks;
- Sensor – touch screen calibration;
- Sleep Mode – activation of sleep mode.
The names and order of the items will differ in different models and depending on the method of entering the Android menu - through service codes or special applications.
How to open
You cannot launch a secret application through the regular interface. How to enter the engineering menu in Android:
- Android engineering menu - how to enter, functions and settings
- open the calls window, where you can enter the phone number using the keyboard;
- enter a special combination of characters;
- If the menu does not start immediately after entering the code, click on the call button.
Each manufacturer has its own combination of characters; it contains numbers and special characters *, #. For example, the engineering menu of Samsung gadgets is launched by entering the sequence *#*#4636#*#*.
If nothing happens after entering the code, use applications from Google Play that can work with the engineering menu. Most of them will need root rights to the device; without them, the program will function unstable, and some parameters will become inaccessible.
MTK Engineering Mode
A complete copy of the standard engineering menu.
Mobileuncle Tools
A utility with advanced capabilities. In addition to viewing and changing basic settings, it allows you to repair IMEI, update firmware and improve the GPRS signal. Displays the full characteristics of the sensor, screen, memory.
Launching the MTK engineering menu
Utility for devices with MediaTek processors. Successfully loads engineering functions, but errors in saving parameters are noted - after a reboot they may be reset.
Recovery Mode
Another mode for developers is smartphone recovery. It will be useful if problems arise with the device or serious errors. If the phone does not turn on, you will not be able to get into the regular menu, but you will most likely be able to launch the recovery mode.
To start, use a combination of the power button and the volume up or down key. Sometimes you additionally need to press Home. Press and hold the indicated buttons until loading begins.
- What is the engineering menu on Honor and how to use it
The most useful item in this mode is wipe data. It initiates a hard reset, returning the device to factory settings. In this case, you will lose all your data and programs, but you will get a clean phone. Resetting will help if you have gone too far with changes in the engineering menu, setting invalid values.
Keyboard shortcut
The second method is to press the key combination during startup to launch the BIOS. On Lenovo laptops, these are most often the Fn+F2 or Fn+F1 buttons. During loading, button combinations are usually written.
Sometimes it helps to press the Esc+F1+Delete button combination when turning it on, the “Startup Interrupt Menu” will open, press F1 to get into the BIOS.
Another method is shown in the video - you need to have time to press Enter when loading:
People often make a mistake at this stage. They click shutdown and the computer seems to shut down. Then they turn it on, press the buttons and nothing works, the OS loads. In fact, the laptop goes into hibernation mode, since Windows 8.1 has fast startup settings by default. To avoid this problem, simply open the BIOS when you restart your computer.
Sometimes on built-in video cards the menu is not displayed when loading, and button prompts are not visible. In this case, try connecting a separate monitor/TV via HDMI or VGA output, or use another method.
Examples
Let's look at a few examples of useful actions that can only be performed in a secret system application.
- How to increase the volume on an Android smartphone through the engineering menu: go to the Harware tab and the Audio item. Select the mode whose values you will change: to add volume to the Android speaker in a conversation - Normal mode, speakerphone - LoudSpeaker, in headphones - Headset. Enter the mode, change the type of function: Ring – call, Sip – call via an Internet channel, Media – playing music, Mic – microphone. Each function has 7 sound levels, from 0 to 6. Select each of them sequentially and set the values in Value, at the end be sure to click on Set - otherwise the parameter will not be saved.
- Disabling frequencies to save battery consumption: open the Band mode subsection. In the list of frequencies, leave only those used in your country; for Russia these are 900 and 1800 MHz. Uncheck the remaining items and press Set so that the device does not waste charge scanning unsupported ranges. If there are 2 SIM cards inserted in your smartphone, you need to turn off the frequencies for each of them - in this case, sub-items SIM1 and SIM2 will appear in the menu.
- Improving the quality of photos. Open the Camera subsection, edit the photo format - you can set RAW instead of regular JPEG, frame size, frame rate, ISO value.
Additional codes
You can access engineering functions in Android without a menu, through special codes. They are entered as a dial number, allowing you to test hardware components and display technical information about them.
In addition to general codes, a number of manufacturers have their own specific ones:
- Sony: **05***# — reset PUK code;
- Samsung: ##778 – launch the system menu;
- Motorola: *#*#2432546#*#* - check for updates, *#06# - show IMEI;
- HTC: ##3282# - calls the system application, ##3424# - full test of the gadget, ##7738# - protocol check.
It is also convenient to use the Secret Codes program to work with codes. Install it on your device, the application will search for combinations to control the OS and display a complete list of them. To check a value, you do not have to rewrite it; you can launch the function with one click on its name.
CAMERA
The main camera has a resolution of 13 MPH
and built-in autofocus. It focuses not so instantly, but very quickly and with virtually no mistakes. Even in auto mode, the camera shoots decently, the colors are very rich, the picture is sharp, but in complex scenes the exposure meter sometimes makes mistakes, which can be corrected manually through the camera menu by adding or decreasing the exposure. I suggest looking at examples of photos of the main camera (photos are clickable to full size):
More photos(4pcs)
The front camera has a resolution of 5 megapixels, fixed focus and software-enhanced sharpness.
We also suggest you look at an example of video recording on the main camera of the Lenovo S60:
Entering the engineering menu
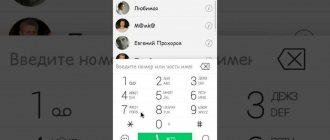
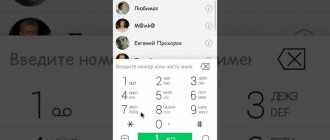
All this, of course, is good, but how do you go to the engineering menu if there is no corresponding option in the Android interface? You can enter the advanced hardware settings menu using a special code entered in the phone number dialing line. The menu should open immediately after entering the last character of the combination, but in some cases you may need to press the call button.
There is nothing complicated in the procedure itself, however, it should be taken into account that different models of mobile gadgets have their own codes. Below we have provided a list of codes for the most popular manufacturers.
| Manufacturer | Code |
| Samsung, ZTE | *#*#4636#*#* or *#*#8255#*#* |
| Acer | *#*#2237332846633#*#* |
| Sony | *#*#7378423#*#* |
| HTC | *#*#3424#*#*, *#*#4636#*#* or *#*#8255#*#* |
| LG | *#546368#*818# or 2945#*# |
| Huawei | *#*#2846579#*#* or *#*#2846579159#*#* |
| Fly, Lenovo, Acer, Prestigio, Philips, Texet, Alcatel | *#*#3646633#*#* |
| BQ | *#*#83781#*#* |
| Smartphones based on MTK processor | *#*#3646633#*#* or *#*#54298#*#* |
Engineering menu codes in Android are universal, however, their correct operation on phones with “left” firmware is not guaranteed. To access Android hardware settings, you can also use special programs, for example, “MTK Engineering Menu” or “Mobileuncle MTK Tools” .
Such applications are especially useful on tablets whose firmware does not provide a dialer. The interface and set of available options in these programs are somewhat different, however, understanding them will not be difficult.
Whatever method you use, you need to exercise maximum caution when working with the engineering menu. Before starting work, it is strongly recommended that you write down all the initial parameter values so that you can restore the settings. It is unacceptable to experiment with the engineering menu just to find out what comes out of it, as you can render your device unusable!
To obtain a list of engineering codes for a specific phone model, you can use the special application Secret Codes , available on Google Play.
On some mobile device models, full access to the engineering menu may require superuser rights (root).
Hidden capabilities of the system
At the last stages of setting up a smartphone, developers test the system for errors and check the operation of all sensors on the device. Especially for this purpose, Android has a special subroutine built into it - the engineering menu, which provides access to hidden settings of the Android OS and allows you to reconfigure them yourself. In addition, the menu contains detailed information about the device. The full list of menu options is known only to the platform developers, so you should make your changes with caution.
Secret paths of developers
To enter the engineering menu, dial the code *#*#3646633#*#*. On some models, you additionally need to press the call key. It is worth considering the features of phones: for different brands there are different combinations of numbers. The Android version does not affect the functionality of the engineering menu.
Enter a special code to enter the engineering menu
If no problems arise, you will be taken to an additional menu for fine-tuning your smartphone.
Enter the menu subsection
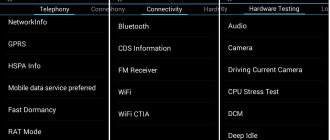
Depending on the system version and processor model, the engineering menu may be incomplete or missing. In the photo above there is a subsection of the menu with elements for testing smartphone sensors, setting up a USB connection, and performing internal and external memory tests.
If it doesn't work out the first time
Not all devices can access the engineering menu.
Let's look at a number of common problems and ways to fix them.
Android is a complex Unix-based operating system. If you can’t do something, you haven’t taken into account all the nuances of the functioning of a particular subroutine.
List of special codes
One of the common reasons for blocking entry to the engineering menu is an incorrect special code. The combination of numbers depends not only on the device model, but also on the type of processor. For example, most devices based on the MTK chip are equipped with an engineering menu. If we talk about Qualcomm, not all smartphones based on this platform have an engineering menu built into them. The list of combinations is given in the table. If you don't find the one you need, try entering a different combination.
Table: code options for different Android models
DIY engineering menu
If none of the special codes work, don’t worry. There are many applications on the network with engineering menu functionality. It is worth noting that the MTK prefix in the names eloquently indicates compatibility only with MediaTek processors.
The first option is Mobileuncle MTK Tools.
In addition to the necessary set of settings, this program has several additional functions: firmware update, recovery update, GPS receiver improvement mode and much more.
Mobileuncle MTK Tools provides a set of settings
Another program is MTK Engineering Mode.
The program completely replicates the standard engineering menu.
MTK Engineering Mode repeats the standard engineering menu
For those whose device is not equipped with an engineering menu, there is another option: installing third-party firmware. Assemblies from third-party developers often contain a wide range of customization settings.
What you can change using the menu
You know how to get to the engineering menu, now let's find out what settings can be made using it. The possibilities are more than wide. The menu subroutine supports changing the speaker volume level and microphone sensitivity, built-in camera settings, audio parameters, GPS, Bluetooth and Wi-Fi modules, and turning off unused frequencies to save battery power. You can also test key components of your device and external memory card, configure I/O operations, determine the exact temperature of the processor and battery, and the level of harmful electromagnetic radiation.
Another useful function is to gain access to recovery mode - an analogue of BIOS on computers, which in turn contains a whole set of settings. Recovery mode features include resetting the device to factory settings, updating the firmware, creating a backup copy of the operating system, gaining root access, and deleting sensitive user data. It is not possible to list all the engineering menu options in one article; the more sensors and components a phone or tablet has, the more extensive it will be.
Increasing phone volume through the engineering menu
Now let’s demonstrate how to work with hardware settings using the example of one of the most popular operations and learn how to increase the volume on Android through the engineering menu. So, go to the menu using Mobileuncle MTK Tools or by entering the “magic” code, then find and open the Audio subsection. If you entered the menu through the Mobileuncle Tools program, this subsection will be located in the senior section Engineer Mode, in other cases it is usually located on the Hardware Testing tab.
In the Audio subsection you will have the following options:
- Normal Mode – normal mode that works when a headset is not connected to the device.
- Headset Mode – headset mode that turns on when headphones or speakers are connected to the smartphone.
- LoudSpeaker Mode – loudspeaker mode. Activated when the speakerphone is turned on, provided that a headset is not connected to the device.
- Headset_LoudSpeaker Mode – loudspeaker mode with a connected headset. The same as the previous one, but with headphones or speakers connected.
- Speech Enhancement - this mode is activated when talking on the phone without using the speakerphone.
There may be other settings in the section, for example, Debug Info and Speech Logger, but it is better not to touch them. Select the mode for which you want to change the volume level (let it be Normal Mode), select Type in the list that opens and indicate for which function we will change the volume. The following functions may be available:
- Ring – adjust the volume for incoming calls;
- Media – adjust the speaker volume when playing multimedia;
- Sip – sound settings for Internet calls;
- Sph – sound settings of the conversational speaker;
- Sph2 – sound settings of the second speaker (the option may not be available);
- Mic – change the microphone sensitivity;
- FMR – FM radio volume settings;
- Sid – it is better not to touch this parameter, otherwise problems with the interlocutor’s voice may occur.
Having selected a function, scroll through the current list, set the desired Value (from 0 to 255) and click to apply the new Set settings.
To change the volume level, you can also use preset templates - the Level option. Most phones have seven levels, from 0 to 6. It is advisable not to touch the Max Vol setting, just as you should not set the Value values too high, otherwise the sound in the speakers will begin to wheeze. Other modes in the Audio subsection are configured in a similar way.
Some smartphone and tablet models require a reboot for the new settings to take effect.
If the BIOS does not open
There is a problem on Lenovo laptops: if you erase the old version of Windows and install another system on a clean hard drive, the BIOS stops opening by any means.
Solution to the problem:
Unplug your laptop and remove the battery. Unscrew the laptop lid from the back and remove the round battery for about 15 minutes. This will reset the BIOS settings. Put everything back in and turn on the laptop.
A couple of errors will appear and the computer will enter the BIOS on its own. On the Startup tab, change the “UEFI / Legacy boot” item to “Both”. In the adjacent settings item “UEFI / Legacy Boot Priority” there should be “Legacy”.
Now let’s save everything: on the “First Restart” tab, click “Exit Saving Changes”.
What is an engineering menu?
We are talking about a special program or system section that developers usually use at the final stage of configuring the software platform of a mobile device. With its help, they make final changes to the operation of the device, check the functioning of various sensors and test system components. Also, the hidden functionality of the service menu is used to obtain a large amount of system information, conduct various tests (about 25 pieces) and configure any Android parameters - various sensors, mobile networks, equipment, etc.
The engineering, service or system menu is available on smartphones and tablets running on a MediaTek processor. On the Qualcomm chipset it is either reduced or absent altogether.
Attention! This section is intended for experienced users who bear full responsibility for the consequences. Careless actions can harm the file system and render the smartphone unusable.
Firmware
The technical characteristics of the Lenovo S660 allow you to install various versions of Android into your smartphone, including the current ones. To bring the latest features to your phone, you will have to resort to installing unofficial modified OSs, but initially you should update, or better yet, install the latest official version of the system. Whatever the desired result, that is, the Android version, it is recommended to go step by step, installing the OS in each method starting from the first and completing the manipulations when you obtain the desired/necessary system software on the device in question.
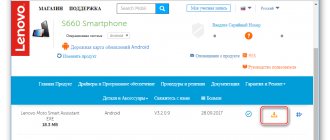
Method 1: Lenovo MOTO Smart Assistant
To manipulate the software part of the Lenovo S660, the manufacturer has created a specialized program called Lenovo MOTO SmartAssistant. You can download the distribution from the developer’s official website in the technical support section:
The method described below is suitable for updating the version of the official Android if for some reason the update was not carried out via OTA.
- We install Smart Assistant by running the installer
and following its instructions. - We launch the tool and connect the S660 with the “USB Debugging”
to the PC. - After identifying the device in the program,
go to the tab "Flash".
- Smart Assistant will automatically check for an update for the system and, if it is present on the server, will issue a corresponding notification.
- Left-click on the downward-pointing arrow located near the update volume value. This action downloads the files necessary for transferring to the device’s memory to the PC disk.
- “Update”
button becomes active , click it. - We respond to the system warning reminder about the need to back up important data from the device in the request window that appears by clicking the “Proceed”
. - Further processes are carried out automatically and are accompanied by a reboot of the smartphone, after which the operating system will be updated,
which is confirmed by a check in Smart Assistant.
Method 2: Factory Recovery Environment
Another method, which is considered official, involves using the capabilities of the factory recovery environment to install system software. This method allows you not only to update the official Android, but also to completely reinstall the OS on the device.
A package with the latest official OS version for the model in question, intended for installation through native recovery, is available for download from the link:
- Copy the update.zip
to the memory card installed in the device. - We start the device into recovery environment mode. For this:
- To completely reinstall the system, you will need to format some memory sections. Select using the key "Volume-"
a point that involves clearing the smartphone’s memory from the data it contains –
"wipe data/factory reset"
. The function selection is confirmed by pressing
"Volume+"
. - Install Android by first selecting "apply update from sdcard"
,then specifying the file "update.zip"
as an installable package.
Next, you should wait for the end of rewriting the Lenovo S660 memory areas - the message “Install from sdcard completed”
. - Reboot the device by specifying the command “reboot system now”
. - The first boot after the update will take longer than usual.
Before using a device with an updated Android, you should wait for the welcome screen to appear and carry out the initial setup of the device.
Method 3: SP Flash Tool
The ability to use a universal tool for manipulating the memory of devices created on processors from the manufacturer Mediatek allows you to perform almost any operation with the Lenovo S660, including updating or completely replacing the installed Android with any other, including unofficial and modified versions of the OS, as well as restoring inoperative ones. smartphone software.
Working with the program and the basic concepts that you will need to know to follow the instructions below are described in the following material:
Below are three main operations that may be required by the owner of the device in question when working with system software via the SP Flash Tool - “NVRAM”
, installation of official firmware and installation of modified recovery. The latest version of the tool at the time of writing this material is used.
As a basis for carrying out manipulations through the Flashtool, you will need the official Android version S062
. This package, in addition to being the latest official software offering for Lenovo S660 from the manufacturer, is used to restore the device, for example, after unsuccessful experiments with custom OS. The archive with the firmware is available for download at the link:
Creating an NVRAM Dump
As mentioned above, the memory section called “NVRAM”
is extremely important for the full operation of the smartphone, and having a backup copy of it is almost a prerequisite for solving communication problems if they arise after manipulating the software part of the device. Dumping an area using FlashTool is quite simple, but it is important to follow the instructions carefully.
- Download and unpack the archive with firmware S062
. - Open FlashTool (run the file flash_tool.exe
, located in the folder with the program, as Administrator). - We add Android images to the program by opening the scatter file MT6582_Android_scatter.txt
from the directory with unpacked OS images. - To read data from memory, including the target NVRAM section, in SP FlashTool there is a “Read Back”
, go to it and click the
“Add”
. - Double-click on the line in the operations field, which will open Explorer, in which you need to select the path for the location of the future dump and give it a name.
- After selecting the path and name of the data file "NVRAM"
set the reading parameters:- The address of the starting memory block – the “Start Address”
– value 0x1000000;
The length of the memory area to be read – the “Length”
– value 0x500000. - The address of the starting memory block – the “Start Address”
- Turn off the smartphone completely, disconnect the USB cable from it, if it was connected. Click “Read back”
. - We connect the USB port of the computer and the microUSB connector of Lenovo S660 with a cable. The device will be detected by the system and the data reading process will automatically begin. “NVRAM”
dump is completed quite quickly and ends with the appearance of the
“Readback OK”
. - The finished partition dump has a volume of 5 MB and is located along the path specified when following step 5 of these instructions.
- If there is a need to restore “NVRAM”
in the future, you should:
Having determined the reading parameters, click “OK”
.
Installation of official Android
After completing the preparatory procedures and saving all the data from the smartphone, you can proceed to installing the operating system. In general, the process should not cause difficulties; all actions are standard.
Installing a modified recovery
To install unofficial modified OSs and carry out other manipulations with the device in question that are not provided by the manufacturer, a special tool is required - a custom recovery environment. For Lenovo S660, there are several versions of custom recovery and, in general, their installation, as well as working with them, is no different. The recommended solution is to use PhilzTouch Recovery
as the most universal product for the model in question, with the help of which most custom firmware based on Android 4.2-7.0 is installed.
PhilzTouch is essentially a modified version, equipped with a touch interface and a lot of additional options. You can download the environment image for installation via FlashTool in Lenovo S660 using the link:
Installing recovery can be done using different methods, but the most effective is the use of SP FlashTool for this operation. Let's use the tool, besides, almost everything necessary for the operation is already present on the user's PC, who flashed the official version of the system using the flasher.
Method 4: Custom firmware
The official versions of Android offered by the manufacturer for the Lenovo S660 model are not characterized by wide capabilities and are overloaded with pre-installed applications. In addition, the latest firmware released for the device is based on the obsolete Android KitKat, and many users of the model require a newer OS. Third-party firmware developers come to help in solving this issue, having created an unusually large number of different versions of modified software shells for the phone in question.
Most custom solutions are installed on the device in the same way, and below there are three options for ports from different romodeling teams, based on Android KitKat, Lollipop, Marshmallow, Nougat. Correct installation of a modified unofficial system includes several stages, the first of which - installation of recovery - has already been performed by the user who has followed the instructions for installing PhilzTouch Recovery suggested above.
Backup via recovery
Again, it should be noted that it is necessary to create a backup copy of the system before overwriting the device's memory partitions. The reader probably wants to quickly move on to installing a custom Android, but you shouldn’t neglect the opportunity to play it safe, even if the data has already been saved. In addition, the custom environment allows you to make backups very easily.
Clearing memory
The installation of a new modified system in the Lenovo S660 must be carried out in the previously prepared, that is, cleared of all data, memory of the device. It is highly recommended not to neglect the procedure for formatting partitions! To clean the device before installing custom firmware, PhilzTouch Recovery provides a special function.
MIUI 8 (Android 4.4)
Among owners of the Lenovo S660 model, the modified MIUI firmware is especially popular. Among its objective characteristics are a high level of stability, the ability to widely customize the interface, and access to services included in the Xiaomi ecosystem. These advantages compensate for complaints about the outdated version of Android on which the shell is based.
This is the official instruction for Lenovo S660 in Russian, which is suitable for Android 4.2. If you have updated your Lenovo smartphone to a more recent version or “rolled back” to an earlier one, then you should try other detailed operating instructions that will be presented below. We also suggest that you familiarize yourself with the quick user instructions in question-answer format.
Official Lenovo website?
You have come to the right place, because all the information from the official Lenovo website, as well as a lot of other useful content, is collected here.
Settings-> About phone:: Android version (a few clicks on the item will launch the “Easter egg”) [Out of the box Android OS version is 4.2].
We continue to configure the smartphone
How to update drivers on Lenovo
You need to go to “Settings -> About phone -> Kernel version”
How to enable Russian keyboard layout
Go to the section “Settings->Language and input->Select language”
How to connect 4g or switch to 2G, 3G
“Settings->More->Mobile network->Data transfer”
What to do if you turned on child mode and forgot your password
Go to “Settings-> Language and keyboard-> section (keyboard and input methods)-> check the box next to “Google voice input”
Settings->Display:: Auto-rotate screen (uncheck)
How to set a melody for an alarm clock?
Settings->Display->Brightness->right (increase); left (decrease); AUTO (automatic adjustment).
Settings->Battery->Energy Saving (check the box)
Enable display of battery charge status as a percentage
Settings->Battery->Battery Charge
How to transfer phone numbers from a SIM card to the phone memory? Importing numbers from a SIM card
- Go to the Contacts app
- Click on the “Options” button -> select “Import/Export”
- Select where you want to import contacts from -> “Import from SIM card”
How to add a contact to the blacklist or block a phone number?
How to set up the Internet if the Internet does not work (for example, MTS, Beeline, Tele2, Life)
- You can contact the operator
- Or read the instructions for
How to set a ringtone for a subscriber so that each number has its own melody
Go to the Contacts application -> Select the desired contact -> click on it -> open the menu (3 vertical dots) -> Set ringtone
How to disable or enable key vibration feedback?
Go to Settings-> Language and input -> Android keyboard or Google keyboard -> Vibrate response of keys (uncheck or uncheck)
How to set a ringtone for an SMS message or change alert sounds?
Read the instructions for
How to find out which processor is on the S660?
You need to look at the characteristics of the S660 (link above). We know that in this modification of the device the chipset is MediaTek MT6582M, 1300 MHz.
Settings->For Developers->USB Debugging
If there is no “For Developers” item?
Follow the instructions
Settings->Data transfer->Mobile traffic. Settings->More->Mobile network->3G/4G services (if the operator does not support, select only 2G)
How to change or add input language on the keyboard?
Settings-> Language and input-> Android keyboard-> settings icon-> Input languages (check the box next to the ones you need)
ANDROID secret codes for Lenovo S660
DISCLAIMER: This information is intended for advanced users. It is not intended for ordinary users, hackers or mobile thieves. We will not be responsible for the use or misuse of this information, including loss of data or damage to equipment. So use these codes at your own risk and to your advantage.
Code: - *#*#4636#*#* This code can be used to obtain information about your phone and battery. The following 4 menus are displayed on the screen:
* Phone information * Battery information * Battery history * Usage statistics
Code: - *#*#7780#*#* This code can be used to reset the factory settings. It will remove the following things:
* Google account settings stored on your phone * System and application data and settings * Downloaded applications
This will NOT delete:
* Current system software and related applications * SD card files such as photos, music files, etc.
PS: After you enter this code, you will see a window asking you to click the “Reset phone” button. This gives you the option to cancel your operation.
Code: - *2767*3855# Think before entering this code. This code is used for factory reset. It will delete all files and settings including internal memory. It will also reinstall the phone's firmware.
PS: Once you enter this code, you will not be able to cancel the operation until you remove the battery from the phone. So think twice before entering this code.
Code: - *#*#34971539#*#* This code is used to get information about the phone's camera. Shows the following 4 menus:
* Update camera firmware in image (don't touch this option) * Update camera firmware on SD card * Get camera firmware version * Get firmware update counter WARNING. Never use the first option, otherwise your phone's camera will stop working and you will need to take your phone to a service center to reinstall the camera firmware.
Code: - *#*#7594#*#* This code can be used to change the behavior of the End Call/Power button on your phone. By default, if you long press the button, a screen will appear asking you to select any option from silent mode, airplane mode, and power off. You can enable direct shutdown by pressing this button so as not to waste time on selection.
Code: - *#*#273283*255*663282*#*#* This code opens the file copy screen where you can backup your media files, for example: photos, audio, video and voice notes.
Code: — *#*#197328640#*#* This code can be used to enter the service mode. You can run various tests and change settings in service mode.
WLAN, GPS and Bluetooth Test Codes:
*#*#232339#*#* OR *#*#526#*#* OR *#*#528#*#* - WLAN test (Use the Menu button to run various tests)
*#*#232338#*#* - Shows WiFi MAC addressMAC address is information about the equipment with which you access the network. As a rule, it is strictly tied to the equipment that provides the connection. If the provider's cable is connected directly to a computer or laptop, then we are talking about a network card. If the connection is made using a router or modem, the MAC address will belong to these devices.
*#*#1472365#*#* — GPS test Lenovo S660
*#*#1575#*#* - Another GPS testThe Global Positioning System (GPS) is part of the NAVSTAR complex, which is developed, implemented and operated by the US Department of Defense. The development of the NAVSTAR complex (NAVigation Satellites providing Time And Range - a navigation system for determining time and range) began back in 1973, and already on February 22, 1978, the first test launch of the complex was carried out, and in March 1978, the NAVSTAR complex began to operate.
*#*#232331#*#* — Bluetooth test Lenovo S660
*#*#232337#*# — Shows the Bluetooth device address
*#*#8255#*#* - This code can be used to launch GTalk Service Monitor.
Codes for obtaining information about the firmware version:
*#*#4986*2650468#*#* — PDA, Phone, H/W, RFCallDate
*#*#1234#*#* – PDA and Phone
*#*#1111#*#* — FTA SW Version
*#*#2222#*#* — FTA HW Version
*#*#44336#*#* — PDA, Phone, CSC, Build Time, Changelist number
Codes for running various factory tests:
*#*#0283#*#* — Packet Loopback
*#*#0*#*#* — LCD test
*#*#0673#*#* OR *#*#0289#*#* — Melody test
*#*#0842#*#* — Device test (Vibration test and BackLight test)
*#*#2663#*#* — Touch screen version
*#*#2664#*#* — touch screen test
*#*#0588#*#* — Proximity sensor test
*#*#3264#*#* — RAM version Lenovo S660
STANDARD GSM CODES Lenovo S660
These codes, dialed from a GSM phone, are used to enable or disable various standard features and services. Some of them duplicate menu functions, some do not.
Legend:
@ = send button (Handset, OK, YES, Navi) ** = enable or activate * = active ## = disable and Deactivate # = inactive
CHANGING PIN CODE Lenovo S660
Change PIN 1 **04*oldPIN1*newPIN1*newPIN1#@ Change PIN 2 **042*oldPIN2*newPIN2*newPIN2#@ Unblock PIN 1 **05*PUK*newPIN1*newPIN1#@ Unblock PIN 2 **052*PUK2 *newPIN2*newPIN2#@
PUK is a code that must be provided by the operator when purchasing a phone or connecting. If this code is missing, or the wrong PUK is entered ten times, your phone will be completely blocked!
SHOW IMEI Lenovo S660
Show IMEI *#06#International Mobile Equipment Identifier, or IMEI for short, is a unique identifier for each cell phone. It is recorded on the hardware, that is, the phone’s firmware, is not tied to the SIM card in any way and therefore does not change when the phone number is changed. A unique IMEI number is assigned at the factory during manufacture. IMEI assignment helps mobile operators block equipment, as well as find its location in their network.
If the code obtained by entering this command and the code on the back cover of the phone do not match, then your phone may be “gray”.
CALL FORWARDING Lenovo S660
Deactivate all types of forwarding ##002#@ Deactivate all conditional forwarding ##004#@ Activate all conditional forwarding **004*phone_number#@
FORWARD ALL CALLS Lenovo S660
Deactivate and Disable call forwarding to another number ##21#@ Deactivate call forwarding to another number #21#@ Set a number and activate call forwarding to another number **21*phone_number#@ Activate call forwarding to another number *21#@ Check call forwarding status to another number *#21#@
FORWARDING IN CASE OF NO ANSWER TO THE CALL
Activate call forwarding to another number if the subscriber does not answer **61*phone_number#@ Deactivate and disable call forwarding if the subscriber does not answer ##61#@ Deactivate call forwarding if the subscriber does not answer #61#@ Activate call forwarding if the subscriber does not answer * 61#@ Check call forwarding status if the subscriber does not answer *#61#@
FORWARDING IF THE SUBSCRIBER IS OUT OF COVERAGE AREA
Activate call forwarding to another number if the subscriber is out of coverage area **62*phone_number#@ Activate call forwarding if the subscriber is out of coverage area *62#@ Deactivate and disable call forwarding if the subscriber is out of coverage area ##62#@ Deactivate call forwarding calls if the subscriber is outside the coverage area #62#@ Check the forwarding status if the subscriber is outside the coverage area *#62#@
FORWARDING IF THE PHONE IS BUSY
Activate call forwarding to another number if the phone is busy **67*phone_number#@ Activate automatic call forwarding if the phone is busy *67#@ Deactivate and disable call forwarding if the phone is busy ##67#@ Deactivate call forwarding if the phone is busy #67#@ Check the status of automatic forwarding if the phone is busy *#67#@
SETTING THE NUMBER OF BEEPING BEFORE ACTIVATING FORWARDING
N = 5-30 (seconds) Set the number of beeps **61*VoiceMail Number**N#@ Cancel the previous setting ##61#@
Change the call barring password **03*330*oldPassword*newPassword*newPassword#@ Activate the barring of all outgoing calls **33*Password#@ Deactivate the barring of all outgoing calls #33*Password#@ Check the status of barring all outgoing calls *#33 #@
BARRY ALL CALLS Lenovo S660
Activate barring of all calls **330*Password#@ Deactivate barring of all calls #330*Password#@ Check status of barring all calls *#330*Password#@
BARRYING ALL OUTGOING INTERNATIONAL CALLS Lenovo S660
Activate barring of all outgoing international calls **331*Password#@ Deactivate barring of all outgoing international calls #331*Password#@ Check status of barring of all outgoing international calls *#331#@
BARRYING ALL OUTGOING CALLS Lenovo S660
Activate barring of all outgoing calls **333*Password#@ Deactivate barring of all outgoing calls #333*Password#@ Check status of barring of all outgoing calls *#333#@
BARRY ALL INCOMING CALLS Lenovo S660
Activate barring of all incoming calls **35*PW#@ or **353*Password#@ Deactivate barring of all incoming calls #35*PW#@ or **353*Password#@ Check the status of barring of all incoming calls *#35#@ or *#353#@
BARRYING ALL INCOMING CALLS WHEN ROAMING
Activate barring of all incoming calls when roaming **351*Password#@ Deactivate barring of all incoming calls when roaming #351*Password#@ Check the status of barring all incoming calls when roaming *#351#@ Activate call waiting *43#@ Deactivate call waiting # 43##@ Check call waiting status *#43#@
SENDING or BANING SENDING YOUR PHONE NUMBER WHEN CALLING
Prohibit sending your phone number #30#phone_number@ Allow sending your phone number *30#phone_number@ Check the status of sending your phone number *#30#
CODES FOR SENDING/BANING NUMBER IDENTIFICATION FOR INCOMING CALLS
Block caller number display on your phone *77# Allow caller number display on your phone #77#@ Check caller number display status on your phone *#77#@
conclusions
Above we have listed the main sections of the engineering menu available on the tested devices. Now let’s summarize what features the user receives during installation:
- Formatting, restoring to factory settings.
- Testing the operation of individual elements of a smartphone or tablet, such as sensors, touch screen sensitivity and calibration accuracy.
- Detailed information about the device and its parts. For example, you can track battery consumption since the last charge and view statistics on the programs used.
- Energy optimization. Alternatively, unnecessary frequency ranges are turned off. In Russia, the standard indicators for working in 2G and 3G networks are 900 and 1800 MHz, while in the USA they are 850 and 1900 MHz.
- Set more detailed settings, such as changing the font size or speaker volume.
The engineering menu can be of great service to experienced users and developers - it can be used to revive the device (for example, by returning the system to factory settings), solve the problem of an overly quiet speaker or microphone, and also monitor and check various system components. But you need to use it extremely carefully and competently, so as not to turn your gadget into a “brick”.
Sources used:
- https://droidov.com/nastroiy-injenernoe-menu-android
- https://viarum.ru/inzhenernoe-menyu-na-android/
- https://androidlime.ru/engineering-menu