Windows operating systems
14.08.20192113
An experienced user who remembers how to enter the BIOS on a desktop computer probably knows not only about the features and potential risks of the process, but also has an idea of how to exit the basic I/O system. Another question is laptops: there are countless models of them today, and for almost every one the manufacturer assigns its own key combination that allows you to get into the BIOS. Let's try to figure out how to do this on Lenovo laptops.
Keyboard shortcuts
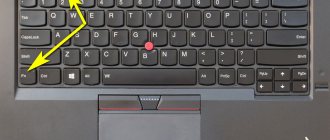
Fortunately, Lenovo has established a single key combination for almost all of its laptop models: Fn + F2 , where Fn is a special “function” button, usually located in the lower left corner.
Much less often, in order to enter the BIOS, you have to use another Fn + F1 or simply press the Delete (Del) key.
In general, the user's actions come down to two steps:
- Open the Start menu and, by clicking on the virtual power button, select one of the options - shutdown or restart.
- Turning on your Lenovo laptop again or waiting for it to start after a reboot and using one of the key combinations listed above to enter the BIOS is no more difficult than understanding the benefits of UEFI Boot.
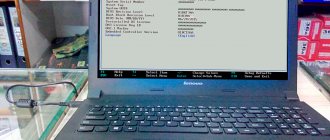
If everything is done correctly, the user will see the BIOS menu in front of him. Now he can configure the BIOS, set the operating system boot order and perform other required manipulations - if necessary, after entering the password.
Tip: if your Lenovo laptop starts up too quickly or you can’t enter the BIOS after rebooting, it makes sense to turn it off using a physical button by pressing and holding it for a few seconds.
Now, after giving the Lenovo laptop a little rest, you should start it again - and do not forget to use one of the combinations listed above in time to enter the BIOS.
Booting a Lenovo laptop from a flash drive via BIOS
Most often, this operation is performed by specialists in order to cure a laptop from viruses. Various software are recorded on removable media, but booting from it is usually not so easy. The problem is that all the latest Lenovo laptop models, starting from the 2013 release, have UEFI BIOS software that has certified Secure Boot security keys. They allow you to boot your laptop only when using a licensed Windows 8 installation disc.
In order to boot from media in such a BIOS, you need to disable Secure Boot in it by following these steps:
- Immediately after turning on the laptop, press two keys Fn + F2 on the keyboard or use the BIOS entry via the Novo Button button.
- By entering "InsydeH20 Setup Utility"(as a rule, this is what is installed in all the latest Lenovo models), go to the section "Security».
- Then select Disabled position Secure Boot , thereby disabling the security protocol.
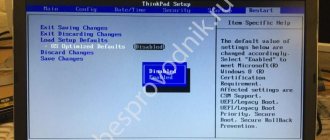
- Boot section, change the installed “ UEFI ” option to “ Legacy Support ”.
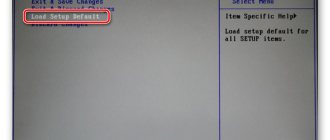
- Save your changes by going to the "Exit" and selecting the option "Exit Saving Changes" From the options offered by the computer, select “ Yes" and wait for the reboot to happen.
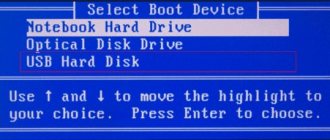
- We insert the removable drive into a free USB input and again get into the BIOS by pressing the keys required for this Lenovo model.
- In the “ Boot ” section we see the flash drive that appears. As a rule, it is listed in the menu as a USB HDD. By simultaneously pressing the Fn + F6 keys, we determine the media first in the list of devices for booting the system.
- We repeat the steps described in paragraph 5.
NOVO button
Owners of Lenovo laptops from the ThinkPad line, as well as some other models, can enter the BIOS without using key combinations - just use the special NOVO button, located next to the power button or on the end of the device.
After turning off your Lenovo laptop, press and hold NOVO for a few seconds; By selecting the BIOS Setup item in the window that appears, the user can finally enter the BIOS and continue working in the basic input/output system.
Tip: sometimes, instead of the NOVO button, there is a special hole on the device body, near which the same icon is located. In this case, you can open the BIOS menu by inserting a special paper clip for an iPhone or smartphone or a regular paper clip into the connector and lightly pressing the contact for two to three seconds.
Branded BIOS launch button
Lenovo installs the proprietary Lenovo One Key Recovery program on its computers. The utility allows you to start a system restore from a backup or change the boot priority of drives. This menu also contains the function we need - entering the BIOS.
In the Lenovo IdeaPad 330, the creators abandoned the prominent Novo Button on the body and left a small hole with a hidden button. A similar solution can be found on smartphones in the design of the SIM card tray. Proceed in exactly the same way: take a paperclip or other thin object, press into the hole until it clicks slightly.
After a few seconds, a menu of four items will appear on the screen. Of these, you need to select the second position using the arrows on the keyboard and press Enter. Through the Novo Button Menu you can also change the boot priority without entering the BIOS settings.
Firmware Settings
To enter the BIOS on Lenovo laptops running Eight or Ten, you can use the built-in Windows option:
- Open the Start menu and click on the gear icon in the leftmost column.
- In the “Windows Settings” window that opens, go to the “Update and Security” section.
- Switch to the "Recovery" tab.
- In the “Special Boot Options” section, click on the “Restart Now” button. It is important to remember that the process will begin immediately and without additional prompts, so before clicking, you should close open documents, save changes made to the system, and take other precautions.
- In the “Select Action” menu, click on the “Troubleshooting” button.
- Next, go sequentially to the “Additional parameters” subsections.
- And "UEFI Firmware Settings".
- That's all - all you have to do is click on the “Reboot” button and wait until the BIOS menu appears on the Lenovo laptop screen.
Important: although theoretically the specified algorithm should launch UEFI, on Lenovo laptops the BIOS is set by default for the initial boot. In addition, even if the owner ends up in the “advanced interface”, he will be able to perform all his tasks in it, bypassing the basic I/O system.
BIOS capabilities in Lenovo laptops
Since the main task of BIOS software is to test the laptop, the program itself is displayed on the monitor in the form of a table, divided into a number of additional tabs. They inform the user about the laptop configuration, show the main technical characteristics of this model, make it possible to boot and configure the security system. All these sections are displayed on the screen as “ Information ”, “ Configuration ”, “ Boot ”, “ Security ”, “ Exit ”.
Pay attention to an important detail. When moving into the BIOS, the mouse connected to the laptop stops working, so while in the software menu, navigation is carried out using buttons with pointers. It must be remembered that in all configurations without exception, the changed settings begin to work only after they are saved and the laptop is rebooted.
Remember that BIOS, like any other software, requires regular updates. Do not use dubious sites and blogs to download. All products installed in Lenovo laptops can be downloaded and updated from the manufacturer’s official website. And it is preferable to do this on the same computer where you are going to change the software. The BIOS version can be found by going through the POST procedure by pressing the Pause/Break key.
You already know how to enter the BIOS.
Removing the battery
If the owner of a Lenovo laptop is also an extreme sports enthusiast, he can enter the BIOS by partially disassembling the device case and taking the round battery out of the motherboard for a few seconds - and then installing it in place.
As a result, a minor system failure will occur, and with a high degree of probability, the next time you start the laptop, it will automatically boot into BIOS mode, without even asking for the owner’s permission.
Resetting BIOS settings on a Lenovo laptop
As stated above, the BIOS and its settings are stored in the CMOS chip on the motherboard. It is powered by CR2032 type batteries - a large flat “tablet”. It powers the CMOS chip even if the laptop is completely de-energized. To reset the BIOS settings, just remove this battery for a few seconds. It sounds simple, but in reality you will have to disassemble half of the laptop, removing the bottom cover and some components.
In most cases you need to do the following:
- Remove the plastic spacer between the keyboard buttons.
- Remove the keyboard itself and disconnect its cable from the motherboard.
- Remove the battery.
- Unscrew the screws and remove the bottom cover.
- Remove the optical drive by unscrewing the fixing screw.
In most laptop models this is enough. Some may have a steel protection plate installed under the bottom cover. As a result, you need to get to the battery and pull it out of the holder for a few seconds. After this, the BIOS settings will be reset, but it will no longer be possible to enter there.
An alternative option for resetting the settings is to find the jumper next to the battery. This is a 3-pin switch, which normally has a jumper across the 1st and 2nd pins. If you move it to the 2nd and 3rd, the BIOS settings will also be reset. You'll have to reconfigure everything again, but it's easier than reflashing the laptop.