Lenovo is on the list of the largest companies in the world that produce computers. And since the demand for the products of this company is growing, questions about the proper operation and operation of Lenovo equipment are becoming more and more pressing for users. And for those who decide to reinstall Windows, at the very beginning of the process the question arises: how to enter the BIOS in Lenovo?
First, it’s worth understanding what a BIOS is and what it comes with. So, BIOS on Lenovo is a special microscopic program that ensures correct and stable interaction between all components of the PC and the OS and allows you to customize it. And the BIOS setting is a standard PC setting that helps the system calculate the functions that should be activated and how they should be loaded. BIOS is available on any computer, be it Lenovo B560, Lenovo S21 or M5400.
Today, several different versions of Bios have been created, which differ slightly in appearance, but as far as functions are concerned, everything is identical. Each version is used to initially set up the computer and test it. BIOS functionality includes:
- Setting date and time;
- Selecting the boot sector – the device from which the operating system will be installed or loaded;
- Checking system components, including checking the health of RAM and hard drives;
- Connecting password protection on your laptop to protect personal data.
How to enter BIOS
On different Lenovo models, the methods for entering Bios on a laptop may differ. First, try the standard login method - when you start your personal computer, you need to press the F2 button on the keyboard, sometimes holding down the Fn key first. Next, the PC settings menu will be called up.
But this method does not always work. For some Lenovo models, the BIOS does not load when you press F2 or Fn+F2 - for example, Lenovo Legion Y520, Lenovo G70, G50-30 or G500. If you tried to enter bios using the method described above and it did not work, the following instructions are for you:
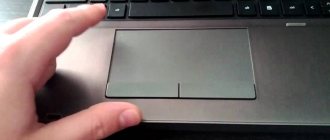
- There should be a special small key with a curved arrow on the side of the laptop (where the charging socket is usually located) or right next to the power button. It's called Novo Button, One Key Recovery or One Key Rescue System. You need to turn off the laptop and click on it.
- If you pressed the correct button, the laptop will start, and on the screen you will see that we go to a special start menu:
- Normal Startup (normal download);
- Bios Setup (parameters);
- System Recovery (system recovery);
- Boot Menu (boot menu).
- As you most likely guessed, to enter the BIOS on Lenovo, you need to go to the BiosSetup item. After you select it, you will see that the laptop has entered the BIOS and you can configure it as you wish.
Factory Windows restoration mechanisms from laptop manufacturers
Not all, but some laptop manufacturers provide an official option to restore factory Windows in case the Recovery partition is deleted. Dell , for example, has a proprietary utility Dell OS Recovery Tool , which creates a bootable flash drive to restore factory Windows for a particular laptop model. But for this you will need a flash drive of at least 16 GB. And also in the utility window you will need to indicate the service code of the Dell laptop.
You can get to the page describing how the utility works and downloading it using this link:
https://is.gd/Xznrmw
Lenovo also provides a factory recovery utility for Windows, although not for everyone, but only for some models of its computer devices .
Windows Lenovo USB Recovery Creator utility to create bootable factory recovery media. To use this utility you also need a flash drive of at least 16 GB. You will also need a registered Lenovo ID and a laptop serial number.
You can read more about this feature on the Lenovo support site:
https://support.lenovo.com/ru/ru/solutions/ht103653
Two secrets for launching Bios
But if you still haven’t been able to start the BIOS using one of the methods described above, and the Windows 8.1 or higher operating system is installed on your laptop, we’ll tell you two startup secrets.
- You need to turn on your PC. With the computer running on the desktop, drag the mouse pointer to the lower right corner of the desktop (call up the side menu).
- A menu opens for us where we select “Options” - “Update and Recovery” - “Recovery”.
- Here, in the “Special boot options” section, click on the “Restart now” button.
- Next, a blue screen with tiles will open. Open the “Diagnostics” tile, clicking on which will take you to additional options.
- You need to open the “UEFI Firmware Settings” item and click the “Reboot” button. Ready! You are in BIOS!
Is OneKey Recovery.exe safe, or is it a virus or malware?
The first thing that will help you determine whether a file is a legitimate Windows process or a virus is the location of the executable file itself. For example, a process like OneKey Recovery.exe should run from C:\Program Files\Lenovo\OneKey App\OneKey Recovery\OneKey Recovery.exe and not elsewhere.
To confirm, open Task Manager, select View -> Select Columns and select Image Path Name to add the location column to Task Manager. If you find a suspicious directory here, it may be worth investigating this process further.
Another tool that can sometimes help you detect bad processes is Microsoft Process Explorer. Launch the program (no installation required) and activate "Check Legends" in the "Options" section. Now go to View -> Select Columns and add “Verified Signer” as one of the columns.
If the Verified Signer process status is listed as Unable to Verify, you should take a look at the process. Not all good Windows processes have a verified signature label, but none of the bad ones do.
The most important facts about OneKey Recovery.exe:
- Located in C:\Program Files\Lenovo\OneKey App\OneKey Recovery\ subfolder;
- Publisher: CyberLink Corp.
- Full Path: C:\Program Files\Lenovo\OneKey App\OneKey Recovery\OneKey Recovery.exe
- Help file: support.gocyberlink.com
- Publisher URL: www.cyberlink.com
- Known to be up to 510.09 KB in size on most windows;
If you have any difficulties with this executable, you should determine if it is trustworthy before deleting OneKey Recovery.exe. To do this, find this process in the task manager.
Find its location (it should be in C:\Program Files\Lenovo\OneKey App\OneKey Recovery\) and compare the size etc with the above facts.
If you suspect you may be infected with a virus, you should try to fix it immediately. To remove the OneKey Recovery.exe virus, you must download and install a complete security application such as Malwarebytes. Please note that not all tools can detect all types of malware, so you may need to try several options before you are successful.
In addition, the functionality of the virus itself may affect the removal of OneKey Recovery.exe. In this case, you should enable Safe Mode with Networking , a safe environment that disables most processes and loads only the most essential services and drivers. When you can run a security program and complete system analysis .
Novo Button
On Lenovo notebooks, next to the power button there is a button with a curved arrow icon. It is called Novo Button, OneKey Recovery or OneKey Rescue System. Turn off the laptop, and instead of the power button, turn it on using this button.
Novo Button Menu will appear on the screen. There you can use the arrows to select loading BIOS or Boot Menu.
Select “BIOS Setup”, press Enter and get into the BIOS.
Keyboard shortcut
The second method is to press the key combination during startup to launch the BIOS. On Lenovo laptops, these are most often the Fn+F2 or Fn+F1 buttons. During loading, button combinations are usually written.
Sometimes it helps to press the Esc+F1+Delete button combination when turning it on, the “Startup Interrupt Menu” will open, press F1 to get into the BIOS.
Another method is shown in the video - you need to have time to press Enter when loading:
People often make a mistake at this stage. They click shutdown and the computer seems to shut down. Then they turn it on, press the buttons and nothing works, the OS loads. In fact, the laptop goes into hibernation mode, since Windows 8.1 has fast startup settings by default. To avoid this problem, simply open the BIOS when you restart your computer.
Open from Windows
BIOS can be opened through Windows. It can be useful when the keyboard does not work. Works on Windows 8, 8.1, 10.
Open Start - Settings.
Select Update & Security.
On the Recovery tab, under special boot options, there is a Restart Now button. Click it, the system will reboot and show options for starting Windows.
Select Troubleshoot (Diagnostics) - Advanced Options - UEFI Firmware Options.
If you can't log into Windows but the login screen appears, you can also open the BIOS. Press the power button, hold Shift and click Restart. Special system boot options will open; further steps are described above.
If the BIOS does not open
There is a problem on Lenovo laptops: if you erase the old version of Windows and install another system on a clean hard drive, the BIOS stops opening by any means.
Unplug your laptop and remove the battery. Unscrew the laptop lid from the back and remove the round battery for about 15 minutes. This will reset the BIOS settings. Put everything back in and turn on the laptop.
A couple of errors will appear and the computer will enter the BIOS on its own. On the Startup tab, change the “UEFI / Legacy boot” item to “Both”. In the adjacent settings item “UEFI / Legacy Boot Priority” there should be “Legacy”.
Now let’s save everything: on the “First Restart” tab, click “Exit Saving Changes”.
Where to get images of recovery partitions for laptops
If the manufacturer has not provided a mechanism for restoring factory Windows for your laptop, you need to look for such a mechanism among homemade tools.
If someone you know has exactly the same model of laptop, and there is a Recovery partition on their hard drive, you need to use any backup program to make an image of this partition and restore it to the disk of your laptop. If no one nearby has such a laptop model, you need to look for an image of the Recovery partition on the network. First of all, you should look at torrent trackers. There is a very good service Tparser.Me , this is a specialized search engine for several torrent trackers on the Runet. We enter a query like “hidden laptop section” into its search field. We can enter our laptop model in the search results filtering field.
If our laptop model is among the torrent distributions of images of Recovery partitions, we carefully read the description of such distribution, especially in terms of the image recovery manual. And download the distribution. The images of Recovery partitions posted on torrent trackers are backups of these partitions created by ordinary users. Created in most cases either by the Symantec Ghost program,
or Acronis True Image.
Mechanisms for restoring factory Windows laptops can be posted in the distribution of images of flash drives or optical recovery disks. Similar to the mechanisms from laptop manufacturers discussed in the previous paragraph, only here there will not be utilities for creating bootable media, but images for recording (ISO, IMG, etc.) or for deployment by backup (for example, images of the same Symantec Ghost program). And you can search for such torrent distributions using the search query “Recovery laptop” .
You can also look for a solution to your problem directly in a special section on the Rutreker website, where torrent distributions of original disks for computers and components are posted. By filtering the topics of the section by model or by the name of your laptop line.
Boot menu
If you want to open the BIOS to change the boot disk (to install the OS), you do not need to go into the BIOS to do this. You can open the Boot Menu. On Lenovo laptops this is done with the combination Fn + F12 (when restarting the computer).
Almost all laptop models produced today come without a built-in CD/DVD drive. Lenovo laptops are no exception. A bootable USB drive in this case is a useful tool for diagnosing and restoring the operating system or for installing a new OS.
There are several ways to boot Lenovo laptops from a bootable USB drive.
System recovery on a Lenovo laptop: basic options
Bringing the operating system to laptops from this manufacturer can be done using several simple methods. Conventionally, they can be divided into the use of built-in tools, so to speak, “hard-wired” directly into the computer system (a hidden partition with the original backup copy on the hard drive), and the use of installed operating systems in cases where the partition with the factory tools is damaged, the user made upgrading/downgrading the operating system or changing the hard drive. You should immediately pay attention to the fact that with the recommended factory reset, all user files will be completely deleted. How advisable it is to use this particular remedy is up to everyone to decide for themselves. However, in some cases you can do without this, but if the system does not boot and no other methods help, this tool will be the most effective.
Booting via BIOS
Booting from a USB drive (flash drive) by changing the BIOS boot priority is the best option when you need to unlock your PC using the Windows password recovery tool or fix a boot problem such as a blue screen, OS not starting, etc.
To download you need:
- Connect the bootable USB drive to the laptop's USB port.
Reference! It is advisable to connect the USB drive to a USB 2.0 port, because... There may be problems with the USB 3.0 port. USB 3.0 ports typically have a blue color in the middle or a lighter color than USB 2.0 ports.
BIOS Boot
- When the BIOS menu appears, go to the “Boot” section using the left-right arrows on the keyboard.
Reference! If there is an MBR partition table on the hard drive (an old version of HDD partitioning that works with partitions of no more than 2 TB), then the “Boot Priority” set to “UEFI First” may lead to a Windows installation error.
Phoenix – Award BIOS
If the Phoenix – Award BIOS is installed on the laptop, after entering the BIOS as standard, you must:
- Use the up and down arrows to select “Advanced BIOS Features” and enter it by pressing “Enter”.
Windows for a laptop: original distribution VS factory build
Factory builds of Windows from laptop manufacturers are notable for the fact that they usually contain all the necessary drivers. They eliminate the need to manually install internal laptop drivers, as happens after installing Windows from a pure Microsoft distribution. Sometimes factory assemblies provide useful integrated software. This is where their advantages end.
There are more disadvantages compared to the original Windows distribution. The Recovery partition, required to store the factory Windows image, takes up disk space. Usually this is a volume of 15 GB or more. The factory build of Windows loses its relevance over time, and after a rollback to its original state, the operating system needs to implement large volumes of updates. Moreover, if we are talking about Windows 10, this can be a long and painful process. If we want to change the layout of the hard drive by deleting all partitions and creating new ones, or resetting the disk to eliminate logical bad blocks, we will not be able to do it so easily. We will always be limited to the untouchable Recovery section. We will first need to create a backup image of this partition, place the image in a storage different from the operated disk, and then also tinker with restoring this image.
Reinstalling Windows from the current original distribution is an easier way to get your laptop into working condition. Moreover, on the software market there are programs like WinToHDD or DISM++ , which allow reinstallation without the need to create installation media. Moreover, in the Windows 10 environment there is a standard “Fresh Start” as part of the “Windows Security” , which reinstalls the system while preserving user data. This function uses a distribution downloaded in the background of the operation from Microsoft servers. Well, for installing drivers, there are complex automatic installation tools - programs like Snappy Driver Installer, SlimDrivers, DriverHub, etc.
Booting via Boot Menu
To boot Lenovo from a USB drive, you do not need to do so through BIOS Setup. Lenovo laptops have a special “Boot Menu” for this purpose.
To enter the boot menu, you must:
- Turn on the system and immediately press the “F12” button.
Booting using UEFI boot
Sometimes the laptop boots so quickly that you cannot enter the BIOS by pressing the “F1”, “F2+Fn”, or “F12” button. If the laptop does not have a “Novo Button” button, but it can normally boot the operating system from the hard drive, then you can enter the UEFI BIOS boot menu directly from Windows 8/8.1/10.
How to enter the UEFI menu
For Windows 8/8.1
- Move the mouse pointer to the upper or lower right corner of the display, and move the mouse up or down. The “Charm” panel will appear, where you need to click “Options” (gear icon).
For Windows 10
- Click “Start” – “Settings” (gear icon).
The last steps are the same for Windows 8/8.1 and 10:
- You need to wait a little before entering UEFI mode and displaying additional settings on the screen, where you need to go to the “Use device” menu.
As you can see, there are quite a lot of options for booting a Lenovo laptop from a USB drive, and each option offers its own solution, which is most suitable for the user in a particular case.
Read more detailed information with instructions in our new article - “How to boot a computer from a flash drive.”
Can I remove or delete OneKey Recovery.exe?
You should not remove a secure executable file without good reason, as this may affect the performance of any associated programs that use the file. Remember to update your software and programs regularly to avoid future problems caused by corrupted files. Regarding software functionality issues, check for driver and software updates frequently to avoid or avoid such issues from occurring at all.
According to various online sources, 18% of people delete this file, so it may be harmless , but it is recommended to check the reliability of this executable file yourself to determine whether it is safe or a virus. The best diagnosis for these suspicious files is a full system analysis with Reimage . If the file is classified as malicious, these applications also remove OneKey Recovery.exe and get rid of associated malware.
However, if it is not a virus and you need to delete OneKey Recovery.exe, then you can uninstall Lenovo OneKey Recovery from your computer using the uninstaller, which should be located at: "C:\Program Files\InstallShield Installation Information\{46F4D124- 20E5-4D12-BE52-EC177A7A4B42}\setup.exe "/z-uninstall. If you cannot find it's uninstaller, then you may need to uninstall Lenovo OneKey Recovery to completely delete OneKey Recovery.exe. You can use the Add/Remove Program feature in the Windows Control Panel.
- 1. From the Start Menu (for Windows 8, right-click in the lower left corner of the screen), click Control Panel , and then under Programs : o Windows Vista/7/8.1/10: Click Uninstall a program . o Windows XP: Click Add or Remove Programs .
- 2. When you find the Lenovo OneKey Recovery , click on it and then: o Windows Vista / 7 / 8.1 / 10: Click Uninstall . o Windows XP: Click the Uninstall or Change/Delete tab (to the right of the program).
- 3. Follow the instructions to remove Lenovo OneKey Recovery .
Lenovo IdeaPad Z580 laptop: a home machine at the right price
If you're looking to buy a laptop that combines style and entertainment at an affordable price, the Lenovo IdeaPad Z580 is a great choice. Attractive appearance, good ergonomics, durable body, excellent performance - a laptop from Lenovo has all these qualities.
The build quality of the Z580 is also good, and despite some give in the plastic panels (the laptop comes in both aluminum and plastic casings), the chassis of the model is quite durable. The laptop offers bold, glossy lines and is one of the brightest budget laptops on the market.
Hidden under the attractive appearance of the IdeaPad Z580 are:
- processor: Intel Core i3/i5/i7, 2200–2900 MHz;
- core: Ivy Br >The glossy display from Lenovo is also impressive. With a screen diagonal of 15.6″, the matrix resolution is standard and is 1366×768 pixels. The monitor's brightness is also average, but the contrast reaches an impressive 260:1, which, along with good color reproduction, provides vibrant colors and makes it one of the best displays in its price category.
The laptop, while not lightweight, is 33mm thick and weighs about 2.5kg. Battery life – 5 hours.
Important! Based on real-world gaming tests, this is one of the fastest budget laptops around. If a buyer needs a fast laptop for everyday tasks without breaking the bank, the Lenovo IdeaPad Z580 will not disappoint.
Lenovo S920 smartphone, characteristics of the fast IdeaPhone
Another interesting solution from Lenovo is the Lenovo IdeaPhone S920 smartphone.
- screen: IPS 5.3″, 16 million colors, 1280×720, touch, capacitive, multi-touch;
- Processor: 4-core MTK 6589, 1.2 GHz, PowerVR Series5XT video;
- memory: 1 GB RAM, 4 GB built-in + 32 GB microSDHC, microSD;
- phone type: monoblock, 159 g, 154×77.7×7.9 mm;
- phone charging connector: micro-USB;
- communication type: GSM 900/1800/1900, 3G;
- navigation: GPS, A-GPS;
- interfaces: Wi-Fi, Bluetooth, USB;
- platform: Andro >IdeaPhone S920 boasts two SIM cards, but it is equipped with one radio module, which, for example, does not allow it to download a file on the Internet during a telephone conversation.
The S920's photo quality is very good, but the ideaDesktop doesn't shine with its design. The battery allows the smartphone to work intensively for a day on one charge, which is a very good indicator. The speaker of the phone is high quality and loud.
The Lenovo IdeaPhone S920 isn't an outright bestseller, but it's a good choice for an all-in-one device, highlighted by its good camera, long battery life, and dual-SIM capabilities.
Video - How to boot from a flash drive or disk on a Lenovo laptop
Did you like the article? Save so you don't lose!