How to find out the current Android version on Lenovo A319
Before installing updates, it is recommended to check the current firmware version. It is possible that the latest Android is already installed on your phone, and an update is not required.
To view the current version you need:
- Open your smartphone settings.
- Go to the “About phone” section.
- Find the “Android Version” item.
This section will indicate the current firmware version. At the beginning of 2021, the current OS is Android 10, but very soon Google will release the next Android 11 update.
Preparatory stage
Despite the fact that each subsequent firmware version brings a lot of new functions, after the update some smartphones are unstable. This happens when the user ignores the preparation step.
Before installing updates on Lenovo A319, you need to meet 2 basic requirements:
- charge your smartphone at least 30%;
- perform a factory reset.
And if everything is clear with the first point, then the second raises many questions for some people. Resetting to factory settings completely deletes files from the smartphone's memory. This allows you to avoid errors when installing updates.
Of course, no one wants to lose personal data, so before resetting you need to create a backup:
- Open settings.
- Go to the "Storage and Backups" section.
- Click on the Google Drive heading.
- Activate the backup.
Performing these steps will result in the backup file being uploaded to cloud storage. After updating Android, it can be restored.
If there is not enough space on Google Drive to save all the data, it is recommended to create a backup copy through the “Backup and Restore” item. The resulting file should be moved to another device (for example, a computer) during the flashing process, and after the process is completed, return it back to the phone’s memory.
If the backup has been successfully created, you can safely proceed to restoring the phone to factory settings:
- Launch device settings.
- Go to the "Backup and Reset" section.
- Select “Reset settings”.
- Click the Reset Phone button.
- Confirm the operation.
Now you need to reboot your smartphone, and then proceed directly to the process of installing new firmware.
How to flash Lenovo A319 RocStar
Attention! Be sure to read the disclaimer. All actions are at your own risk. Be sure to back up the files you care about!
- The smartphone must be charged at least 30%.
- We will use TWRP Manager, you can download it from our archive with firmware or from the market
- Installing TWRP Manager
- Download and upload the firmware file (located below) and place it on your memory card
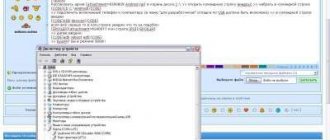
- Launch TWRP recovery mode by turning off the phone and holding down the power key and volume rocker up, the display should show “recovery” and a menu as in the screenshot below.
- First we reset the data (Wipe button). Your smartphone will be completely cleaned
- Then press back and select Reboot recovery, this action must be confirmed (usually by swiping to the right, i.e. drag the slider across the screen to the right)
- Now you can click Install, selecting the file and confirming your intentions. I would like to draw your attention to the fact that the firmware process is not displayed on the screen, so you need to sit and wait.
This is how we flashed the Lenovo A319 RocStar via TWRP recovery .
Download firmware
It's up to you, of course, but we recommend upgrading to Android above version seven
- Android Pie 9.0 or just a pie - there’s nothing to say, the best thing there is now!
- 8.1 Oreo is also a very good option, not raw, unlike the nine.
- Seven Nougat – suitable for those with mid-range or budget-class hardware.
- Six Marshmallows is a good thing, of course, but outdated, something newer would be better.
- Android 10
- Android 11 (2020)
Methods to update Android on Lenovo A319 phone
The Android operating system can be updated in different ways. There are both classic and alternative options. It is recommended that you review the update methods in the order in which they are presented in this material.
By air
This is the easiest and most common way to update your phone. The main condition, in addition to completing the preparatory procedures, is the presence of an Internet connection.
To install a new Android, you will need:
- Go to device settings.
- Go to the “About phone” section.
- Select "System Update".
- Click the “Update” button.
Next, the phone will automatically search for updates. If they are available for this model, you will be prompted to download the firmware file and click the “Install” button. After this, the device will reboot and will be ready for further use.
Manually through settings
This option is suitable for cases when the smartphone cannot find an update over the air. To install the latest firmware version, you will first need to download the installation file from the developer’s official website. After placing the zip file in the device memory, you need to do the following:
- Open phone settings.
- Go to the system update section.
- Click the button with three dots, and then click on the heading “Select firmware file.”
- Specify the folder where the zip file was saved.
- Confirm installation of updates.
The further process will not differ from the one presented earlier in the over-the-air updates. That is, the smartphone will reboot, and after installing the firmware it will be ready for use.
Manually via Recovery Mode
This option is similar to the previous method due to the fact that the firmware file must first be downloaded to the phone. But otherwise the process will be very different, since installation will require going to the engineering menu (Recovery Mode).
To go into recovery, you need to turn off the device and hold down the power button and the top volume rocker for a few seconds. If nothing happens, you should change the combination to the power button and the bottom rocker.
Provided that everything is done correctly, the recovery menu will light up on the screen. To navigate it, use the volume buttons, and confirm the action by pressing the power button.
You need to select “Reboot system now” if you want to update over the air. The “Apply update from ADB” parameter is responsible for installing the firmware from the internal storage, and the “Apply update from SD card” parameter is responsible for installing the firmware from the memory card. Having selected the appropriate item, all that remains is to confirm the operation and wait for the process to complete.
Lenovo a319 firmware brick
The popular Lenovo A319 smartphone was prematurely forgotten by the manufacturer and remained with Android 4.4 on board. Many users don’t like this, because they want to keep up with the times and try out new versions of the OS in a timely manner. For Lenovo A319, firmware of an unofficial system can solve this problem and provide access to all the advantages of Android 5.1 and 6.0 systems!
Lenovo A319 Andro firmware >It's no secret that new firmware is constantly being created for popular smartphones by the users themselves. All that is required from the manufacturer is to publish the source code of the official firmware, and then it’s up to the craftsmen.
Since Lenovo A319 is very popular, the number of custom firmware is very large. Unfortunately, there are no stable firmware based on Android 6.0 yet and most likely there won’t be, you can only install and look at it, otherwise it is not viable (the camera, Bluetooth and other bugs do not work).
But there is CyanogenMod 12.1 (Android 5.1) firmware for Lenovo A319, and it is quite functional. There are also many modifications of it, which allows you to try out various improvements to the system from users.
There is also firmware for Lenovo A319 based on the stock one, with a third-party interface. For example, if you like the Samsung interface, install the Galaxy J1 firmware/port; if you like the Asus interface, ZenUI is for you. For Lenovo A319 you can download such firmware here.
All of the above firmwares are installed via custom recovery.
Lenovo A319 firmware via TWRP
When you have decided which firmware to install, you can begin preparation and firmware. First of all, fully charge your smartphone. It is also very advisable to make a backup of the NVRam and a full backup of the firmware via the SP Flash Tool.
On Lenovo A319, the firmware of an unofficial system can be carried out without a PC, so you can download all files at once to the smartphone’s memory card. The entire firmware procedure is divided into several stages.
Root rights
- Download and install KingRoot
- Get root rights
- Reboot your smartphone
Ruth's rights received! Let's move on to the next stage.
TWRP recovery
- Custom recovery for Lenovo A319 download
- Install recovery via Flashify (the program may write that you do not have root rights, try installing it anyway)
- Reboot your smartphone
Ready! TWRP recovery installed! You can move on to the main part of the instructions!
Lenovo A319 firmware via TWRP
- Download the archive with the firmware of interest to the memory card (no need to unpack the archive!)
- Download the GApps archive to your memory card
- Make sure all important files and data are backed up
- Turn off your smartphone, hold Volume Up + Power, select recovery and confirm with the Volume Down button
- From the TWRP main menu, select Wipe and confirm wiping your smartphone
- Return to the main menu of custom recovery
- Click Install - specify the archive with the firmware and confirm installation
- Once the firmware installation is complete, go to Install again and install the GApps archive
- Reboot your smartphone
The first turn on of the Lenovo A319 after the firmware can last up to 10 minutes, don’t worry, everything is fine with your smartphone, and it will turn on soon. If your Lenovo A319 does not turn on, proceed to the next instructions.
How do you feel about the new firmware? Everything worked out? If not, write in the comments and I will help with your problem!
Lenovo A319 official system firmware
If your Lenovo A319 does not turn on after flashing custom firmware, or for any other reason, the first and surest way to restore its operation is to flash the official system using the SP Flash Tool. If you managed to create a system backup, it is better to restore it. If not, you will have to flash it again.
In this instruction we are working with a PC, so you will need Lenovo A319 drivers. Install them after disabling digital signature verification. When the Lenovo A319 drivers are ready to work, you can begin recovery.
To get started, download the official firmware here, also download the SP Flash Tool and unzip it to the root of the system disk. After downloading the firmware, it should also be unpacked, preferably to the root of the disk, avoiding long paths using Russian characters. Ready? Let's get started!
- Launch SP Flash Tool
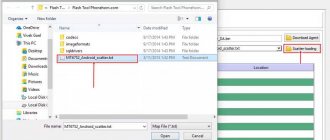
- Click scatter-loading and point to MT6572_Android_scatter.txt from your extracted firmware (in the target_bin folder)
- The program will automatically check all the boxes, do not uncheck them
- Check the box DA DL All With Checksum
- Click Download in the main program window
- Remove the battery from the smartphone and connect using a USB cable
- The firmware of the smartphone has begun, when it is finished a window with the signature Ok will appear
- You can disconnect your smartphone from the PC, insert the battery and turn on the phone
After this on the Lenovo A319, the firmware takes a very long time to start, since the entire cache and other traces of the previous system are cleared. Wait until it turns on completely without rebooting your smartphone.