On this page we will not describe the pros and cons of this Android device; we are really looking forward to your feedback about the device. Here you will find and be able to download custom original firmware, the official version of MIUI v4, MIUI v5 android firmware from our website, and you can also watch video instructions for installing the firmware
for Lenovo A6000 and leave a review.
To download firmware for Lenovo A6000
with Android 7.0 Nougat, Android 6.0 Marshmallow (aka Android M or Marshmallow) or Android 5.0 Lollipop, you need to read the entire page and find the link. There are also firmware Android KitKat 4.4.x (Kitkat) and Android 4.3 Jelly Bean (Jelly Bean), as well as older versions, but we do not recommend downloading them, due to the fact that this is outdated software. The fifth version of Android has stepped far ahead of its predecessors, not to mention versions 6 and 7, worked out to the smallest detail. Below you will find an overview of the latest versions of Android and can compare them.
Don't forget to write a full review about this model in the comments. By doing this, you can help other users make a decision about purchasing a device.
Availability of firmware: available
.
Download firmware
When adding a review to our website through the comment system, do not forget to indicate your real email if you need advice and were unable to install the firmware according to our instructions. Instructions for firmware are on the download page. Our assistance in the form of consultations is free and therefore there may be delays in our responses, since there are many people interested. Downloading firmware for Lenovo A6000
can be done either through a torrent with instructions in Russian, or directly without depositfiles and other bloodsuckers.
Installation instructions
- Click on the download link, selecting the firmware you need
- Download Android M firmware - we checked you, to be honest M is Marshmallow, follow the second link
- Download the file with firmware and application
- Run the application file
- Select the required firmware version
- Follow the instructions from the file archive
Preparing the device for firmware
First of all, you need to understand that the user carries out all actions with the phone software at his own peril and risk. All data stored on the device will be deleted. Therefore, we strongly recommend that you save all media files, contacts and documents on a third-party storage device. It is important to charge your smartphone to 100% to avoid draining the battery while flashing the gadget.
Before flashing your smartphone, you need to do several important sequential steps. Without them, the firmware will not be installed on the Lenovo A6000.
Installing drivers
In order to be able to change the software part of your smartphone, the first step is to install special drivers on your personal computer. They will allow you to synchronize your mobile device with your PC and implement your plans. We will now tell you exactly how to do this. The easiest way is to use the official driver installer for smartphones from Lenovo.
Download the driver package from the company’s official resource and unpack the archive to any folder on your hard drive. After that, open the folder, find the installer file AIO_LenovoUsbDriver_autorun_1.0.14_internal.exe and run it. The installation will begin, you just need to follow the instructions on the screen and be sure to confirm permission during the process to install the drivers. The process will be completed in a couple of minutes.
Now it is important to check whether the installation of the necessary files was completed correctly. To do this, you need to open “Device Manager”, enable “USB Debugging” on your phone and connect it to the computer via a cable. If everything is done correctly, our device will appear in the list of devices.
You also need to check for the possibility of firmware. Here you need to connect the switched off smartphone to the PC, simultaneously holding down both volume control buttons. After that, go to the same “Device Manager” in the “COM and LPT Ports” section, the phone with the name “Qualcomm...” should be displayed there. In order to safely exit the firmware mode, you need to hold the lock button for ten seconds.
That's it, the drivers are installed and successfully tested for functionality!
Changing the region code
Since the A6000 was sold all over the world, it is possible that you have a device on your hands that was intended for sale in another country. The so-called region code is important when manipulating the software part of the gadget, so you need to make sure that the code corresponds to the country where you are currently arriving.
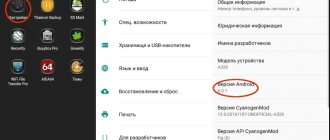
The first thing you need to do is start dialing mode on your phone and enter the code ####6020#, which will open the region selection menu.
Scroll down the list of countries and find your region there and activate it.
Next, a window will pop up warning you to completely reset the system to the factory default. Click “Ok” if you are sure that you have saved all important data on a flash drive or PC.
The device will reboot and all data will be deleted forever. Next, the official firmware can be installed on the Lenovo A 6000.
How to unlock a pattern key
Removing a forgotten pattern key, regardless of its complexity, has ceased to be a global problem even for an ordinary user who is little familiar with the security mechanisms of the Android operating system and its loopholes. Not long ago we came across a program for unlocking the Gaigunlock graphic key (Gaigunlosk). Step-by-step instructions in Russian and a description of how the program works are published at the link above.
A key feature of the Lenovo A6000 is its improved audio system. Thanks to it, the smartphone produces high-quality sound when watching movies, playing games and listening to music. Support for LTE networks is responsible for high-speed data transfer. And the 5” HD resolution display supports any multimedia entertainment.
Today we will be working on firmware for Lenovo A6000. You can download all the necessary files and utilities on our website or on the manufacturer’s official website.
Firmware for PC: | https://yadi.sk/d/qhD1SmHw3EstMb |
Firmware for Recovery: | https://yadi.sk/d/du45DmsN3EsvfR |
Downloader Lenovo: | https://yadi.sk/d/Q55N8F3j3Essze |
Drivers: | https://yadi.sk/d/5jYyehHk3EstSN |
Recovery TWRP 2.8.6.1: | https://yadi.sk/d/NxyydGT_3EsvhQ |
Recovery TWRP 2.8.7.7: | https://yadi.sk/d/aEPYKg373Esvj7 |
Why update the firmware on your Android smartphone?
The reasons are different for everyone, the main thing is that in new firmware the manufacturer corrects bugs and shortcomings.
- There are problems with the front selfie camera; let’s say it takes pictures that are far from the quality indicated on the lens.
- Poor display response to touch.
- I would like to see the new Android Pie 9.0.
- I'm tired of the old version of Android and want to expand its functionality.
- The phone doesn't turn on.
- The phone stopped charging.
How to reflash Lenovo A6000 via TWRP Recovery?
In order to update the firmware via TWRP Recovery, you must install it:
- Download the TWRP-2.8…_A6000.7z
and extract it to the TWRP folder in the root directory of the disk. - We enable ADB debugging on the phone.
- Download and install drivers for ADB on your PC.
- Using USB we connect the device to the PC.
- Run the Flash-TWRP_A6000.bat
and wait for TWRP to finish downloading to the phone. - Disconnect USB from the device.
After this, we begin the software update process:
- Download the archive with the firmware files to the root directory of the Lenovo A6000 memory card.
- Turn off the device and launch TWRP Recovery. To do this, hold down the Power button and both volume keys.
- After the TWRP Recovery menu appears, perform the items Wipes data, Factory reset
. - Go to the Install
, in the list that appears, select the archive with the downloaded firmware and tap on it to confirm. - We wait until the firmware process is completed, after which we restart the device.
Root rights
If you want to get root access, you can use the universal program Rookthp Pro 3.2 , download here . Instructions for using the program can be found here. We can also recommend ZYKUroot version 2.2 among the universal ones. You can find out information about it at zykuroot.info We won’t talk about more popular programs, the same Kingo and Framaroot are always popular, although they are losing ground a little
Article updated on 06/11/2021:
This update concerns universal options for unlocking the bootloader, flashing firmware and speeding up Android smartphones. It is important to remember that unlocking the bootloader is currently only possible using a PC; there are no .apk applications for such operations , no matter how some incompetent authors on the sites invent it.
FAQ in simple words:
What is a bootloader? The bootloader is responsible for starting and loading the operating system, as well as the Recovery Menu. That is, it is a very important element.
Why unlock the bootloader?
- Installing custom Recovery
- Patches and operating system updates.
- System backup and other features
Will the warranty be void if the bootloader is unlocked?
No, if the phone is in working condition.
Will OTA updates work after unlocking?
Yes, they will.
What to do if the “cannot request parameter” error appears?
Try using the old USB 2.0 instead of USB 3, this usually solves the problem, the reason is unknown.
- Firmware without unlocking the bootloader on Android 11. All this can be done in a couple of clicks; for this purpose, enthusiasts have created the appropriate software that is installed on the computer.
- Cleaning and speeding up the mobile device (we are testing the application without advertising).
How to change the region code of Lenovo A6000
- Open your standard dialer app and enter ####6020#
. - In the menu that appears, select the RU region or the corresponding one.
- Confirm your choice.
- After rebooting the device, the region you selected will be confirmed.
- Region code change completed successfully.
Start the firmware reinstallation process only when the device is at least 70% charged, since the initial startup of the device requires a lot of energy.
Connect the Lenovo A6000 to the USB port located on the back of the PC directly on the motherboard.
During the operation of Lenovo smartphones, which are widely used today, unexpected hardware failures may occur, which will lead to the impossibility of normal functioning of the device. In addition, any smartphone requires periodic updating of the operating system and updating the firmware version. The article discusses methods for reinstalling system software, upgrading and downgrading the Android version, as well as methods for restoring software-inoperative Lenovo A6000 devices.
The A6000 model from one of the most famous Chinese electronics manufacturers, Lenovo, is overall a very balanced device. The heart of the device is a fairly powerful Qualcomm 410 processor, which, given the sufficient amount of RAM, allows the device to run even the most modern versions of Android. When switching to new builds, reinstalling the OS and restoring the software part of the device, it is important to choose effective tools for flashing the device, as well as carefully carry out the procedure for installing the system software.
All actions aimed at interfering with the software of all devices without exception carry certain risks of damaging the device. The user follows the instructions at his own discretion and desire, and is responsible for the result of his actions!
As when installing software in any other Android devices, before operations with Lenovo A6000 memory partitions, some preparatory procedures are required. Doing the following will allow you to flash the firmware quickly and get the desired result without any problems.
Drivers
Almost all methods of installing system software in the Lenovo A6000 involve the use of a PC and specialized flashing utilities. To ensure the interaction of the smartphone with the computer and software, you will need to install the appropriate drivers.
Detailed installation of components needed when flashing Android devices? discussed in the material at the link below. If you have any difficulties with this issue, we recommend that you read:
The simplest method to equip the operating system with components for pairing with the A6000 in question is to use a driver package with auto-installation for Lenovo Android devices. You can download the installer from the link:
- Extract the file AIO_LenovoUsbDriver_autorun_1.0.14_internal.exe
and run it. - We follow the instructions of the installer program,
in the process we confirm the installation of unsigned drivers. - Upon completion of the installer, close the finishing window by clicking the “Finish”
and proceed to checking the correctness of the installation. - In order to make sure that all the necessary components are present in the system, open the window "Device Manager"
and connect the Lenovo A6000 to the PC in the following modes.To exit the firmware mode, you need to hold down the “Power”
.
Backup
When flashing the Lenovo A6000 using any method, the information contained in the internal memory of the device will almost always be erased. Before starting the process of reinstalling the operating system of the device, you should take care to save a backup copy of all data that is valuable to the user. We save and copy everything important in any available way. Only after gaining confidence that data recovery is possible, we proceed to the procedure of overwriting partitions of the smartphone’s memory!
Change region code
The A6000 model was intended for sale throughout the world and could have entered the territory of our country in a wide variety of ways, including unofficial ones. Thus, the owner of the smartphone in question may have a device with any regional identifier in his hands. Before proceeding with the firmware of the device, as well as after its completion, it is recommended to change the identifier to the one corresponding to the region where the phone will be used.
The packages discussed in the examples below were installed on a Lenovo A6000 with the “Russia”
. Only in this option can you be sure that the software packages downloaded from the links below will be installed without failures or errors. To check/change the identifier, do the following.
The smartphone will be reset to factory settings, and all data contained in the memory will be destroyed!
How to flash an Android device using factory recovery
Almost every device running the Android OS is equipped by the manufacturer with a special recovery environment, which provides, to some extent, including ordinary users, the ability to manipulate the internal memory of the device, or more precisely, its partitions.
It should be noted that the list of operations that are available through the “native” recovery installed in devices by the manufacturer is very limited. As for the firmware, only official firmware and/or updates are available for installation.
In some cases, through factory recovery, you can install a modified recovery environment (custom recovery), which in turn will expand the ability to work with firmware.
At the same time, it is quite possible to carry out the main actions for restoring functionality and updating the software through factory recovery. To install the official firmware or update, distributed in *.zip , follow the following steps.
- To install the firmware you will need an installation zip package. Download the required file and copy it to the device’s memory card, preferably to the root. You may also need to rename the file before manipulation. In almost all cases, the appropriate name is update.zip
- Boot into the factory recovery environment. Methods to access recovery vary for different device models, but they all involve using combinations of hardware keys on the device. In most cases, the desired combination is “Volume -” + “Power”.
With the device turned off, hold down the “Volume-” button and, while holding it, press the “Power” key. After the device screen turns on, you need to release the “Power” button and continue to hold down “Volume-Volume” until the recovery environment screen appears. To install the software or its individual components into memory partitions, you will need the main recovery menu item – “apply update from external SD card”, select it.
update.zip package previously copied to the memory card and press the confirmation key. The installation will begin automatically.
- Once the files are copied, reboot into Android by selecting “reboot system now” in recovery.
Installing firmware
In order to install Android on Lenovo A1000, use one of four methods. When choosing a firmware method and the appropriate tools, you should be guided by the initial state of the device (boots and works normally or is “bricked”), as well as the purpose of the manipulation, that is, the version of the system that should be installed as a result of the operation. Before you begin to perform any actions, it is recommended that you read the relevant instructions from beginning to end.
Method 1: Factory recovery
The first method of flashing Lenovo A6000 firmware that we will consider is to use the factory recovery environment to install official versions of Android.
The tool is very easy to use, and as a result of its use, you can get an updated version of the system software and at the same time, if you wish, save user data. As an example, we install the official version of the S040
based on Android 4.4.4. You can download the package from the link:
- Place the zip package with the software on the memory card installed in the device.
- Boot into recovery mode. To do this, with the A6000 turned off, press the buttons simultaneously "Increase volume"
And
"Nutrition"
. After the logo appeared
"Lenovo"
and short vibration key
"Nutrition"
let go, and
"Volume Up"
hold until the screen with diagnostic menu items is displayed. Select the item from the list of suggested options
"recovery"
,which will boot into the factory recovery environment.
- If during work you want to remove all applications from your phone and the “garbage” that has accumulated during their work, you can clean the partitions by calling the “wipe data/factory reset”
. - Using the volume control keys, select the “apply update from sdcard”
on the main recovery screen, then indicate to the system the package to be installed. - The suggested update will be installed automatically.
- Upon completion of the operation, a reboot is initiated, the smartphone starts with the reinstalled/updated system.
- If the data was cleared before installation, we perform the initial setup of Android, and then use the installed system.
Method 2: Lenovo Downloader
Lenovo smartphone developers have created a utility for installing system software in devices of their own brand. The flash driver is called Downloader Lenovo. Using the tool, you can completely overwrite the device’s memory partitions, thus updating the version of the official operating system, or roll back to a previously released build, and also install Android “cleanly.”
- Unpack the received archives into a separate folder.
- Launch the flasher by opening the file QcomDLoader.exe
from folder Downloader_Lenovo_V1.0.2_EN_1127.
- Click the button on the far left with the image of a large gear “Load rom package”
located at the top of the Downloader window.
This button opens the “Browse Folder”
, in which you need to mark the directory with the software -
“SW_058”
, and then click
“OK”
. - Click “Start download”
- the third button from the left at the top of the window, stylized as
“Play”
. - We connect the Lenovo A6000 in the “Qualcomm HS-USB QDLoader”
to the USB port of the PC.
To do this, turn off the device completely, press and hold the “Volume+”
and
“Volume-”
simultaneously, and then connect the USB cable to the device connector. - The loading of image files into the device’s memory will begin, which is confirmed by a filling progress bar "Progress"
. The whole procedure takes 7-10 minutes.Interrupting the data transfer process is unacceptable!
- Upon completion of the firmware,
the status
“Finish”
“Progress” . - Disconnect the smartphone from the PC and turn it on by pressing and holding the “Power”
until the bootloader appears. The first boot will take quite a long time; initialization of installed components can take up to 15 minutes. - Additionally.
After the first boot into Android after installing the system, it is recommended, but not necessary to skip the initial setup, to copy one of the patch files to the memory card to change the region identifier, obtained from the link below (the name of the zip package corresponds to the region in which the device is used). - The firmware is completed, you can proceed to configuring
and using the reinstalled system.
The patch must be flashed through the native recovery environment, following steps similar to steps 1-2.4 of the instructions “Method 1: Factory recovery”
above in the article.
Method 3: QFIL
The method of flashing Lenovo A1000 firmware using a specialized universal tool Qualcomm Flash Image Loader (QFIL), designed for manipulating memory sections of Qualcomm devices, is the most radical and effective. It is most often used to restore “bricked” devices, as well as in cases where other methods do not bring results, but can also be used for regular firmware installation with clearing the device’s memory.
- The QFIL utility is an integral part of the QPST software package. Download the archive from the link:
- Let's unpack what we received,
then install the applications following the installer's instructions QPST.2.7.422.msi.
- Download and unpack the archive with the firmware. The following steps cover the installation of the official version of the Lenovo A6000 system, the latest version at the time of writing - S062
based on Android 5. - Using Explorer, go to the directory where QPST was installed. By default, the utility file is located at: C:\Program Files (x86)\Qualcomm\QPST\bin
- Launch the QFIL.exe
. It is advisable to open on behalf of the Administrator. - Click “Browse”
“ProgrammerPath”
field and in the Explorer window specify the path to the file
prog_emmc_firehose_8916.mbn
from the directory containing the firmware files.
Having selected the component, click “Open”
. - In a similar manner to the step above, by clicking “Load XML...”
we add the following files to the program: - We remove the battery from the Lenovo A6000, press both volume keys and, holding them, connect the USB cable to the device.
Inscription "No Port Aviable"in the upper part of the QFIL window, after the system detects the smartphone, it should change to
“Qualcomm HS-USB QDLoader 9008 (COM_XX)”
. - Click “Download”
, which will start the procedure for rewriting the memory of the Lenovo A6000. - During the data transfer process, the field "Status"
filled with records of ongoing actions.The firmware process cannot be interrupted!
- The fact that the procedures have been completed successfully will be indicated by the inscription “Finish Download”
in the
“Status”
. - We disconnect the device from the PC, install the battery and start it by long pressing the “Power”
. The first launch after installing Android via QFIL will take a very long time; the Lenovo screensaver may freeze for up to 15 minutes. - Regardless of the initial software state of the Lenovo A6000, after following the above instructions, we get a device
with the latest version of the operating system offered by the manufacturer at the time of writing.
Method 4: Modified recovery
Despite the good technical characteristics of the Lenovo A6000, the manufacturer is in no hurry to release official firmware versions for the smartphone based on new versions of Android. But third-party developers have created many custom solutions for the popular device, based on operating systems up to 7.1 Nougat.
Installing unofficial solutions allows you to not only get the latest version of Android on your smartphone, but also optimize its operation, as well as make it possible to use new functions. Almost all custom firmware is installed the same way.
To obtain positive results when following the proposed instructions for installing modified system software on the Lenovo A6000, any firmware based on Android 5 and higher must be pre-installed!
Installation of modified recovery
Custom recovery is used as a tool for installing unofficial versions of Android in Lenovo A6000. It is very simple to install this recovery environment on the device in question. The popularity of the model led to the creation of a special script for installing TWRP on the device.
Custom installation
We will install one of the most stable and popular system software among model owners who decide to switch to custom - ResurrectionRemix OS
based on Android 6.0.
That's all. We hope that the application of the above instructions will give positive results and, accordingly, will turn the Lenovo A6000 into a perfectly working smartphone that will bring only positive emotions to its owner due to the flawless performance of its functions!
Lenovo A6000 dualSIM A6000_L_S062_161223_8G_ROW EUROVERSION for installation from a PC. Creator: Lenovo Build date: 12/23/16 OS: 5.0.2 Description: Region code Russia - RU Region code Ukraine/Belarus/Georgia - UA Euro-region firmware update (including Russia (RU) and Ukraine/Belarus (UA) Download firmware for PC: click in the upper left corner. Archive password: website File size: 0.99 GB Read before installing OTA: Why OTA Updates are sometimes not installed? Archive composition by folder: Country_codes - region code files. Additionally, the same files is on the internal card in the folder 0/carrier. This folder can be deleted. SW - firmware files Tools - Downloader_Lenovo_V1.0.2_EN_1127 Drivers - drivers for firmware Attention - EVERYONE READ before doing anything!!! Important information! Lenovo, qualified or custom (extended recovery) threatens that the smartphone or tablet at the start will require the Internet and the entry of the Google account that was before the reset. There will be no problems if you know your account login and password. But if you forgot it or someone else introduced it to you (at your request, or you took the device for temporary use, or maybe bought it second-hand), then after “wipe” you will receive a brick and full firmware from a PC will not help you!!!
Recommendations BEFORE the firmware Backup of current data 1- How to quickly save and restore data when changing firmware 2 - Creating a backup copy and restoring user programs without ROOT 4- Synchronization, managing contacts, SMS, screenshots from a PC using MyPhoneExplorer 1- Backup and restore EFS for Lenovo devices based on Qualcomm - before firmware. 2- Pairing Lenovo devices for service setup on Qualcomm processor with QPST package on PC 3- Switching to HS-USB Diagnostics 9091 mode for service setup. Several variants
Flashing instructions: 1-QualcommDrv drivers and step-by-step instructions for installing them 2-A set of QPST utilities and drivers for flashing Lenovo devices based on Qualcomm chips (updatable) 3-Instructions for installing firmware for Qualcomm devices using QFIL 4-Changing region- code for Lenovo devices / Instruction for country code / Lenovo devices to all platforms/ 4a- Recommendation Steaven: For the sake of life, I RECOMMEND to my Belarusian colleagues to use the region code RU - some interface features are available ONLY in this region code. BEFORE submitting for service, flash from your PC and return to the original UA region! For some time now, to make changes to the regional settings of the device, many things are applied ONLY after changing the region code /Country code/. A simple example - organizing the desktop / arranging icons in folders /, widgets, changing the system font and preset settings for the Russian and Ukrainian regions is available ONLY after changing the region code by the user. Without changing the region code after flashing the firmware from a PC, you get a general template for the ENTIRE ROW region without taking into account the regional characteristics of your country. After flashing: 1-What Lenovo smartphone users need to know about Android Marshmallow 2-Disable (block) unnecessary Android applications without ROOT rights from the PC, while maintaining the possibility of standard updates.
Instructions, with a detailed and step-by-step explanation, for flashing the Lenovo A6000 smartphone to a new version of Android OS, update, custom firmware. And also obtaining Root (superuser rights) on Lenovo A6000 and installing a custom TWRP recovery.
Characteristics
- Type: smartphone
- Operating system: Android 4.4
- Case type: classic
- Control: touch buttons
- SIM card type: micro SIM
- Number of SIM cards: 2
- Multi-SIM operating mode: alternating
- Weight: 128 g
- Dimensions (WxHxT): 70x141x8.2 mm
- Screen type: color IPS, 16.78 million colors, touch
- Touch screen type: multi-touch, capacitive
- Diagonal: 5 inch.
- Image size: 720×1280
- Automatic screen rotation: yes
- Type of ringtones: polyphonic, MP3 ringtones
- Vibration alert: yes
- Camera: 8 million pixels, LED flash
- Camera functions: autofocus
- Video recording: yes
- Front camera: yes, 2 million pixels.
- Audio: MP3, FM radio
- Voice recorder: yes
- Headphone Jack: 3.5mm
- Standard: GSM 900/1800/1900, 3G, LTE, LTE Advanced Cat. 4
- LTE bands support: 800, 1800, 2100, 2600, 2300 MHz
- Internet access: WAP, GPRS, EDGE, HSDPA, HSUPA, HSPA+
- Interfaces: Wi-Fi, Bluetooth 4.0, USB
- Satellite navigation: GPS/GLONASS
- A-GPS system: yes
- Protocol support: POP/SMTP, IMAP4, HTML
- Processor: Qualcomm Snapdragon 410 MSM8916, 1200 MHz
- Number of processor cores: 4
- Video processor: Adreno 306
- Built-in memory: 8 GB
- RAM capacity: 1 GB
- Memory card support: microSD (TransFlash), up to 32 GB
- Additional SMS features: text entry with dictionary
- MMS: yes
- Battery type: Li-polymer
- Battery capacity: 2300 mAh
- Battery: removable
- Sensors: light, proximity
- Search by book: yes
- Exchange between SIM card and internal memory: yes
- Organizer: alarm clock, calculator, task planner
- Announcement date: 2015-01-10
»
Instructions for firmware Lenovo A6000
Before flashing your smartphone, you must first charge it to 100%, and in the meantime, while the phone is charging, download all the necessary files to your PC, namely:
Unpack the archive with drivers and run the installer as administrator. Select all items by default, click Next
We take the Lenovo A6000 phone in our hands and turn it off by holding the Volume up button, turn on the A6000 power button, after vibrating, release the power button and then after a couple of seconds releasing the volume button - mode 9091 devices will be installed on the PC.
Next, download the firmware program Downloader Lenovo V1.0.2, unpack the downloaded archive into a folder without spaces or Russian letters in the path. Run the flasher as administrator:
There is no need to change the program settings; select the folder in which you unpacked the archive with the Lenovo A6000 firmware:
After you have selected the firmware, feel free to click on the arrow in the upper left corner, thereby starting the firmware process. Then turn off the smartphone, hold down the Volume up button, turn on the power button of the smartphone, after the vibration, release the power button and then after a couple of seconds release the volume button - you will see the following menu:
And only then connect your Lenovo A6000 to your PC using the included USB cable. The program itself will put it into firmware mode (download mod), if you connect it for the first time, drivers for new devices will be installed and only then the smartphone will start flashing. Usually the firmware process takes 6 - 7 minutes, but the time may vary, it all depends on your computer. Upon completion, the program will tell you:
That's it! Turn off your smartphone, after the first start, enter the desired region code, after changing the region, I recommend immediately making a wipe - and use your smartphone!
Installing custom recovery on Lenovo A6000
Download ADB RECOVERY FLASH to your PC and unzip it. Run the Flasher Recovery.exe file. After starting, you need to select the required recovery version (by entering the number that corresponds to the desired item) and press “Enter”. There are also additional functions such as loading into recovery or bootloader.
That's all.
Installing CWM Recovery or TWRP
It is not necessary to install Recovery on Android via a computer; most often, on the contrary, it is easier to use the stock one. All you need to do is download the necessary file, again located in an archive with the *.zip extension, and place it on the external flash card of your smartphone.
After that, going to the stock “Recovery”, you need to select the “Apply update from external storage” item and in the list that opens, select the same file with the custom “Recovery”. After confirming your choice, the installation process will begin, after which the device will prompt you to reboot. The process is complete.