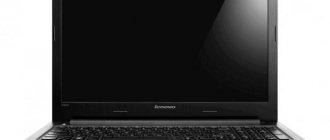
Lenovo is on the list of the largest companies in the world that produce computers. And since the demand for the products of this company is growing, questions about the proper operation and operation of Lenovo equipment are becoming more and more pressing for users. And for those who decide to reinstall Windows, at the very beginning of the process the question arises: how to enter the BIOS in Lenovo?
First, it’s worth understanding what a BIOS is and what it comes with. So, BIOS on Lenovo is a special microscopic program that ensures correct and stable interaction between all components of the PC and the OS and allows you to customize it. And the BIOS setting is a standard PC setting that helps the system calculate the functions that should be activated and how they should be loaded. BIOS is available on any computer, be it Lenovo B560, Lenovo S21 or M5400.
Today, several different versions of Bios have been created, which differ slightly in appearance, but as far as functions are concerned, everything is identical. Each version is used to initially set up the computer and test it. BIOS functionality includes:
- Setting date and time;
- Selecting the boot sector – the device from which the operating system will be installed or loaded;
- Checking system components, including checking the health of RAM and hard drives;
- Connecting password protection on your laptop to protect personal data.
Common login methods on a Lenovo laptop
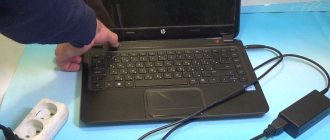
The most common and well-known way to enter the BIOS is to press the Delete key on the keyboard. However, some computer and laptop manufacturers, including Lenovo, have defined other login methods for their systems.
When choosing a Lenovo manufacturer when purchasing, you must remember that the computer equipment of this company is produced, as a rule, with an already installed operating system. If you want to reinstall software on your laptop, you may encounter a problem: almost all modern models ignore the operating system you want, trying to return the computer to the original one. This is why you will need the ability to enter the BIOS yourself to get around this problem.
Depending on the Lenovo model, you can enter the BIOS in several ways:
- press and hold the F1 or F2 keys;
- press the DELETE button;
- press the Novo Button.
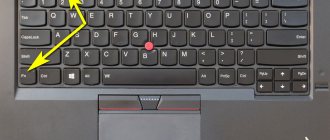
a Novo Button on their panel or side edge . Finding it is not difficult. The manufacturer has highlighted it with a corresponding design - a curved arrow.
If you need to get into the BIOS on a Lenovo laptop, then instead of the power button you need to press Novo Button. When booting, the system will enter the BIOS.
Please note that the BIOS will not appear on the monitor immediately. To enter the program, you need to perform one more step - find in the “ Novo Button ” menu the option to boot the laptop “ BIOS Setup ”, which is selected with the mouse button.
After making your selection, press the Enter key on your keyboard. You are logged into the software.
Powering on with the system key
Every laptop, regardless of configuration and manufacturer, has the function of launching the BIOS from the keyboard. The specific button depends on the motherboard model and software version. Since we are talking about Lenovo >F2 laptop. It must be pressed on the initial startup screen (before the operating system starts) and held for 1-2 seconds.
After this, you will immediately be taken to the BIOS settings menu. If the laptop's firmware or components have changed, the key may change. For example, this function will use the Fn key.
How to enter the BIOS on a Lenovo laptop from the Windows 8.1 operating system
This login method is not as common as the previous ones, but, nevertheless, it is successfully used by both ordinary users and programmers. It is proposed by experts for cases where the laptop keyboard or BIOS entry keys are faulty. Let's look at how to enter the BIOS in this case.
Logging into the program requires the following steps:
- Boot a laptop with Windows 8.1 already installed.
- Select “ Settings ” with the mouse pointer in the lower right corner of Win 8.1.
- Go to “ Change user settings ” and select “ Update and recovery ”.
- Select with the mouse pointer “ Recovery ” - “ Special boot options ”.
- Then you need to reboot the system by selecting “ Restart now ”.
- The Diagnostics tab will appear on the monitor . Here you need to select the “ UEFI Firmware Settings ” function.
- Reboot the laptop again.
After completing a number of the listed steps, you will be taken to the BIOS. Please note that this login is only available for Lenovo laptops running Windows 8.1.
How do I know if my USB drive is bootable?
How to check if a USB drive is bootable or not in Windows 10
- Download MobaLiveCD from the developer's website.
- Once the download is complete, right-click on the downloaded EXE file and select "Run as administrator" from the context menu. ...
- Click the button that says "Launch LiveUSB" in the bottom half of the window.
- From the drop-down menu, select the USB drive you want to test.
Aug 15 2021
Booting a Lenovo laptop from a flash drive via BIOS
Most often, this operation is performed by specialists in order to cure a laptop from viruses. Various software are recorded on removable media, but booting from it is usually not so easy. The problem is that all the latest Lenovo laptop models, starting from the 2013 release, have UEFI BIOS software that has certified Secure Boot security keys. They allow you to boot your laptop only when using a licensed Windows 8 installation disc.
In order to boot from media in such a BIOS, you need to disable Secure Boot in it by following these steps:
- Immediately after turning on the laptop, press two keys Fn + F2 on the keyboard or use the BIOS entry via the Novo Button button.
- By entering "InsydeH20 Setup Utility"(as a rule, this is what is installed in all the latest Lenovo models), go to the section "Security».
- Then select Disabled position Secure Boot , thereby disabling the security protocol.
- Boot section, change the installed “ UEFI ” option to “ Legacy Support ”.
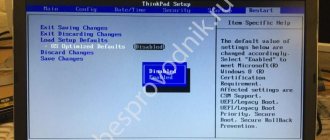
- Save your changes by going to the "Exit" and selecting the option "Exit Saving Changes" From the options offered by the computer, select “ Yes" and wait for the reboot to happen.
- We insert the removable drive into a free USB input and again get into the BIOS by pressing the keys required for this Lenovo model.
- In the “ Boot ” section we see the flash drive that appears. As a rule, it is listed in the menu as a USB HDD. By simultaneously pressing the Fn + F6 keys, we determine the media first in the list of devices for booting the system.
- We repeat the steps described in paragraph 5.
After all the steps have been completed, the laptop will begin the next boot from the flash drive.
Please note that for some Lenovo models, disabling just one Secure Boot option may not be enough. To boot the system from removable media, you may need to enable compatibility mode.
In various models it may be called CSM OS, CSM Boot, Legacy BIOS, UEFI and Legacy OS, or simply CSM.
Method 3: Use the Shift button during restart to enter BIOS
This method is applicable for Windows 8/8.1/10. The steps are described as follows:
- Step 1: Log out of your Windows and go to the login screen.
- Step 2: Press the Shift while clicking the Power on the screen. Then continue holding down Shift button and click Restart .
- Step 3: While holding down Shift button , you will see a blue screen with the option to continue.
- Step 4: Select Troubleshoot > Advanced Options > UEFI Firmware Settings > Reboot and you can access the BIOS.
BIOS capabilities in Lenovo laptops
Since the main task of BIOS software is to test the laptop, the program itself is displayed on the monitor in the form of a table, divided into a number of additional tabs. They inform the user about the laptop configuration, show the main technical characteristics of this model, make it possible to boot and configure the security system. All these sections are displayed on the screen as “ Information ”, “ Configuration ”, “ Boot ”, “ Security ”, “ Exit ”.
Pay attention to an important detail. When moving into the BIOS, the mouse connected to the laptop stops working, so while in the software menu, navigation is carried out using buttons with pointers. It must be remembered that in all configurations without exception, the changed settings begin to work only after they are saved and the laptop is rebooted.
Remember that BIOS, like any other software, requires regular updates. Do not use dubious sites and blogs to download. All products installed in Lenovo laptops can be downloaded and updated from the manufacturer’s official website. And it is preferable to do this on the same computer where you are going to change the software. The BIOS version can be found by going through the POST procedure by pressing the Pause/Break key.
You already know how to enter the BIOS.
Internet
Paper documentation is not always saved. This is especially true for those devices that have been in use for more than three years. How to enter the BIOS in asus laptops is located on the motherboard chip, how to enter the BIOS. But there's nothing wrong with that. In such a situation, the manufacturer’s official website should come to the rescue. There are sure to be electronic versions of all instruction manuals. But here it is necessary to note one important point. The article describes in detail the process of updating bios on a laptop. How to update with it. how to enter bios on a lenovo laptop; to enter the BIOS, On Lenovo g500 the price varies in. In the case of a desktop PC, you need to go to the website of the motherboard manufacturer. But in the case of a mobile PC, we turn to the website for documentation. The instruction manual should be on this resource.
Video on the topic
The primary BIOS input/output system or its improved, newer modifications UEFI is an integral part of any desktop personal computer or laptop and is very often used to set some important parameters that cannot be changed in other ways. In addition, it is this chip and the software shell “built into it” that are responsible for storing data about all “hardware” equipment and testing the main components when the computer device is turned on. But it also happens that the BIOS does not start on a laptop, and it becomes impossible to change the settings the user needs. What is the reason for this phenomenon, and how to independently eliminate possible problems and failures, then we will try to figure it out.
Why the BIOS does not start on a laptop: the main reasons
There can be quite a lot of situations in which access to the primary system is denied. As for the main reasons for this phenomenon, most experts identify the following:
- access using an incorrect key combination;
- inoperable or conflicting equipment;
- physical damage to the chip, motherboard or excessive overheating;
- incorrectly set settings of the primary system itself;
- outdated or damaged firmware.
Based on the points presented in the list above, we will try to understand each situation and try to find out in what ways we can fix the problems without contacting the service center.
Nuances of accessing BIOS on laptops
First of all, let's look at the situation when the BIOS does not start on an ASUS laptop or a laptop from any other manufacturer. Each user must clearly understand that, unlike stationary computer terminals, where a single Del key is used to enter the primary system (and on an external keyboard), for laptops their manufacturers themselves set completely different combinations. Most often, you use either one function key, or a button for calling a special start menu located on the main keyboard panel, or a combination with the Fn, Alt, etc. keys.
If you see that the BIOS does not start from the keyboard on an HP laptop or laptop from any other manufacturer (entering the settings of the primary system with a standard combination is impossible), pay attention to the start window that appears when you turn on the device, on which an item describing the combination will be presented entrance. True, you should be very careful here, since it appears for a very short period of time, and the user does not always have time to notice the necessary information on the screen. As a last resort, you can go to the manufacturer’s official Internet resource and find the necessary data there or look at the technical documentation for the laptop, if available.
Options for entering the BIOS of LENOVO laptops
As for entering the BIOS of Lenovo laptops, the methods are quite varied and the choice of one method or another depends primarily on the device model. There is no one-size-fits-all solution for all Lenovo devices, but often several methods work successfully on the same laptop. They can be used alternately or choose the one that seems most convenient.
Method 1: Keyboard shortcuts
The most common and frequently used way to enter BIOS settings is to press a specific key or key combination on the keyboard immediately after turning on the device. With the laptop turned off, press the power button and, almost immediately, press one of three options:
- In very rare cases, the “F1” key is used on older Lenovo laptop models.
Common mistakes when using the method
- In most cases, after pressing the keys, the expected loading of the BIOS setup screen does not occur due to the incorrectly selected key/key combination for entry. It is worth trying all the above keys and combinations in order. To reliably find out which key or combination of keys is exactly right, you need to refer to the documentation for your specific laptop model. You can find and download it on the official Lenovo technical support website.
- In addition, the failure may be due to a very short delay between the initialization of the laptop hardware components and the start of loading the operating system. The user simply does not have time to get into this short period of time and the keystroke is not processed by the system as needed. In order to exclude this option, you can try the following:
- Turn off the laptop completely. To turn off completely, you need to hold the power button for 10-15 seconds.
- First, press the BIOS entry key or key combination and hold it.
- Briefly press the power button and do not release the enter key or key combination until the BIOS settings screen appears.
Is it possible to get to the BIOS without a keyboard?
Part of the problem that the BIOS does not start on an Acer laptop (or any other model) may be due to the failure of the keyboard. In this case, it is strongly recommended to check for functionality. You never know, maybe the button you need simply doesn’t function? The same goes for using wired or wireless keyboards. But the situation can be further complicated by the fact that the USB port or wireless adapter does not work. As is already clear, they will also have to be checked, which will require, if possible, to fully load the operating system and use at least the “Device Manager” to check the status of the device itself and its installed driver.
As for accessing the primary system without using any keyboard at all, it is believed that there are several ways, but they are so labor-intensive that the average user will not understand them. And that is why they are not considered. In 95% of cases, it is impossible to get to the BIOS settings without a keyboard.
But on non-standard models, special attention should be paid to special buttons located on the main panel and designed to call up special menus, through which you can often get to the parameters of the primary system. But not all laptops have such buttons.
Screen
Another way to find out which key is used to access basic settings is to carefully watch the laptop boot process. To be more precise, the first window with equipment parameters. How to install applications on a memory card in Android 6.0. How to enter BIOS on computers and laptops + video. Convert SD card to internal. If you see the logo of the device manufacturer, then you need to press Esc. You need to pay attention to the line “Press b to setup”. Instead of b, F1 or F12 must be specified. This is the answer to how to enter the “BIOS” in Lenovo. How to enter the Boot Menu will not help. This method is universal and can be used not only on products from this Chinese manufacturer, but also from any other company.
Problems connecting an additional monitor
You can also very often encounter situations where the BIOS does not start on a Lenovo laptop or a model from another manufacturer, where some function keys, when used together with Fn, are assigned the function of duplicating the screen or projecting an image onto a second connected monitor.
Here the situation can be resolved quite simply, and you do not need to have any special knowledge to perform further actions. If the BIOS does not start on the laptop (the black screen appears on the laptop), it is quite possible that projection is still active, and the second monitor is not currently connected. As is already clear, the solution will be to deactivate this function (Fn + F5, Fn + F8, etc.). If the user still needs a second monitor for work, he should simply turn it on and check if there is an image on it.
How to enter and configure the BIOS of a LENOVO G500, G505 laptop to install WINDOWS from a flash drive or disk
Let's look at how you can enter the BIOS of a Lenovo G500/G505 laptop to configure it to install the Windows 7 or Windows 8 operating system from a USB drive (flash drive) or disk.
We turn on the laptop. The flash drive or disk must already be installed in the USB port or CD/DVD drive, respectively. To get into the laptop BIOS, you must frequently press the “Fn” + “F2” button combination during boot.
Our laptop model has the Windows 8 operating system installed, so you may be put straight into the BIOS, or problems may arise. Problems usually arise if the Windows operating system was not shut down correctly.
To enter the BIOS in this case, you need to wait until the operating system starts loading - the loading icon appears on the screen and starts spinning. See the image below.
After this, you need to press and hold the power button on the laptop for about 5 seconds. The laptop will turn off.
Turn on the laptop again. We begin to frequently press the combination of the “Fn” + “F2” buttons. The problem should now be resolved.
Resetting the primary system to factory settings
Quite often you can observe that the BIOS on a laptop does not start under any pretext due to incorrectly set parameters in the primary system itself. The situation is quite serious, since some “too active” users sometimes set such options that the primary system simply “crashes”. The same applies to carrying out the firmware process when the power supply suddenly turns off. But this mostly applies to situations where the laptop’s battery operation is not provided for at all, or it is almost completely discharged (we’ll look at the firmware separately).
In this case, it makes sense to perform a complete reset of all parameters to factory settings.
Since the BIOS on the laptop will not start, you will have to disassemble the laptop and remove the CMOS battery from the socket on the motherboard for 10-15 minutes. In this case, all parameters will be reset automatically and without the necessary user access to the software shell of the primary system.
The BIOS does not start on the laptop (black screen): how to update the firmware?
Now a few words about updating the firmware. As mentioned above, its obsolescence can lead to the fact that the BIOS on the laptop does not start. Unfortunately, it is not always possible to update the software shell of the primary system directly in the Windows environment, although there are no problems with UEFI. However, you can download the update and burn it to removable media. For example, if the BIOS does not start on an ASUS N53 laptop or another model of the same serial line, you first need to download the firmware from the official website, change its extension to BIN or ROM (depending on the flasher used) and copy it to removable media.
Now the most important thing! As a removable device, you must use either regular flash drives or SD memory cards with a capacity of no more than 2 GB, pre-formatted exclusively in FAT16! If this is not done, the device will simply not be recognized by the primary system. After this, you need to completely turn off the power to the laptop, remove the battery, insert the media into the desired port, hold down the Ctrl + Home keys and, while holding them, first plug the power supply into the outlet, and then press the power button directly on the laptop. After the indicator on the flash drive lights up, release the pressed keys.
After a couple of seconds, a reboot should follow, followed by the start of the proprietary built-in Easy Flash applet. Here you just need to wait for the firmware process to complete. When the laptop reboots again, you should turn it off, insert the battery back and turn it on again.
Note: Sometimes the device may not be recognized the first time. In this case, you will have to look for a suitable port yourself, and the actions on laptops from different manufacturers may differ quite significantly.
How to update Bios?
In order to update the BIOS version, you need to go to the manufacturer's website. Further steps may differ, since the official resources of popular brands have different structures. Let's look at the process of updating drivers for Bios using Lenovo as an example.
- Go to support.lenovo.com, select “Laptops” from the list. Specify the series and model.
- On the new page, scroll to the list of components, then select BIOS drivers from the drop-down list.
- Read the list of drivers, their release date, find out the version and changes (for this you need to open Readme).
- On your computer, use a search in the Start menu to launch the msinfo program. In the window that opens, find the BIOS version and compare it with the version on the website.
- If an old build is installed on your laptop, then you need to download the file from the official Lenovo website, run it and follow the instructions.
- After the installation is complete, the computer will reboot, then you need to go to the BIOS menu, load the default setting, save, exit and restart the system again.
The update process is quite simple, but it’s still worth noting once again that you only need to update the BIOS if you need to add support for new devices or fix errors.
Determining conflicting devices
Now let’s assume that everything is in order with the software environment, but the BIOS does not start on the laptop even after flashing it. What could be going on here? Apparently, there is some device in the laptop that is causing conflicts.
Disconnect all external devices, and then disconnect the hard drive, optical drive, wireless adapter, discrete graphics card, etc. (anything that can be removed from the motherboard). After that, turn on the laptop again. If logging into the primary system becomes possible, turn off the laptop and replace the removed devices one by one. When the problematic device is found, it will have to be replaced.
Non-working video cards
You can often encounter situations where the BIOS on a laptop does not start due to a non-working video card. Unfortunately, such problems have been noticed with NVIDIA GeForce 8-series graphics chips and outdated AMD cards that are installed on Acer laptops. In this case, the easiest way would be to remove the problematic adapter immediately and try to enter the BIOS. If the firmware is not damaged, the card will have to be replaced. If failures occur, you can try to reflash the software environment of the primary system. Again, you need to look at the instructions for installing the updated software in advance.
Some experts recommend using special flashers like Flash Utility for DOS, but you must use only those versions that are suitable for the BIOS of a certain developer (Phonix, InsiderH2O, etc.). The process is quite complex and can be launched, as the name suggests, exclusively from the command console, but it is first recommended to create a special Crisis Disk media with a flasher and firmware file recorded on it.
When should you update your BIOS?
If the computer is operating in normal mode, then the BIOS does not need to be touched. Installing the update may not bring benefits, but additional problems. Previously, the process of updating this component was quite difficult (you had to use DOS), but now there are special utilities that allow you to update the software version in just a few clicks.
You should update the BIOS on a laptop only if:
- Various errors occur during computer operation, and they are corrected in the new BIOS version (the list of changes is usually available on the manufacturer’s official website).
- There was a need to install new equipment. From time to time, some manufacturers add support for new components (processor, etc.) to the BIOS.
The BIOS update process may be different for each computer, so there is no single instruction. If you install the wrong update, serious system problems may occur. That is why you need to carefully read the information on the manufacturer’s website and install the new version only if it is really necessary.
Overheating of chips
This is perhaps the simplest situation, but overheating can relate to both the graphics adapter and the BIOS chip itself. In this case, it is best to let the laptop “rest” for a while by completely de-energizing it and removing the battery to get rid of residual currents. Only after this can it be turned on again, after which one of the above actions can be taken. In particular, this helps Acer Aspire 7220, 7520, 5220, 5520, 4220 and 4520 laptops with NVIDIA MCP67 graphics cards. But it should be noted that such resuscitation is only temporary.
What to do if nothing helps?
Finally, if none of the above helped, or you were unable to perform some operations yourself, the easiest way is to contact the nearest service center or a qualified technician who can even replace the microcircuit soldered into the motherboard. This will, of course, not be cheap, but it’s still better than buying a new motherboard, which is almost comparable in price to buying a new laptop.
Lenovo is on the list of the largest companies in the world that produce computers. And since the demand for the products of this company is growing, questions about the proper operation and operation of Lenovo equipment are becoming more and more pressing for users. And for those who decide to reinstall Windows, at the very beginning of the process the question arises: how to enter the BIOS in Lenovo?
Documentation
You can get the answer to the question “how to enter Lenovo BIOS” in the documentation that comes with the device. How to enter Bios on a laptop. How to reinstall Windows on a laptop? Like a Toshiba laptop;. how to enter BIOS on Lenovo laptops. For desktop PCs, this is the user control of the motherboard. There is an entire section dedicated to this issue. In addition to the procedure for entering the basic settings, each parameter is also described in detail, as well as its possible values. In most cases, the Del key is used for these purposes. In the case of a laptop, the situation becomes more complicated. There may be various options here. And one way to find out which one is used in your case is to study the instruction manual. How to make an email on your phone. Using standard settings to create e-mail in iOS and Android. It necessarily describes the procedure for entering the basic settings of a device such as a Lenovo . enter the BIOS using one of three options: F1 or F12.
How to enter BIOS
On different Lenovo models, the methods for entering Bios on a laptop may differ. First, try the standard login method - when you start your personal computer, you need to press the F2 button on the keyboard, sometimes holding down the Fn key first. Next, the PC settings menu will be called up.
But this method does not always work. For some Lenovo models, the BIOS does not load when you press F2 or Fn+F2 - for example, Lenovo Legion Y520, Lenovo G70, G50-30 or G500. If you tried to enter bios using the method described above and it did not work, the following instructions are for you:
- There should be a special small key with a curved arrow on the side of the laptop (where the charging socket is usually located) or right next to the power button. It's called Novo Button, One Key Recovery or One Key Rescue System. You need to turn off the laptop and click on it.
- If you pressed the correct button, the laptop will start, and on the screen you will see that we go to a special start menu:
- Normal Startup (normal download);
- Bios Setup (parameters);
- System Recovery (system recovery);
- Boot Menu (boot menu).
- As you most likely guessed, to enter the BIOS on Lenovo, you need to go to the BiosSetup item. After you select it, you will see that the laptop has entered the BIOS and you can configure it as you wish.
Via the diagnostic menu
Now let's move on to ways to launch the BIOS through the operating system. This option is not very convenient, but it can be useful if the system keys refuse to perform their function. Use this guide:
- Open the Settings window and go to the Update & Security section.
- Open the “Recovery” tab and in the block called “Special boot options” click on the “Restart now” button.
- After this, your computer should restart. And when you turn it on, it’s not the operating system that will start, but the options from the screenshot. You need to click on “Troubleshooting”.
- At the next stage, you need to go to “Advanced options”, and then select the item marked in the screenshot.
- The computer will now reboot again and you will be taken to the BIOS settings.
You can use the same method without “travelling” through Windows windows. To do this, open the Start menu and click on the PC shutdown button. In the action selection list, you must click on “Reboot” while holding down the Shift key. After which the computer will begin to reboot as usual, but will launch the above-mentioned menu.
This method also works on the Windows lock screen. You also need to click on the shutdown button and select the option to reboot while holding down the key.
Two secrets for launching Bios
But if you still haven’t been able to start the BIOS using one of the methods described above, and the Windows 8.1 or higher operating system is installed on your laptop, we’ll tell you two startup secrets.
- You need to turn on your PC. With the computer running on the desktop, drag the mouse pointer to the lower right corner of the desktop (call up the side menu).
- A menu opens for us where we select “Options” - “Update and Recovery” - “Recovery”.
- Here, in the “Special boot options” section, click on the “Restart now” button.
- Next, a blue screen with tiles will open. Open the “Diagnostics” tile, clicking on which will take you to additional options.
- You need to open the “UEFI Firmware Settings” item and click the “Reboot” button. Ready! You are in BIOS!
Second secret. Many Win 8.1 users make a mistake when trying to enter Bios. Everyone knows how to get into the BIOS - you need to press a certain button on the keyboard. To do this, the user clicks on “Shutdown”, waits until the laptop turns off, and then presses the button to enter the Bios, but the computer starts as before - the OS is loading.
The whole problem is that the Windows 8.1 operating system initially works with a quick startup function, which is based on sleep mode - enter the BIOS without turning off the PC, but rebooting it.
Some useful tips:
- After entering Bios, go to various settings for system parameters and boot in the BIOS itself. Be very careful and careful, and it’s better not to touch something you don’t know, as there is a risk of doing something wrong and completely losing your computer. And after making all the changes, go to the “Exit” section and select “Save & exit”. After this, the laptop will reboot, and when it starts again, all the settings that you previously had to set will be taken into account.
- If the above methods for entering the BIOS on a Lenovo laptop do not work, try pressing and holding the F12 key when starting the device until the BIOS starts - this method works on some Lenovo models.
- Very rarely, but it still happens - in some models the F1 key works (you need to press it several times until the laptop turns on).
- Manufacturers recommend configuring PC settings in Bios only with a fully charged laptop battery, since if during the setup process your laptop turns off due to being discharged, this will most likely cause some system problems in the future.
- Before exiting the BIOS, be sure to save all changes so as not to go astray.
Remember that setting up Bios is a very serious action that requires maximum understanding of the process and great attention to detail. You should be aware that if configured incorrectly, some system components may not work correctly, which brings additional operational difficulties. And if you doubt that you know how to do it correctly, it is better to call qualified specialists, this will save money, time, and nerves. We hope that this article helped you understand how to enter Bios.
Lenovo g770 removal WHITELIST
I have a Lenovo G770 laptop with a ar9285 wifi adapter that does not have bluetooth.
I decided to install another adapter so that I could connect my ears via bluetooth and I bought ar9585wb-eg from the Chinese, which has both wifi and bluetooth.
But I encountered a problem that was unexpected for me - the manufacturer created a list of equipment that will work, and when loading the new wifi I received the message “1802: Unauthorized network card is plugged. "
Lenovo G770 BIOS version 40cn11ww V3.10
THE WHOLE OPERATION TOOK 30-40 SECONDS, THE FAN TURNED ON TO THE MAXIMUM AND EVERYTHING HAPPENED.
removes the entire WHITELIST, the LED indicator works, no problem. If anyone repeats it, please unsubscribe))
This is how my brother died.
Are you writing from the refrigerator?
From the second brother.
We have a big family. Well, it was.
Isn't this the family with the mermaid and the cow?
Is this a family associated with history in which representatives of different nations carried out the king’s quests?
I have a g780 - the same story with the white list of acceptable expansion cards, on the Internet I came across a forum where you need to merge the BIOS from the laptop, on the forum they will clear it from the white list and send it by private message. It was attributed that each laptop has its own BIOS. In general, then I didn’t take any risks and took a usb adapter, made one usb port (the one on the cable) internal and placed the adapter inside the laptop case