During the operation of a laptop, sooner or later the need for service arises. More often this is due to excessive overheating of the device, as a result of which slow operation is observed. Overheating occurs when the cooling system malfunctions. A large amount of dust accumulates in the fan and makes it difficult for it to function effectively.
Disassembling a laptop
Service maintenance involves cleaning the cooling system and replacing thermal paste on the chips. These procedures usually require complete disassembly of the device.
Another reason to disassemble a laptop may be the need for an upgrade. Modern technologies are developing at a pace that even owners of advanced cars cannot always keep up with. In this case, manufacturers offer users to increase the capabilities of the device by adding or replacing components. Some devices provide convenient access to the components necessary for this, which allows you to avoid disassembling the entire device. For other devices this will be a necessity.
In addition to these reasons, disassembly may be required for repairs. If any component fails, it must be replaced. And without disassembling there is no way to get to such a component.
Important! Manufacturers assemble devices in their own way. It is difficult to create any universal disassembly scheme. But the main steps are approximately the same for each model.
How to disassemble a laptop
Disassembly can be considered using devices from HP as an example. The devices of this company have a fairly typical design. During disassembly, a certain procedure must be followed. If this order is neglected, the results can be very disastrous. Let us describe the main stages of disassembling the device.
Disconnect the battery
Battery disconnection
The first step is to always disconnect the battery from the case. Usually, the battery can be disconnected quite simply by removing the latches. However, in some models the battery is located internally, making it difficult to quickly access. Disassembly of such devices must be done with the greatest care and attention.
Disconnecting the battery is necessary in order to de-energize the device components. After all, if you disassemble the device under voltage, there is a high probability of shorting any contacts and thereby causing a short circuit. This will inevitably lead to failure of some components. And such “service” turns into very serious and expensive repairs.
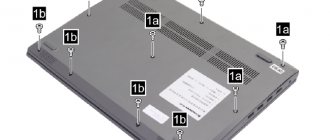
Unscrew all visible bolts on the bottom
Unscrewing the bolts
Direct disassembly should begin by unscrewing the visible bolts on the bottom. They can hold the laptop lid together, hold the motherboard or any component. The bolts can be of different lengths, so you need to remember their location. To do this, you can use a sketched diagram.
It is worth noting that different screwdrivers may be required to remove the bolts. Most often, it is a cross and in the form of an “asterisk”.
If the bolt does not come off, you may need to select a different tool. If you apply too much force when unscrewing, you can damage the bolt head. The notches may become misaligned and further use of the bolt will be difficult.
Remove all the caps on the bottom and unscrew all the bolts underneath them
Removing covers
Many devices have special covers on the bottom of the case that provide access to some components of the device. These covers are bolted on. They also need to be removed. Under the covers there will be components and their fastenings. The bolts under the covers also need to be unscrewed.
Disable Wi-Fi module, hard drive, RAM, DVD
Disabling components
Next, you need to remove the components to which you have access. Usually the first step is to remove the Wi-Fi module. It is mounted on special guides and connected to two antennas. The antennas must be carefully disconnected by pulling the wires. Sometimes you may need to pry the plugs with something.
If access to the hard drive is opened, it must be removed. The disk is secured with bolts, after unscrewing which you need to carefully pull the component. If there are no obstructions, the disc should come out easily.
Covers on the bottom usually hide access to the RAM for easy replacement. To disassemble a laptop, it is not necessary to remove the RAM, but it can be done for convenience. The RAM strips are secured using special latches. Having bent these latches, you need to smoothly pull the bar and pull it out.
At this point in disassembly, you can usually remove the disk drive. It is attached to special bolts or latches. Once the fasteners are loosened, the drive is pulled out from the side.
Turn the laptop over and see if the keyboard is removable
In further disassembly of the device, differences begin depending on the manufacturer. You need to turn the device over and look at the keyboard. It can be removable or non-removable. A detachable keyboard is usually fairly easy to identify. It is a kind of module, clearly separated from the very top cover of the laptop.
If the keyboard is removable, remove it
Removing the Keyboard
If it is discovered that the keyboard can be removed, then this is where further disassembly continues. Most manufacturers secure this keyboard with latches. In this case, a pick or some flat object that can be used to pry the keyboard can be very useful. Using this “spatula” you need to go around the entire perimeter of the keyboard and unclip the fasteners. This must be done as carefully as possible, since the fasteners are plastic and quite fragile. Excessive force can easily damage or even break them. The consequence will be a permanent gap between the case and the keyboard. Once the fasteners are released, the keyboard should come off.
Some keyboards are equipped with additional frames on top. In this case, before removing the block itself, you need to remove this frame.
Everything is quite simple, but it turns out that many manufacturers additionally glue the keyboards. In this case, it will take a little more time and patience to disconnect the component.
The keyboard is attached to the motherboard using a special cable that must be disconnected. This procedure is carried out with the utmost care so as not to damage the wiring.
We unscrew all visible bolts under the keyboard, remove all cables and connectors
Disconnecting cables
Once the keyboard is removed, you need to inspect the surface underneath it. There should be a large number of bolts holding the parts together. The bolts need to be unscrewed. Just like in the beginning, the location of the bolts needs to be remembered. Next, the cables going from the components to the motherboard are disconnected. Removing cables can be quite a labor-intensive process. All cables are disconnected differently. Some need to be pulled sideways, others up. Don't forget about the snap fasteners that need to be bent.
Carefully open the laptop from the side around the perimeter and remove the top cover
Removing the Top Cover
Next comes, perhaps, the most labor-intensive process, which will require remarkable patience from the examiner. It is necessary to detach the top cover and open access to the motherboard. To do this, using a mediator, you need to walk around the entire perimeter of the device and unclip the fasteners. Under no circumstances should you rush. If the lid does not come off after the first time, then you need to repeat the procedure again. This continues until the top cover comes off with a little force.
Unscrew the remaining screws and disconnect the connectors, remove the motherboard
Motherboard
After removing the top cover, the exposed surface is inspected. If there are any screws, they must be removed. The same goes for the back of the laptop. Once the screws are removed, you can begin to disconnect the connectors. Once this procedure is completed, the motherboard can be removed and properly serviced.
Reassembling in reverse order
Once the maintenance is completed, it becomes necessary to assemble the device. The device is assembled in the reverse order in exactly the same way. The screws are screwed into place. Cables, connectors and sockets are connected. The hard drive, drive and RAM are inserted. If no latches were broken during disassembly, the laptop should reassemble without any problems. There should be no gaps.
Lenovo Legion Y540 disassembly
Separately, we will analyze the manipulations with the Y540 gaming model. Since this is a full-fledged gaming machine, it has a number of features that should be taken into account when working. Keep in mind that if you open the lid, you immediately void the warranty and act at your own peril and risk.
Preparing for work
Removing the upper elements
If in ordinary laptops the battery is located on the outside, here it is hidden inside the case and to access it you need to remove the protective and back covers. It is held on by two screws hidden in the depths of the rib. Pull it towards you and put it aside.
Removing the top cover
Next in line is SSD. It is held on by one bolt and latch, and if there are no problems with the first, then the latter is easy to break. Carefully remove the disc, which is installed without a protective cover and is easily exposed to external influences.
Dismantling the bottom
Start unscrewing the bolts around the periphery of the case, not forgetting to remove the metal plate installed to the left of the SSD mounting area. You can install an additional disk in its place if desired. Once unscrewed, use a plastic card or stick to release the latches with extreme care.
Dismantling the bottom
Having completed the process, we begin to work with the power system, presented in the form of a compact battery. It needs to be dealt with first to avoid short circuits and other problems. Nearby, under the protective casing, is the RAM. If you are disassembling a laptop to replace thermal paste, you do not need to remove the dies.
Cooling system
The gaming laptop does not use a classic cooling system, but an improved one. In it, the fans are placed under the matrix and connected by a heat pipe. The entire array is hidden under a plastic cover that needs to be removed. This must be done carefully, armed with a high-quality screwdriver. This is the most important moment in the work. A bad screwdriver can tear off the heads and then unscrewing the bolts will become impossible.
Dismantling the ventilation system
If everything went well, remove the plastic case, which will expose the processor and video card chips.
Rest
It is not necessary to dismantle the remaining elements. Most buyers who service their laptops end up upgrading or replacing thermal paste. But if you decide to move on, then you need to take the following steps:
- Disconnect all cables;
- Remove Wi-Fi modules, etc.;
- Unscrew the cooling system fans;
- Dismantle the bolts of the matrix clockwise, and then remove it itself.
This way you will perform a complete disassembly of your device. The laptop is put back together in the exact sequence. The only exception is when the user decides to make changes by adding additional RAM or a hard drive.
We will buy your used laptop in any condition no older than 2010! Quick estimate by phone, free courier service in Moscow. Money - immediately. Call! Tel.: +7 (903) 729-32-48 or write to us by email: [email protected]
Sell laptop
Service maintenance
Service maintenance
Since the most common reason for disassembling a laptop is its service, it is necessary to understand how it is carried out.
First of all, the disassembled device contains the cooling system. It is necessary to unscrew all the screws holding it above the processor and near the cooler. The screws near the processor are usually labeled with numbers. They need to be unscrewed in accordance with this number. This is designed to prevent uneven load on the processor, which could damage its contacts.
After the screws are unscrewed, you need to remove the cooling system. Next, the cooler itself is removed. If a lot of dust has accumulated in it, it must be removed. This is done using a special brush. If necessary, the cooler is lubricated.
Next is replacing the thermal paste on the processor. The old paste must be removed using a cotton swab soaked in alcohol. The new paste is applied in a very small amount and distributed in an even layer over the surface of the chip. The cooling system is reassembled in reverse order and the service is completed.
Differences in the disassembly process between different manufacturers
Various manufacturers
Laptops from HP, Asus, Acer and Lenovo are disassembled almost identically. The entire procedure remains the same for all models. But some differences are still present. They consist, first of all, in the location of the screws, the type of fastenings and the design of the keyboard. There may also be differences in the location of the device components themselves, such as the cooling system, processor, video card, etc.
As for the materials from which the devices are made, it is usually plastic. It is light, strong and durable. However, HP prefers to produce models with an aluminum body. It is much stronger than plastic, and also heavier.
Tips for subtleties when disassembling a laptop yourself
Tips for disassembly
Disassembling a laptop yourself is a rather complicated process, especially if you have no experience in this matter. There are several basic tips, following which, even the most inexperienced user will understand how to quickly and correctly disassemble a laptop.
It is very important to remember which bolts were in which places. Otherwise, there is a possibility of damaging not only the mounting points themselves, but also ending up with a completely loose device. Such a device will definitely not last long.
One of the most important tips is not to use too much force when disassembling. It’s better to double-check again to see if there is any screw left. Some screws may be hidden behind stickers or special support structures. There's no need to rush. Excessive zeal in applying force will lead to very significant damage. Moreover, such breakdowns not only have aesthetic disadvantages, but can even affect the operation of the device.
Even if the purpose of disassembly is not to clean the cooling fan and replace thermal paste, such procedures will definitely not be superfluous. Thermal paste must be applied to the chips in a very thin layer, which will smooth out possible surface irregularities.
If during the disassembly process any problems arise that cannot be resolved, it is better to contact a service center. And in general, if there is no desire to thoroughly study the structure of the device, it is more advisable to leave the disassembly to qualified specialists.
All basic disassembly articles describe the process associated with the main part of the device, which contains the motherboard and all components. But sometimes it may be necessary to disassemble the upper part. There is a matrix and some other components, depending on the configuration of the device. This part is also not difficult to disassemble. You just need to unscrew all the screws, unclip the fasteners and disconnect the cable. All this may be required if the laptop screen itself has failed. The screws in this part are usually hidden with special plugs.
Important! Any independent disassembly of the device is a risk. In this regard, manufacturers regulate this issue very clearly. If the device is subjected to unauthorized disassembly during the warranty period, the warranty is immediately void. This fact must be taken into account, especially for owners of very expensive devices.
Preparing the necessary tools
Before disassembling the Lenovo G580 laptop, you should prepare the tools and materials necessary for the process. You will need:
- small slotted (phillips) screwdriver (for fine work);
- a tool for opening a laptop (a dental spatula or just an unnecessary plastic card may be suitable);
- a container in which we will put the fastening screws;
- as well as thermal paste (it can be purchased at a computer store or in radio parts departments).
Note: it’s better not to skimp on thermal paste, because it is the main transfer of heat from the processor to the heatsink.