Recently, many laptop manufacturers, in addition to the ability to use troubleshooting tools available in the installed operating systems themselves, have begun to include their own tools that allow you to perform almost similar actions without using system applets or removable media, even in cases where the device does not boot at all. under what pretext? Next, let's look at Lenovo laptops. Restoring the system by resetting all parameters to the factory state can be done precisely by using the tools provided by the manufacturer itself. In addition to the main material, there will be several tips for performing similar operations, but taking into account Windows tools, which every self-respecting user should know about.
Recovery menu Android in Russian: how to enter and exit, decoding
Android recovery menu - what purpose is it intended for and what advantages does it provide? This is a question that is considered relevant for users of this OS. There is a special boot mode here that starts the recovery operation. The article presents the features and advantages of the mode, as well as options for its use.
Android Recovery Menu - decryption
A similar program is a recovery mode for the Android system. The factory version has limited functionality. But you can still perform a reset and subsequent restoration of settings and firmware.
There are certain important items in the program menu. Each of them is responsible for performing its own function:
- Install zip from sdcard. Responsible for installing an archive with previously completed updates onto the phone’s built-in memory card.
- Wipe data/factory reset. With its help, you can completely clean the installed system partition and return them to their original position.
- Wipe cache partition. Used to clear the cache. It should be activated when replacing the smartphone firmware.
- Backup and restore. Responsible for backing up the OS and restoring a special backup.
- Mounts and storage. Ensures the operation of built-in partitions and monitors the correct installation and connection.
- Special additional settings and descriptions responsible for processes such as rebooting, deleting cache and resetting settings.
This Android recovery menu is not presented in Russian, so you need to know its decoding, know what mode and other words mean. Used by competent users or programmers. The selection of items is carried out by scrolling, that is, by turning the volume down or moving the volume up.
How to enter the Recovery menu?
To enter the program, you will need to press a certain key combination. Which buttons need to be pressed depends on the brand of smartphone:
- Samsung - turn on, additionally increase the volume and Home;
- LG - activation and reduction of volume;
- Google Nexus, as well as HTC - turn on the phone, the button is quieter, immediately after that you need to click on Recovery;
- Gadgets Lenovo, Motorola - turn on, increase volume and Home;
- Sony - power, and after the vibration signal you need to press and hold the volume up.
These combination systems are the same for entering the regular menu and the custom one. They can also be used if necessary to activate recovery.
This is typical for a situation where the phone does not boot. If you cannot log in using the standard method, it is advisable to find official instructions and check that the authorization is correct.
Via computer
If operating via a computer, USB cable debugging is required. You need to go to settings, select the line for developers and then click on debugging. If this mode has been deactivated, the presented method cannot be used. Here you need to use ADB Run, a working device and a cable. After this, the user must perform the following actions:
- The device connects to the PC.
- The ADB Run program starts.
- In the menu you need to press item 4, then 3.
If everything is done correctly, the special device will automatically reboot. This will open up the ability to carry out the required processes.
If you have any questions, please let us know
Ask a Question
Removing the “battery” on the motherboard
This is the easiest way to “hard reset” the BIOS. Most laptops will allow you to reset the settings by removing the battery highlighted in the picture below.
By removing the battery, you turn off the power to the BIOS and, accordingly, reset all settings and the password itself. The board should be de-energized for 5 to 40 minutes, it all depends on the model. Sometimes this may not work.
The battery is always in a visible place and located closer to the edge of the motherboard and nothing prevents its removal.
- remove the lid
- completely disconnect the device, remove the laptop battery
- find the battery
- carefully remove it
- wait up to 40 minutes for this to work
- put the battery back in place
- turn on the laptop
- configure the BIOS in a new way, set the date, time and other parameters
Currently, there are non-removable batteries. This option is not suitable for them. Therefore, you can use the following method.
How to exit the recovery menu?
If a situation arises when the user has completed the necessary manipulations using the program and cannot exit, he needs to follow the following instructions:
- Go to the Reboot menu;
- The system tab is selected.
If after this you cannot exit, and the smartphone running on Android does not go into normal operating mode, but returns to the standard menu, you should press and hold the power button for a while. The optimal time here is 10 seconds, then everything starts working.
After this, you need to remove the battery and put it back in after the gadget is completely discharged. The Android device is connected to the PC, to software called ADB RUN. You need to find the Manual Command button in the menu. Click on the adb reboot normal command, but you should know that it does not work everywhere.
What to do if the Recovery menu does not open?
On certain devices there is no custom rollback menu in Russian. Accordingly, you won’t be able to get into the software if nothing opens. In this situation, you need to install it. When the No Command notification appears, you can judge that there are problems with startup and login. To fix the problem, you need to quickly press activation and volume up.
If the gadget refuses to boot in this mode, the cause may be a software error. It can only be eliminated by installing a custom Recovery. When this does not help, the user will only have to call the feedback form or contact the service center. There is a possibility that the device is damaged, and settings can be made using software methods.
Windows 10 has crashed, how can I restore it on a laptop or PC?
If there is no access to the system, you will have to carry out all manipulations at the level of the BIOS and Live CD drives. Since it is impossible to restore Windows 10 on a Lenovo laptop and other devices without a special disk, it is worth finding the installation distribution in advance. It can be a disk with a licensed system or a mounted flash drive. To create a suitable drive you need an OS image and an application like UltraISO. Proceeding further, we assume that the disk or flash drive is already ready.
How to restore Windows 10 on an Acer laptop:
Unfortunately, it is not possible to restore Windows 10 through BIOS without a disk or USB drive. In previous versions of the OS, a similar function was built-in, but it is missing in the top ten. A disk or flash drive is required.
How to put your Android device into Recovery mode
Android users are familiar with the concept of recovery - a special mode of device operation, like BIOS or UEFI on desktop computers. Like the latter, recovery allows you to carry out non-system manipulations with the device: reflash, reset data, make backup copies, etc. However, not everyone knows how to enter recovery mode on their device. Today we will try to fill this gap.
Method 1 Using Onekey Recovery to restore Lenovo laptop
The first thing you need to do is find the recovery button on your Lenovo ThinkPad/IdeaPad/YOGA laptop. In most cases, you can find it on the right/left side of the laptop or at the top of the keyboard, next to the power button. If you find the restore button, proceed to the step-by-step instructions to restore your Lenovo laptop.
- Turn off your Lenovo laptop. If you can't disconnect it normally, you can remove it from the battery and then connect it again.
- Connect the power supply to your Lenovo laptop, press the NOVO key (recovery key) for 5 seconds.
- When the New-button menu pops up, press the down (↓) arrows to select the “System Restore” option and press the “Enter” key to enter the recovery environment.
- On system onekey recovery mode, select "restore from original backup" and then click on the next button.
- Click on "Start", and click "Yes" when prompted by the PUP message to begin the recovery process.
- Wait until the system restore process completes, and then follow the on-screen instructions to configure your Lenovo laptop's Windows settings.
If there is no Onekey recovery button on your Lenovo laptop, or you have a system clean installed on your laptop and the system drive has been cleaned, and the recovery file has been deleted or destroyed, this method will not work for you.
How to enter recovery mode
There are 3 main methods to enter this mode: key combination, loading using ADB and third-party applications. Let's look at them in order.
Some devices (for example, Sony 2012 model series) do not have stock recovery!
Method 1: Keyboard shortcuts
The easiest way. To use it, do the following.
- Turn off your device.
- Further actions depend on which manufacturer of your device. For most devices (for example, LG, Xiaomi, Asus, Pixel/Nexus and Chinese B-brands), simultaneously pressing one of the volume buttons along with the power button will work. Let us also mention special non-standard cases.
- Samsung. Press and hold the Home+Volume Up+Power buttons and release when recovery starts.
- Sony. Turn on the device. When the Sony logo lights up (for some models, when the notification indicator lights up), press “Volume Down”. If it doesn’t work – “Volume Up”. On the newest models, you need to click on the logo. Also try turning it on, holding down “Power”, releasing it after vibrations and frequently pressing the “Volume Up” button.
- Lenovo and the latest Motorola. Press “Volume Plus” + “Volume Minus” and “Power On” at the same time.
- In recovery, control is done using the volume buttons to navigate through menu items and the power button to confirm.
If none of the above combinations work, try the following methods.
Method 2: ADB
Android Debug Bridge is a multifunctional tool that will help us put the phone into Recovery mode.
- Download ADB. Unpack the archive to the path C:adb.
Launch Command Prompt - the method depends on your version of Windows. When it opens, enter the command cd c:adb .
adb reboot recovery
After it, the phone (tablet) will automatically reboot and begin loading into recovery mode. If this does not happen, try entering the following commands sequentially:
adb shell reboot recovery
If it still doesn't work, the following:
adb reboot —bnr_recovery
This option is quite cumbersome, but gives an almost guaranteed positive result.
Method 3: Terminal Emulator (Root only)
You can put the device into recovery mode using the built-in Android command line, which can be accessed by installing an emulator application. Unfortunately, only owners of rooted phones or tablets can use this method.
- Launch the application. When the window loads, enter the su command.
Then the reboot recovery command.
After some time, your device will reboot into recovery mode.
Fast, efficient and does not require a computer or turning off the device.
Method 4: Quick Reboot Pro (Root only)
A faster and more convenient alternative to entering a command in the terminal is an application with the same functionality - for example, Quick Reboot Pro. Like the option with terminal commands, this will only work on devices with installed root rights.
- Launch the program. After reading the user agreement, click Next.
In the application's working window, click on "Recovery Mode".
Confirm your choice by clicking “Yes”.
Also give the app permission to use root access.
The device will reboot into recovery mode.
This is also a simple method, but the application contains advertising. In addition to Quick Reboot Pro, there are similar alternatives in the Play Store.
The methods described above for entering recovery mode are the most common. Due to the policies of Google, owners and distributors of Android, access to recovery mode without root rights is possible only in the first two ways described above.
Thank the author and share the article on social networks.
Restoring the system via the command line while the computer is on.
If you do not want to restart your computer, you can restore the system via the command line from Windows. To do this, you will need to insert the disc into the DVD-ROM while the PC is loaded. Then launch the command line by pressing the hotkey combination “Win + R” and in the search bar of the “Run” window, enter “sfc /scannow” and click “OK”. After which the broken system distributions will be copied from the boot disk automatically. System recovery and rollback are quite quick and trouble-free.
Reset Hard Reset on Lenovo
Surely you will agree that a Lenovo phone is one of the best options for mobile gadgets. It works on Android and is quite reliable, and it’s quite inexpensive. Nevertheless, no matter which Lenovo model you choose, sooner or later there will be failures in the operation of the initially made installations. This is quite logical, since any technique is not ideal. This can happen due to an ill-considered installation of third-party software, or simply if you have not updated it for a long time. In such a situation, the question arises: how to reset settings on Lenovo? Don't worry, everything is quite possible to do! Resetting to factory settings on a phone is no more difficult than on a computer.
What do we do if there is a need to reset all settings on a computer or laptop? If a tough and decisive measure is needed, then we reinstall the operating system by going into Bios. This is a safe but radical method - reinstalling the OS via BIOS leads to the loss of all data. You could try to do this on Lenovo if you have a laptop manufactured by this company. For example, lenovo g50, lenovo a2020, lenovo g580, lenovo b590, b50, g50-45, S 40-40, etc.
Restoring factory settings on a Lenovo phone or tablet is also called Hard Reset. With its help, you can completely reset all parameters, but remember that the stored information will be deleted and will not come back.
Reset details
Resetting the settings to factory settings is not difficult at all. But a user who encounters this for the first time will need to specify the “path” and answer questions.
Why is it necessary to reset the BIOS on a laptop:
- You need to reset your password-protected BIOS because you have lost access to it. But this is only necessary if you will access the BIOS settings often
- Incorrect “overclocking” of the processor, while the highest, critical values for the bus frequency or memory timing are set. In general, overclocking the processor on laptops is not recommended.
- The system cannot boot, but the BIOS is available
- Various changes were made to the BIOS by an inexperienced user, which led to system malfunction
When to do a Hard Reset on Lenovo
The need to return all factory settings of the phone arises in the following cases:
- The device started to work slowly.
- When loading certain applications (or any), the system freezes seriously.
- The phone is infected with a virus.
There are two main ways to reset Lenovo. The first of them involves working in the phone menu, and the second involves using physical buttons. We will talk in more detail about how to do a hard reset using each of them.
How can I reset the BIOS. Options.
For PCs and laptops, there are several main options for resetting the BIOS to factory settings:
- Using the BIOS interface itself, if available
- Using additional software, most often applicable for 32-bit OS
- Mechanically
Other methods for resetting a PC to factory settings can be found in its documentation, if it is preserved. You can also find instructions for certain device models on the Internet or on the manufacturer’s website.
Factory reset via menu
A complete reset via the phone menu is possible as follows:
- Go to the “Settings” section.
- We find the item “Restore and reset”.
- Click on “Reset”.
Before performing a factory reset, the BIOS will ask you if you are sure of your actions. After all, if the system did not do this, it would be possible to reset all Lenovo settings by mistake. If you reset Lenovo consciously, then confirm your actions, and after a few minutes the smartphone will reboot, after which the presets will be reset automatically.
The first time the smartphone turns on takes a long time, but don’t worry - this is how it should be. When it turns on, indicate your wishes regarding the basic parameters of the device’s operation and check whether the newly configured gadget works correctly.
How to restore a laptop through BIOS using DOS?
It is worth understanding that DOS is a relatively small OS, which is most often stored on a regular disk or flash drive. After startup, this system gains full access to managing all hard drives and access to the BIOS menu. Using a DOS system allows you to revive the operating system with minimal losses. Thanks to the possibility of low-level control, it is possible to make the necessary settings and correct surgical punctures with pinpoint accuracy.
Common recovery methods:
1. Initially, you can use a disk image or flash drive as an assistant. You must act in the following sequence:
When the laptop reboots, just select “System Restore” and proceed to recovery.
2. “Almighty” command line. Sometimes, this method is rightfully considered a real salvation. The command line allows you to correct basic errors in the operation of the hard drive so that the system comes to life. We reboot the laptop and press the BIOS entry button several times, after which we perform the following steps:
Reset to factory settings via buttons
Now we reset Lenovo to factory settings in a different way. We will use physical buttons. This method of returning to the original system data is especially relevant if the BIOS is infected with a virus and you cannot even turn on the gadget. This reset Lenovo is done as follows:
- Press and hold the volume button and the power button at the same time. We hold them for about 10 seconds.
- After this time, you will see the Android logo on the screen. This means that the buttons can be released.
- After a while, Recovery will open, and using the volume down and up buttons, select the item we need - Wipe Data. This will allow you to do a Hard Reset of all settings.
- The BIOS will again ask if you are sure that all data has been deleted. We agree, pressing the volume up button and restoring the system.
- After rebooting and setting the settings, the phone works like new.
Resetting BIOS using the DEBUG program
You can change BIOS settings or reset it using a special add-on for Windows OS. Most often, it is built into x32 systems and must be launched “as an administrator”.
- Open the Run program Win + R
- Enter “debug.exe”
- Now enter “o702E”, “o71FF” and “q” one after the other
- Confirm your entry with the “Enter” button
After this action, all BIOS settings will be reset. And after the system reboots, the user will receive a notification that it is necessary to check the BIOS settings. Next, you will need to configure the BIOS yourself, or leave it as it is.
The disadvantage of this software is the inability to run on x64 Windows OS. This means that most modern computers will need to be “zeroed” using other methods.
How to roll back settings on a Lenovo tablet?
You already know how to return the system to its original state on Lenovo phones. But what if you want to reset the software of your Lenovo 30 or 7600 tablet? This task is easy to complete! All you have to do is do the same as with a smartphone. The tablet settings also have a factory reset function, and as you know, the volume and power buttons on these gadgets are similar. The only difference is the location - the power button is usually on top, not on the side.
Thus, you can reset the system on any Lenovo mobile device, and you will not be afraid of any software failures.
Using Windows Operating System Tools
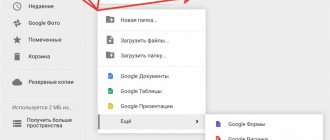
If we are talking about Lenovo laptops and restoring the Windows 10 system, you can also use the tools of the OS itself.
For a complete reset, use the update and recovery section in the options menu, where there is a corresponding item.
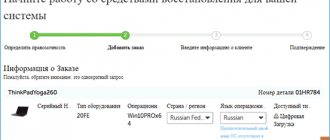
Today we will talk about restoring laptops of the legendary ThinkPad series from Lenovo to factory condition. The procedure for returning a laptop to factory settings from the recovery partition described in this article applies exclusively to mobile computers of this series, since Lenovo laptops of the series >
Before proceeding with the description of the recovery procedure, I, as always, want to warn readers about the need to first read the article “How to return a laptop to factory condition: introduction”, since it contains information about the necessary preparations that must be made before starting the recovery procedure.
So, in order to start the factory reset procedure, when you turn on the computer, you need to press the F11 key. After a while, a window should appear on the display asking you to select a system recovery language. Select the value we need and click “Next”.
The next step is to select a user on whose behalf the Lenovo laptop recovery process will be launched. If the selected account is protected by a password, enter it in the appropriate field and click OK.
The application that restores the state of ThinkPad series laptops is located at the very bottom of the menu of available recovery tools. Click Lenovo Factory Recovery. This will directly launch the application you are looking for.
The first thing to do in the recovery utility interface is to select a language. In the specific case under consideration, support for the Russian language is not provided. Maybe you will be luckier and the application will be Russified, but I will have to be content with English.
Having selected the language, click Next.
On the next screen, we agree with everything and click Next again.
Next, a sign will appear informing you that if we click Yes, all data will be destroyed and the system will be restored. Since this is exactly what we are trying to achieve, click Yes.
From this point on, your Lenovo ThinkPad will begin to recover to its original state. This process will take some time.
At the end of the procedure, we will be informed that the system has been restored and will be asked if we want to restart the computer. Click Yes.
Immediately after the reboot, preparations for the first launch of the operating system will begin. We wait.
After some time, we will be asked to select the operating system language. This means that we have achieved our goal. The Lenovo ThinkPad laptop has been restored to factory condition from the recovery partition.
If my article was useful to you, please recommend it to your friends using the social network buttons or simply sharing the link.
You can send your questions for the “Free Help” section to the following address: In the subject line, write “Free Help”.
When reprinting materials, an active link to the website cherev.ru is required.
Thank you very much for the detailed instructions! Everything is clear and understandable, simpler and unnecessary.
Valery, that’s good. I did my best )
hello, tell me what to do? During step 7, I get the message “Cannot find the backup files“
Pavel, are you by any chance trying to restore something other than from a previously saved copy? The procedure is a little different
I don't know! I did everything as you described earlier. when loading f11 and everything is as you said! where can I watch this procedure? thank you in advance .
Pavel, it would be better for you to call support.
Initial data: thinkPad x230 with a classic HDD, I want to install an mSATA SSD. After this, I would like to reinstall Windows (7pro, x64, English) on the SSD.
Please tell me, when restoring to factory settings, Windows will ask during installation which media to install on, or is it easier to immediately install third-party Windows and then enter the key from mine?
Sergey, it’s easier to make an image of your disk, transfer it to an SSD and enjoy life
Thank you! Your advice helped a good person. I wish you good health for the benefit of people. That’s what you are doing!
Vladimir, thank you for your kind words too
Thank you very much for the information. The Lenovo g 780 laptop had a virus that completely blocked the system. Nothing helped restore the OS. Automatic recovery was powerless, the last successful configuration too. The blue “screen of death” with a sad smiley face from Windows 8 stubbornly hung on the monitor. And only the above-described resuscitation option helped in solving this unpleasant problem. I would like to note that all the information on disk D was untouched, which was very pleasant, since there were personal photographs and much more. Many thanks to you.
Julia, I'm glad everything worked out
What should you do if the laptop screen does not light up, but there is a sound when turning on Skype sound?
how to restore understood thank you
Hello! such a question: yesterday I reset the Lenovo S10-3t completely to factory settings using the One Key Recovery function to sell the netbook. At first glance, all personal data was deleted, which is what I wanted. Tell me, they may be located somewhere in the system folders or be restored in some way; I did not make a backup copy to the hard drive. Thank you!
Sergey, it depends on the operating system. Windows 8 has two modes: fast with simple cleaning and long with complete removal. If you restored in an earlier operating system or in Windows 8 in fast mode, it makes sense to install an application to securely delete files and check the system for their presence. If there are any left, then delete them without the possibility of recovery. I wrote about how this is done in the article “How to delete files beyond recovery”: https://cherev.ru/kak-udalit-fajly-bez-vozmozhnosti-vosstanovleniya/
Good day, I have a question, what should I do if when I press the f11 key it does not display this window, but offers recovery and a normal boot, during recovery the screen starts blinking, and during normal reboot it reboots and freezes with the Leonov logo, Leonov G500 laptop Windows 7 professional
Nikolay, this is an article about restoring laptops from the ThinkPad series. You need instructions for >https://cherev.ru/kak-vernut-noutbuk-k-zavodskomu-sostoyaniyu-lenovo-ideapad/
Hello. The system recovery partition was deleted. Where can I download an image of a partition or the entire HDD for Lenovo S10-3s. I've looked all over and can't find it anywhere. It could be created by Acronis or something else. Could you tell? I would be VERY APPRECIATE. Thank you in advance for your answer (by email)! Regards, Oleg.
Peter, thank you! Please advise how to correctly split drive C into two partitions - 50 gigs for the system (laptop E325, system 7 home) and about 230 for the rest... The compression program allocates only about 40 gigs for the new partition (after defragmentation and transfer of pagefile.sys) , I want more. Well, the system barely moves - a friend said that it was necessary to immediately prohibit all 7 updates. Therefore, I’ll go back to “out of the box”... Then I’ll try the partition manager...
Oleg, you can try contacting support.
Serge, you can do this. But I try to leave at least 100 gigs for the system. Nowadays a lot of software is crawling onto the C drive without demand.
Hello, on the Lenovo L412 laptop, after switching to Windows 10, the Internet stopped working after a while. When you try to restore factory Windows 7 through the procedure you described, the very first step is not performed - interrupting the standard boot process via F11. Please advise what needs to be done. Thank you
Vladimir, maybe it’s easier to just remove Windows 10 and work in the previous system? Check out this article: https://cherev.ru/kak-vernutsya-s-windows-10-k-predydushhej-operacionnoj-sisteme/
Thank you, but unfortunately, I switched to Windows 10 more than a month ago.
Vladimir, to be sure, it’s better to call support.
Thank you very much, I restored it easily with the help of your instructions.
Thank you, reinstalling Windows could not be easier
Hello! The Lenovo website describes a different factory reset procedure. It uses Recovery Disc Set, which you first need to create yourself. Tell me, what is the difference between the procedures described by you and Lenovo? Thank you.
Julia T, I described a method for restoring to the factory state, and you create a copy with your configured system, with some data and installed applications. Of course, this is a better option.
It’s just that my article is intended for people for whom everything no longer works and no copies have been made.
Thank you very much! Lenovo gives such vague information regarding various recovery options!
Julia T, you're welcome
Here, for example, is what they write in the instruction manual:
In Windows 7 and Windows Vista, the recovery tool can only be used to return the computer to its original factory settings. The recovery tool can be used to return the computer to a working state (as I understand it, this means my personal system - with all my applications and files) only after all other recovery methods have failed. (English: On the Windows 7 operating system and the Windows Vista operating system, you can use recovery media to restore the computer to the factory default settings only. You can use recovery media to put the computer in an operational state after all other methods of recovery have failed.)
Where is the logic? Or am I misunderstanding the phrase “operational state”?
And why should I even create recovery disks if they can still only return to the initial factory settings? After all, everything is in the computer itself? Please comment, there is something I can’t figure out without outside help. Thank you.
“You can use recovery media to put the computer in an operational state after all other methods of recovery have failed” - based on this phrase, we can conclude that this utility copies the partition and recovery environment to the disk so that you can restore the system if other methods don't help. For example, if you reinstalled Windows or simply crashed system files.
Thank you very much! In the absence of normal operation of the OS, nevertheless, I was able to access the recovery utility. But no text was displayed on her screens. Thanks to this detailed article, I was able to go through all the steps of the wizard and press the right buttons. Many thanks to the author!
fpmip, good luck
Good afternoon Thanks for the instructions. Please tell me what to do if the user password is lost. Data loss is not important.
Alexey, as a matter of principle, I do not provide advice on password hacking issues. Hope for understanding.
Thanks for the answer, everything is clear. I took the computer to the service center. I wanted to do it myself because of the speed and the presence of unprotected confidential data.
Good afternoon Peter, I encountered a problem: I boot from the recovery DVD, which I made when I bought the laptop, after confirming that all information will be destroyed, the recovery program freezes at the preparing hdd stage. Then nothing happens for a long time, just a reboot. Repeated attempts do not help. HDD partitions are destroyed. ThinkPad Edge 14 laptop.
Artem, you should call Lenovo support. This is an emergency situation.
Thank you for the article. I'm going to return the laptop to factory settings (ThinkPad X201I). The model is old. The sticker with the OS key is worn out. Will I need an OS key when performing a factory reset? How long does the recovery procedure take?
Boris, usually you don’t need to enter anything. All this is done automatically. It is impossible to say exactly the time, because it depends on the chosen recovery method and the power of the laptop.
- 618
- Author: admin
- Date: 1-11-2015
Lenovo A760
Lenovo A760 is a budget smartphone with very impressive specifications. The phone is equipped with a 4-core Qualcomm Snapdragon MSM8225Q processor, each of the cores operating at a frequency of 1.2 GHz, 1 GB of RAM and 4 GB of internal memory. If necessary, the smartphone can be equipped with a MicroSD memory card with a capacity of up to 32 GB, and a 2000 mAh battery.
Login to recovery for Lenovo a760
To enter recovery, do the following:
Then simultaneously hold down the “Power”, “Volume +” and “Volume -” buttons.
When the Lenovo logo appears on the screen and then the screen goes dark, release the buttons
Wait for the recovery to load.
Navigation using the “Volume +” and “Volume -” buttons, confirmation “Power”
Factory reset (wipe)
Resetting to factory settings is carried out through recovery.
Enter recovery
Select wipe data/factory reset
In the next menu - Yes - delete all user data
The phone will reset the phone and the first menu will be displayed. Now select reboot system now to reboot.
Reset to factory settings (Method No. 2)
Resetting your Lenovo A760 smartphone is as follows:
Press and hold the "Volume -" button and the "Power" button
After the backlight turns on, release the buttons
After a while a menu will appear
Use the volume buttons to select “5. Erase Userdata" and confirm the selection with the "Power on" button
In the next menu, click "Power" again
After formatting, select “8. Reboot". The smartphone will reboot with default settings
Comments
no comments
If some advice helped you or, on the contrary, did not help you, then do not be lazy - register and vote. By doing this you will help other users and us. Well, or just click on the advertisement, this will also make us happy and in this way you can thank us. Also, only registered users can leave comments and make changes to the database. By registering, you can add new devices or add notes to existing ones.
You can register or login on this page
Cleaning jumper - switching
This method of switching a jumper is possible if there is a special jumper on the motherboard, which is responsible for resetting the BIOS settings.
In order to find it, you need to “climb” under the lid of the laptop and gain access to the motherboard. Most often, such a switch is located directly next to the battery, and the jumper is labeled with one of the following names: CLRTC, CLR and CCMOS.
Most often, the Jumper pad consists of three contacts. To reset the BIOS you need to move this jumper one step, that is, from a certain position to the next, and vice versa.
After the jumper is switched, you should press the power button of the laptop for more than 10 seconds.
The laptop, of course, will not be turned on, but the signal will be transmitted to the jumper. After this, return the jumper to the position in which it was and proceed to turn on the laptop and configure the reset BIOS.
The hardware method of resetting BIOS settings will almost 100% ensure their reset, but if the laptop is still under warranty, this action will lead to loss of warranty, so it is best to use the hardware method after the warranty period has expired.
The provided methods for resetting BIOS settings will help you deal with this problem without specialists. Most often, solving this problem should take no more than a couple of minutes.
But if none of the methods help, contact a service that specializes in this area. The device can be protected using some kind of additional chip.
Source
How to log into Recovery
Disconnect the charger or USB cable from your device!
1. The most common method.
- Turn off your smartphone.
- Hold down the center button (home) .
This method is suitable for many modern Samsung smartphones and tablets.
2. Center key + volume down + power on .
3. Volume up + power .
4. Volume down + power (suitable for most HTC).
5. Center key + power .
↑ Samsung
Samsung will allow you to log in by pressing the following keys simultaneously:
- button to turn the device on and off
- increase in sound.
For smartphones of previous versions:
- button to turn the device on and off;
- increase in sound.
For Samsung tablets, just press the combination of the volume control “up” and the on/off button.
Rare ways to log into Recovery
Some manufacturers have clever ways to enter the recovery menu.
So, for Lenovo, to enter Recovery you need:
- Uncheck Fast boot the next time you turn on .
- Turn off your smartphone.
- the Power , Volume+ and Volume- buttons .
- When the logo appears, release the Power and continue to hold both Volume keys.
- After the robot appears, release all keys and briefly press the Power .
To call the Recovery menu on Sony :
- Turn off your device.
- Turn on.
- When the logo appears or the power indicator turns on, hold down either Volume+ or Volume-, or tap on the logo on the display.
To enter Recovery on Fly , you sometimes have to go through a whole ritual:
- Hold Volume+ and Power .
- When the Fly logo appears, release the Power button.
- After the green robot appears, release the Volume + key.
- Briefly press the Power button.
Keep in mind! The recovery menu may be missing. Naturally, in this case it is impossible to enter it.
↑ OnePlus
- First method
- food together with sound reduction;
wait for the inscription “Powered by Android”;
- language selection in English;
- entrance to the recovery module.
- Second method:
- power button together with volume up;
- The Fastboot system will appear;
- a selection is made in the recovery system menu;
- install "English".
How to enter Recovery from Chinese models of gadgets Smartphones from Chinese manufacturers that are powered by an MTK processor have a common algorithm for entering Recovery:
- sound increases together with power;
- A menu will appear
- Enter “Recovery” using the volume button;
- Agree to enter the program using “volume down”.