How to reset settings on Android to factory settings on Lenovo is a question that periodically affects users. If your Lenovo device is slow, won't start, or has limited functionality, there are problems with the software. This can be easily resolved by yourself by resetting the system. You can reset the settings on Android to factory settings on Lenovo both on a running and off device.
Lenovo smartphones are capable of freezing and losing performance, which is typical for any technology. Users are often bothered by problems that cannot be resolved by rebooting the device. If your smartphone or tablet displays the Android logo and an exclamation mark when booting up, repair is required.
Before resetting, if you have access to the phone memory, you need to save important files, contacts, and synchronize accounts. After finishing cleaning a device that does not turn on, the user can return the information using special applications. This requires a connection to a computer with Internet access.
How to reset Bios to factory settings on a laptop
Good afternoon.
Many problems on a laptop can be solved if you reset the BIOS settings to factory settings (sometimes they are also called optimal or safe).
In general, this is done quite easily, it will be more difficult if you set a password on the BIOS and when you turn on the laptop it will ask for this same password. Here you can’t do without disassembling the laptop...
In this article I wanted to look at both options.
1. Reset laptop BIOS settings to factory settings
To enter the BIOS settings, you usually use the F2 or Delete keys (sometimes the F10 key). It depends on the model of your laptop.
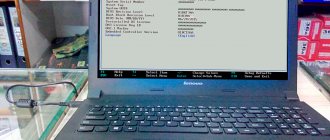
Finding out which button to press is quite easy: restart the laptop (or turn it on) and look at the first welcome window (it always indicates the button to enter the Bios settings). You can also use the documentation that came with the laptop upon purchase.
And so, we will assume that you have entered the Bios settings. Next we are interested in the Exit tab. By the way, in laptops of different brands (ASUS, ACER, HP, SAMSUNG, LENOVO) the names of the Bios sections are almost the same, so there is no point in taking screenshots for each model...
Setting up BIOS on an ACER Packard Bell laptop.
Next, in the Exit section, select a line like “Load Setup Defaults” (i.e. loading default settings (or default settings)). You will then need to confirm in a pop-up window that you want to reset your settings.
And all that remains is to exit the BIOS while saving the settings made: select Exit Saving Changes (first line, see screenshot below).
Load Setup Defaults - loads default settings. ACER Packard Bell.
By the way, in 99% of cases with the settings reset, the laptop will boot normally. But sometimes a small error occurs and the laptop cannot find where to boot from (i.e. from what device: flash drive, HDD, etc.).
To fix it, go to BIOS again and go to the Boot section.
Here you need to change the Boot Mode tab: change UEFI to Legacy, then exit the BIOS saving the settings. After rebooting, the laptop should boot normally from the hard drive.
Changing the Boot Mode function.
2. How to reset BIOS settings if it requires a password?
Now let's imagine a more serious situation: it so happened that you set a password for the Bios, and now you have forgotten it (or your sister, brother, friend has set a password and is calling you for help...).
Turn on your laptop (in the example, an ACER laptop) and see the following.
ACER. The BIOS asks you to enter a password to use the laptop.
To all brute force attempts, the laptop responds with an error and after several incorrect passwords are entered, it simply turns off...
In this case, you cannot do without removing the back cover of the laptop.
You only need to do three things:
- disconnect the laptop from all devices and generally remove all cords that are connected to it (headphones, power cord, mouse, etc.);
- remove the battery;
- remove the cover protecting the RAM and hard drive of the laptop (the design of all laptops is different, sometimes you may need to remove the back cover completely).
Overturned laptop on the table. You need to remove: the battery, the HDD and RAM cover.
Next, remove the battery, hard drive and RAM. The laptop should look something like the picture below.
Laptop without battery, hard drive and RAM.
There are two contacts under the RAM strips (they are also signed JCMOS) - these are what we need. Now do the following:
- close these contacts with a screwdriver (and do not open them until you turn off the laptop. This requires patience and accuracy);
- connect the power cord to the laptop;
- turn on the laptop and wait about a second. 20-30;
- turn off the laptop.
Now you can connect the RAM, hard drive and battery.
Contacts that need to be closed to reset the BIOS settings. Usually these contacts are labeled with the word CMOS.
Next, you can easily enter the laptop’s BIOS via the F2 key when turning it on (the BIOS was reset to factory settings).
ACER laptop bios has been reset.
We need to say a few words about the “pitfalls”:
- not all laptops will have two contacts, some will have three, and to reset you need to move the jumper from one position to another and wait a few minutes;
- instead of jumpers there may be a zero button: just press it with a pencil or pen and wait a few seconds;
- You can also reset the Bios if you remove the battery from the laptop motherboard for a while (the battery looks like a small tablet).
That's all for today. Don't forget your passwords!
Source
When will we need a Hard reset?
Sometimes restoring settings on your tablet is simply necessary. For example, if you decide to sell it or donate it for free. No one.
IMPORTANT
! In order to clear the memory of the card without the possibility of restoring deleted files, you need to use special technical utilities.
In another case, you will need to “restore” the tablet to “treat it from any “garbage” that accumulates in the Android system (or any other) over the years of use and is the cause of slowdowns or freezing.
In the third case, but not exclusively, the settings will have to be restored if the graphic key “falls out” from its own memory. True, for this option it would be an extreme way out of the situation.
Things to remember before resetting your settings
IMPORTANT
! Please read this section of the article carefully before taking the first (irreparable) steps towards recovery.
- Save all the necessary files (photos, audio, video library, etc.) to your PC. Or create an important backup copy in some alternative (available) way;
- Save application data. (For this, the “Smart Switch” or “Android File Transfer” program is suitable, which will create the necessary backup copies of the tablet using a PC on Windows (for Android 4.3+, iOS 4.2.1+) or Mac (for Android 4.3+, iOS 4.2. 1+));
- Since some device models are not equipped with low-battery reset protection - . If it completely sits down during the recovery procedure, this will lead to dangerous consequences;
- If your device has Android OS 5.1 or higher, you need to do this before starting the process. (The next time you turn it on, the request for the previous account is activated). Unlocking the device without a password is only possible in the service (upon presentation of documents).
It’s important to know how to prevent such problems from occurring.
If you want to be prepared for such problems and get out of a difficult situation without losses, we advise you to do the following things:
- Enable data synchronization in all accounts you trust: first of all, Google. Activate backup photo uploads to Google+ or Facebook. By default, photos are saved in hidden albums that are accessible only to you. If something goes wrong with your device, you can restore all your data after restoring it (or buying a new one).
- Make backup copies of applications regularly, preferably to a memory card or even to cloud storage. We recommend the Titanium Backup application, which can save not only the applications themselves, but also their settings and data, and also send copies of them to the Dropbox server. Moreover, we advise you to buy a licensed copy of this application: in case of problems, it will pay for itself.
- Don't clog up your tablet's memory. Try to install only the applications and games you need most, and if possible, install them on a memory card. When choosing a card, pay attention to at least class 10, and preferably UHS-I. Only such cards will provide you with decent operating speed. We categorically do not recommend saving on small things and buying class 4 cards.
- Protect the device from physical damage. The advice is no longer new, but never superfluous.
Reset details
Resetting the settings to factory settings is not difficult at all. But a user who encounters this for the first time will need to specify the “path” and answer questions.
Why is it necessary to reset the BIOS on a laptop:
- You need to reset your password-protected BIOS because you have lost access to it. But this is only necessary if you will access the BIOS settings often
- Incorrect “overclocking” of the processor, while the highest, critical values for the bus frequency or memory timing are set. In general, overclocking the processor on laptops is not recommended.
- The system cannot boot, but the BIOS is available
- Various changes were made to the BIOS by an inexperienced user, which led to system malfunction
How can I reset the BIOS. Options.
For PCs and laptops, there are several main options for resetting the BIOS to factory settings:
- Using the BIOS interface itself, if available
- Using additional software, most often applicable for 32-bit OS
- Mechanically
Other methods for resetting a PC to factory settings can be found in its documentation, if it is preserved. You can also find instructions for certain device models on the Internet or on the manufacturer’s website.
Why did the device suddenly start to work poorly?
There may be several reasons for this. The most common is a virus. The fact is that a fair amount of viruses are written under the Android OS. Moreover, mobile antiviruses are completely unable to detect and eliminate them. If any malware gets into the system, it will begin to glitch and slow down. Another common reason is a cluttered system disk. When too many files accumulate there and there is catastrophically little free space left, the OS may also behave inappropriately. In any of these cases, resetting “Android” can help, since it also implemented this feature in its devices. Now let's look at all the reset methods.
To factory settings via BIOS
Resetting BIOS settings can be done through the working BIOS itself, using a special utility already built into it. To do this, you need to go to the interface. The transition to the BIOS interface can be done using the following buttons: Delete, F2, F10, F1, Esc. Most often, this button is indicated when the system starts. The picture shows an example.
Once you are in the BIOS menu, you need to find the special “Exit” menu and select the “Load setup Defaults” item. Confirm the reset using the “Y” button, so the factory settings will be applied. After confirming the action with the F10 key, all changes will be saved.
Some laptop models have a different name for the reset option. For example, Sony has “optimized defaults”, that is, using this item you can reset the BIOS settings.
In Toshiba, Samsung and HP, this item is located under the F9 key and is called “Setup Defaults”.
For older models, these items are most likely: Use Default Settings or Set BIOS Default.
Most often, resetting the settings will cause your PC or laptop to boot normally.
But if an error occurs during the BIOS reset process, for example, at the system media selection point, you will need to go to the BIOS again and go to special settings:
- Go to BIOS
- Find the Boot section
- In the Boot Mode tab, change the UEFI item to Legacy
- Save settings and reboot system
This method has a chance of not working, for example, if a password is set on the BIOS, or it is inaccessible for some other reason.
Force reboot LENOVO A10-70 A7600F
How to reset factory settings on LENOVO A10-70 A7600F? How to erase all data on LENOVO A10-70 A7600F? How to bypass screen lock on LENOVO A10-70 A7600F? How to restore default settings on LENOVO A10-70 A7600F?
The current tutorial shows all the methods to master reset LENOVO A10-70 A7600F. Learn how to perform a Hard Reset using hardware buttons and Android 4.2 Jelly Bean settings. As a result, your LENOVO A10-70 A7600F will be as good as new and your Tek MT8121 processor will run faster.
Resetting BIOS using the DEBUG program
You can change BIOS settings or reset it using a special add-on for Windows OS. Most often, it is built into x32 systems and must be launched “as an administrator”.
- Open the Run program Win + R
- Enter “debug.exe”
- Now enter “o702E”, “o71FF” and “q” one after the other
- Confirm your entry with the “Enter” button
After this action, all BIOS settings will be reset. And after the system reboots, the user will receive a notification that it is necessary to check the BIOS settings. Next, you will need to configure the BIOS yourself, or leave it as it is.
The disadvantage of this software is the inability to run on x64 Windows OS. This means that most modern computers will need to be “zeroed” using other methods.
Reset BIOS with button
Laptops released 2-3 years ago have this button in a visible place, so as not to resort to disassembling the device. To reset the BIOS using the button, you need:
- Turn off the laptop completely, turn it upside down
- At the bottom you will find the inscription “CMOS”, near it there will be a special hole through which you can reset the BIOS
- Insert a suitable object such as a paper clip or nail into the hole found and hold down the button for 30 seconds or more
- Turn on laptop
If there are no holes, you need to disassemble it and find such a button. Before disassembling your laptop, remove all power cords and other peripheral devices, including the battery.
Removing the “battery” on the motherboard
This is the easiest way to “hard reset” the BIOS. Most laptops will allow you to reset the settings by removing the battery highlighted in the picture below.
By removing the battery, you turn off the power to the BIOS and, accordingly, reset all settings and the password itself. The board should be de-energized for 5 to 40 minutes, it all depends on the model. Sometimes this may not work.
The battery is always in a visible place and located closer to the edge of the motherboard and nothing prevents its removal.
- remove the lid
- completely disconnect the device, remove the laptop battery
- find the battery
- carefully remove it
- wait up to 40 minutes for this to work
- put the battery back in place
- turn on the laptop
- configure the BIOS in a new way, set the date, time and other parameters
Currently, there are non-removable batteries. This option is not suitable for them. Therefore, you can use the following method.
What should you do after formatting?
After formatting is completed, you need to do the following:
- Change the language (most often it switches to English by default).
- Connect to the Internet and log into your Google account (if you have one).
- Set the correct time (and time zone in settings).
- Allow your tablet to use location data.
If you backed up all your data, then just connect to the network and log into your Google account. Then follow the following path: settings → privacy → data backup → auto recovery.
The best option is not to save money and buy the best tablets for work and business that will not slow down while running applications.
Cleaning jumper - switching
This method of switching a jumper is possible if there is a special jumper on the motherboard, which is responsible for resetting the BIOS settings.
In order to find it, you need to “climb” under the lid of the laptop and gain access to the motherboard. Most often, such a switch is located directly next to the battery, and the jumper is labeled with one of the following names: CLRTC, CLR and CCMOS.
Most often, the Jumper pad consists of three contacts. To reset the BIOS you need to move this jumper one step, that is, from a certain position to the next, and vice versa.
After the jumper is switched, you should press the power button of the laptop for more than 10 seconds.
The laptop, of course, will not be turned on, but the signal will be transmitted to the jumper. After this, return the jumper to the position in which it was and proceed to turn on the laptop and configure the reset BIOS.
The hardware method of resetting BIOS settings will almost 100% ensure their reset, but if the laptop is still under warranty, this action will lead to loss of warranty, so it is best to use the hardware method after the warranty period has expired.
The provided methods for resetting BIOS settings will help you deal with this problem without specialists. Most often, solving this problem should take no more than a couple of minutes.
But if none of the methods help, contact a service that specializes in this area. The device can be protected using some kind of additional chip.
Source
What are the factory settings?
Factory settings are set by the manufacturer for a specific computer or laptop model. They store BIOS settings and computer configuration parameters. This information is located in the device's dynamic memory, which is called CMOS.
All factory settings take up very little space and are separately powered - from a small battery located on the motherboard. You can reset the laptop parameters without access to the BIOS. To do this, simply remove the battery, wait 30-40 seconds, and insert it again.
After the process of resetting the BIOS settings is completed and the OS is reinstalled, you will receive the laptop in the same condition in which you bought it in the store.
It is worth noting that to successfully return the device to factory settings, in addition to CMOS, you need a Recover partition, which stores installation files and other necessary system information.
Video: Laptop factory settings
Reset Lenovo IdeaPad
It is worth noting that this operation will entail the deletion of files stored on the hard drive, so it is worth making a backup of important data in advance. Restoring factory settings on IdeaPad series laptops is performed using a special utility “OneKey Rescue System”, which is installed by default. So, let's get straight to the point.
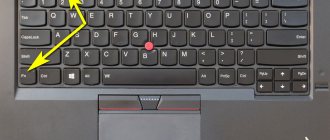
- The first step is to turn off the computer and turn it on again using a special button with an arrow pointing down.
- After downloading the software, a special menu will appear on the Lenovo laptop screen. In it you need to select the “OneKey Recovery” item.
- Next, in a new window you need to select one of the proposed options. The best option is to restore from the original backup.
- A note will appear asking you to confirm your decision again.
- After restoring the settings, the laptop needs to be rebooted. Now you will have a computer with standard settings at your disposal.
Force reboot LENOVO A10-70 A7600H
How to reset factory settings on LENOVO A10-70 A7600H? How to erase all data on LENOVO A10-70 A7600H? How to bypass screen lock on LENOVO A10-70 A7600H? How to restore default settings on LENOVO A10-70 A7600H?
The current tutorial shows all the methods to master reset LENOVO A10-70 A7600H. Learn how to perform a Hard Reset using hardware buttons and Android 4.2 Jelly Bean settings. As a result, your LENOVO A10-70 A7600H will be as good as new and your Tek MT8121 processor will run faster.
Reset settings on Lenovo ThinkPad
On laptops of this series, the recovery process is performed slightly differently. In order to restore factory settings, you need to complete several steps:
- While the system is booting, press the F11 button.
- In the window that appears, select the language and confirm using the “Next” button.
- Next, you need to select a user and enter a password (if necessary).
- A special menu should appear in which you need to select the last item “Lenovo Factory Recovery”.
- A program window will open where you need to select a language (we chose English) and click the “Next” button.
- Now you should accept the agreement and click “Next”.
- A message will appear stating that all data will be deleted during the recovery process. You need to confirm the decision using the “Next” button.
- After this, the settings will be reset to factory settings. Then the utility will prompt you to restart the laptop (you need to click “Yes”).
- After restarting the computer, a menu for setting parameters (country, time, keyboard layout) should appear. This confirms that the parameters have been restored successfully.
Resetting Lenovo laptops to their original settings is not difficult. To do this, you just need to use special utilities. If you have questions, write them in the comments.
Source
Lenovo A2010
Lenovo A2010 is a budget smartphone with LTE support and two SIM cards
- OS: Android
- Number of SIM cards: 2
- Screen: 4.5″, resolution 854×480
- Camera: 5 MP
- RAM: 1 GB
- Memory 8 GB, memory card slot
- Connectivity: 3G, 4G LTE, Wi-Fi, Bluetooth
- Navigation: GPS
- Battery 2000 mAh
- Weight 137 g
- Size: 66.60×130.50×9.98mm
0 0
Reset to factory settings (wipe)
Resetting your Lenovo A2010 smartphone is as follows:
- Turn off your phone
- Press and hold the “Volume +” button and the “Power” button
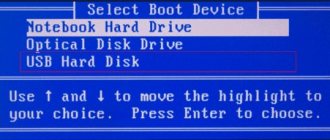
- After a while you will see the “Select Boot Mode” menu
- Use the "Volume +" button to select and confirm with the "Volume -" button
- After the Android appears with an open belly and an exclamation mark, simultaneously press the “Power”, “Volume +” and “Volume -” buttons (on some firmware, “Power” and “Volume +” sequentially)
- After the recovery menu appears, use the volume buttons to select “wipe data/factory reset” and confirm with the “Power” button
- In the next menu - item “Yes - delete all user data” and confirm with the “Power on” button
- The phone will reset the phone settings, after which the first menu will be displayed and below it will appear “Data wipe complete”. Now select “reboot system now” to reboot.
Added by: Borodach 02/24/2016: 5 1
If some advice helped you or, on the contrary, did not help you, then do not be lazy - register and vote. By doing this you will help other users and us. Well, or just click on the advertisement, this will also make us happy and in this way you can thank us. Also, only registered users can leave comments and make changes to the database. By registering, you can add new devices or add notes to existing ones.
You can register or login on this page
Source: https://factory-reset.ru/device_id=5036
Reset Lenovo laptop to factory settings without password
Greetings, dear friends, to my website! In today's article, I will tell you two ways to reset your Lenovo laptop. Resetting a Lenovo laptop to factory settings is easier than a laptop from any other manufacturer. The proprietary software “OneKey Rescue System” (sometimes also called “OneKey Recovery”) built into Lenovo laptops is intuitive even for a novice personal computer user.
If you are unable to reinstall the system, then there is only one way left: resetting your laptop to factory settings. However, if you have forgotten the administrator password, you will not be able to reset the settings. In today's article we will talk to you about how to reset a Lenovo laptop to factory settings without a password? This article will show you how to use the OneKey feature and get your laptop back up and running.
These methods apply to Lenovo ThinkPad, IdeaPad, YOGA laptop models
How to roll back settings on a Lenovo tablet?
You already know how to return the system to its original state on Lenovo phones. But what if you want to reset the software of your Lenovo 30 or 7600 tablet? This task is easy to complete! All you have to do is do the same as with a smartphone. The tablet settings also have a factory reset function, and as you know, the volume and power buttons on these gadgets are similar. The only difference is the location - the power button is usually on top, not on the side.
Thus, you can reset the system on any Lenovo mobile device, and you will not be afraid of any software failures.
source
Method 1 Using Onekey Recovery to restore Lenovo laptop
The first thing you need to do is find the recovery button on your Lenovo ThinkPad/IdeaPad/YOGA laptop. In most cases, you can find it on the right/left side of the laptop or at the top of the keyboard, next to the power button. If you find the restore button, proceed to the step-by-step instructions to restore your Lenovo laptop.
- Turn off your Lenovo laptop. If you can't disconnect it normally, you can remove it from the battery and then connect it again.
- Connect the power supply to your Lenovo laptop, press the NOVO key (recovery key) for 5 seconds.
- When the New-button menu pops up, press the down (↓) arrows to select the “System Restore” option and press the “Enter” key to enter the recovery environment.
- On system onekey recovery mode, select "restore from original backup" and then click on the next button.
- Click on "Start", and click "Yes" when prompted by the PUP message to begin the recovery process.
- Wait until the system restore process completes, and then follow the on-screen instructions to configure your Lenovo laptop's Windows settings.
If there is no Onekey recovery button on your Lenovo laptop, or you have a system clean installed on your laptop and the system drive has been cleaned, and the recovery file has been deleted or destroyed, this method will not work for you.
Preliminary preparation: making a system backup
A system backup is required , otherwise all data will be irretrievably lost. This can be photos, phone numbers, messages, applications, account data and other important information.
A hard reset will not delete information from the memory card. You can erase data from a flash drive only by formatting it.
It is recommended to make a backup of the system to restore data if you have to do a sudden reset.
The backup copy can be placed in cloud storage. For example, it could be a cloud from Google, Lenovo or any other.
Use the Setup/Repair disk to reset your Lenovo laptop to factory settings
For Lenovo laptops with Windows 10/8.1/8 operating system, there is an easy way to return to factory settings by pressing the "Shift" key and clicking on the "Restart" button.
But along the way, you will need to select the User account and enter the password to get the privileges reset. If you have forgotten your laptop password, this method will not work for you. However, you may be able to get help with an installation/repair disk to bypass the password requirement.
The setup/repair disk not only helps you reinstall/recover your system, but can also help you get into Windows recovery environments. The steps below will show you how to use the setup/repair disk to reset your laptop to factory settings without a password.
- Connect the Setup/Repair disk to your Lenovo laptop.
- Set your Lenovo laptop to boot from the installation/recovery disk. If your laptop cannot boot from a removable device automatically, you may need to press the F2 (or F1) key to enter the UEFI (BIOS) settings to change the boot order to set your laptop to boot from USB and CD devices.
- If you boot from the installation disk, you will see the settings screen, click on the Next button.
- Click on the "System Restore" link on the bottom left of the screen.
- Click on "troubleshoot" on the select screen.
- Click on "reset this PC" on the troubleshooting screen.
- There will be two options to choose from: “Keep My Files” and “Delete All”.
- Select the "remove all" option to delete all your personal files on the system drive, or it will not help remove the forgotten password from your user account. If you do not need to delete your User account and password, select “Keep My Files” to save your personal files.
- Select Windows system.
- Select the drive you are "upgrading", "the only drive where Windows is installed", or "all drives".
- There are also two options to choose in the next step: “just delete My files” or “clean the disk completely”. Choose the appropriate option according to your needs.
- Finally, click on the “reset” button, this will begin the reset process.
Advice from the author of the article: Before resetting the settings, make sure that your important data is backed up; once it is deleted, it can no longer be recovered from your computer.