There are probably no PC users who do not need to go into the BIOS at least once during the entire time they work with the computer. Those who use Lenovo products did not stand aside either. This manufacturer has a huge list of laptops, and not all of them can enter the BIOS in the same way, but setting it up is easy - the functions are the same everywhere. Today we will try to figure out how to enter the BIOS on a Lenovo laptop, be it Lenovo s9, Lenovo z50 or Lenovo b50.
Why might there be a need to enter the BIOS on Lenovo? Even though laptop manufacturers in each new released model try to minimize the user’s PC knowledge requirements and give the simplest possible answer to the question of how to configure it or determine the cause of problems, sometimes there is a need for finer adjustment of parameters. What can you use this input for:
- Turning on and off some laptop hardware, diagnosing problems;
- Configuring boot parameters for the OS and the entire device;
- Configuring the disk subsystem, in particular, its operating modes;
- Customization of many other functions, parts or the system in general.
- How to enter the BIOS of a Lenovo laptop: method 1
- Entering BIOS on a Lenovo laptop: method 2
- How to enter the BIOS of a Lenovo laptop: method 3
- How to go to BIOS on a Lenovo laptop: method 4
- How to enter BIOS: method 5
How to enter the BIOS of a Lenovo laptop: method 1
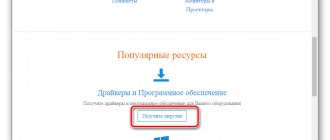
Equipment manufacturer Lenovo has created its own software called Lenovo One Key Recovery - this is a system that includes the ability to backup data on a Lenovo PC and restore it. In order to turn it on, there is an additional button on the laptop - Novo. It is found on almost all the latest laptop models from Lenovo and is located either on the side panel of the case or near the power button. Sometimes, in the most modern models, there is a small hole with a microswitch inside. In this case, you need to use a thin, non-sharp object - for example, a paper clip.
And despite the fact that the direct purpose of this button is not to call up the BIOS, you can still get into the BIOS using it:
- Turn off the device by holding down the power key for 10-15 seconds;
- Hold the Novo key for 2-3 seconds and release;
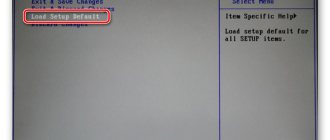
- Your laptop turns on and opens a small menu with a choice - click on the line labeled “BIOS Setup”.
Booting a Lenovo laptop from a flash drive via BIOS
Most often, this operation is performed by specialists in order to cure a laptop from viruses. Various software are recorded on removable media, but booting from it is usually not so easy. The problem is that all the latest Lenovo laptop models, starting from the 2013 release, have UEFI BIOS software that has certified Secure Boot security keys. They allow you to boot your laptop only when using a licensed Windows 8 installation disc.
In order to boot from media in such a BIOS, you need to disable Secure Boot in it by following these steps:
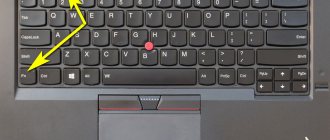
- Immediately after turning on the laptop, press two keys Fn + F2 on the keyboard or use the BIOS entry via the Novo Button button.
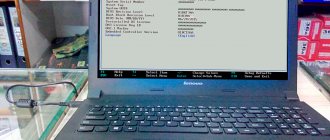
- By entering "InsydeH20 Setup Utility"(as a rule, this is what is installed in all the latest Lenovo models), go to the section "Security».
- Then select Disabled position Secure Boot , thereby disabling the security protocol.
- Boot section, change the installed “ UEFI ” option to “ Legacy Support ”.
- Save your changes by going to the "Exit" and selecting the option "Exit Saving Changes" From the options offered by the computer, select “ Yes" and wait for the reboot to happen.
- We insert the removable drive into a free USB input and again get into the BIOS by pressing the keys required for this Lenovo model.
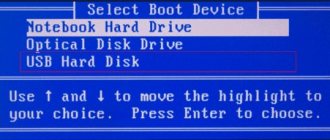
- In the “ Boot ” section we see the flash drive that appears. As a rule, it is listed in the menu as a USB HDD. By simultaneously pressing the Fn + F6 keys, we determine the media first in the list of devices for booting the system.
- We repeat the steps described in paragraph 5.
After all the steps have been completed, the laptop will begin the next boot from the flash drive.
Please note that for some Lenovo models, disabling just one Secure Boot option may not be enough. To boot the system from removable media, you may need to enable compatibility mode.
In various models it may be called CSM OS, CSM Boot, Legacy BIOS, UEFI and Legacy OS, or simply CSM.
Entering BIOS on a Lenovo laptop: method 2
Entering the BIOS on a Lenovo laptop is carried out in several ways - unfortunately, there is no one solution for everyone on how to get into the BIOS, but the methods for launching it are quite simple. So, let's move on to the first method.
The most popular solution is to use the keyboard - simultaneously pressing several laptop buttons immediately after starting it. Turn off your laptop (this method will not work if it is turned on), then press the power button and immediately one of the options:
- F2 button or Del button;
- Combination Fn+F2;
- F1 key
If the BIOS was launched incorrectly, the computer will boot the OS in normal mode. In this case, you will have to turn it off again and call the BIOS again, but using a new boot method. To avoid playing guessing games and launch the BIOS faster, you can also look at the instructions for your Lenovo laptop.
It also happens that the laptop starts up too quickly, and the user does not have time to press the required combination. To avoid this, turn off the laptop by holding down the power key for 10-15 seconds. Then hold down the desired combination to enter the BIOS, and then press the power button and release, while continuing to hold down the keys to enter the BIOS until the desired screen with parameters appears in front of you.
MYUOSHE EBRYUY Linux, RTPZTBNNNSCH - RTPVMENSHY TEYEOYS
lBL CHPKFY CH BIOS
URYUPL ZPTSYUYI LMBCHYY DMS CHIPDB CH BIOS
Acer (Aspire, Power, Veriton, Extensa, Ferrari, TravelMate, Altos) - F2 YMY DEL
Acer (Altos 600 Server) - Ctrl+Alt+Esc YMY F1
Acer (Older PC) - F1 YMY Ctrl+Alt+Esc
AMI (American Megatrends AMIBIOS, AMI BIOS) - Delete
AMI (American Megatrends AMIBIOS, AMI BIOS) - Old Version - F1 YMY F2
Award BIOS (AwardBIOS) - Del
Award BIOS (AwardBIOS) - Old Version - Ctrl+Alt+Esc
ALR - Ctrl+Alt+Esc YMY Ctrl+Alt+Del
ARI - Ctrl+Alt+Esc YMY Ctrl+Alt+Del
AST Advantage - Ctrl+Alt+Esc
Compaq (Presario, Prolinea, Deskpro, Systempro, Portable) - F10 - LPZDB LHTUPT CH CHETIOEN RTBCHPN KHZMH
Compaq (Presario, Prolinea, Deskpro, Systempro, Portable) - F10 - CH NPNEOF RPLBЪB MPZPFYRB
Compaq (Older Computers) - F1, F2, F10, YMY Del
Dell (XPS, Dimension, Inspiron, Latitude. OptiPlex, Precision, Vostro) - F2
Dell (Older 486 Models) - Ctrl+Alt+Enter
Dell (Some Models) — Reset — OBTSBFSH LOPRLH DCHBTDSCH
Dell Dimension L566cx System - Del
Dell (Older Laptop Models) - Fn+Esc YMY Fn+F1
DTK (Datatech Enterprises) - Esc
eMachines (eMonster, eTower, eOne, S-Series, T-Series) — Tab YMY Del
eMachine (Some Older Computers) - F2
Fujitsu (LifeBook, Esprimo, Amilo, Tablet, DeskPower) - F2 - RTY RPSCHMEOY MPZPFYRB
Gateway Using Phoenix BIOS (DX, FX, One, GM, GT, GX, Profile, Astro) F1
Gateway (Some Older PCs) - F2
Hewlett-Parkard (HP Pavilion, TouchSmart, Vectra, OmniBook, Tablet) - F1
Hewlett-Parkard (HP Alternative) - F2 YMY Esc
Hewlett-Parkard (HP) Tablet PC - F10 YMY F12
IBM ThinkPad using IBM BIOS (Early Models) - Ctrl+Alt+Ins - LPZDB LHTUPT CH CHETIOEN RTBCHPN HZMH
IBM ThinkPad using IBM BIOS (Later Models) - F1 - OBTsBFSH Y HDETSYCHBFSH
IBM ThinkPad using Phoenix BIOS - Ctrl+Alt+F11 - Ъ ЛПНБОДОПК УФТПЛИ DOS
IBM PS/1 (Late Models), PS/ValuePoint and 330s - Ctrl+Alt+?
IBM PS/2 with Reference Partition - Insert
IBM PS/2 - Ctrl+Ins - LPZDB LHTUPT CH CHETIOEN RTBCHPN HZMH
IBM PS/2 - 75 and 90 Ctrl+Alt+?
IBM (PC, XT, AT) - F1
IBM (Older Computers or Notebooks) - F2
Lenovo (ThinkPad, IdeaPad, 3000 Series, ThinkCentre, ThinkStation) - F1 YMY F2
Lenovo (Older Products) - Ctrl+Alt+F3, Ctrl+Alt+Ins YMY Fn+F1
Microid Research MR BIOS - F1
Micron (MPC Computers ClientPro, TransPort) - F1, F2 YMY Del
NEC (PowerMate, Versa, W-Series) - F2
NEC Versa Notebook - F1 ? OBTSBFSH Y KHDETSYCHBFSH
Olivetti PC Pro — Ctrl+Alt+Shift+Del — ABOUT GYZHTPPCHP LMBCHYBFHTE
Packard Bell (8900 Series, 9000 Series, Pulsar, Platinum, EasyNote, imedia, iextreme) – F1, F2 YMY Del
Packard Bell (Early 386 and 486 Dodels) – Ctrl+Alt+S – RPUMEDPCHBFEMSHOP
Phoenix BIOS (Phoenix-Award BIOS) - Del
Phoenix BIOS (Phoenix-Award BIOS) - Old Version - Ctrl+Alt+S, Ctrl+Alt+Esc, Ctrl+Alt+Ins YMY Ctrl+S
Sharp (Notebook Laptops, Actius UltraLite) - F2
Sharp (Old PCs) - FTEVHEFUS DYUL DYBZOPUFYLY DMS CHIPDB H BIOS
Shuttle (Glamor G-Series, D'vo, Prima P2-Series, Workstation, X Mini XPC, Surveillance) - F2 YMY Del
Sony (VAIO, PCG-Series, VGN-Series) - F1, F2 YMY F3
Sony Vaio 320 Series - F2
Tandon 386 - Ctrl+Shift+Esc
Toshiba (Portege, Satellite, Tecra) - Esc
Toshiba (Portege; Satellite, Tecra with Phoenix BIOS) - F1
How to enter the BIOS of a Lenovo laptop: method 3
Around the same time that the new BIOS version called UEFI was released, the new Windows 8.1 operating system was released. And along with it, a new way to load the BIOS appeared - through the OS:
- First you need to go to the desktop. Then call the side menu of the Windows desktop - to do this, move the mouse cursor to the lower right corner of the desktop. Select “Settings” – “Change computer settings”;
- Next, go to the “Update and Recovery” menu item, and then under the “Special boot options” line, click on the reboot key;
- After the reboot has been completed, we are taken to a screen with the ability to select an action. Click on the Diagnostics tile and then on UEFI Firmware Settings;
- Confirm your choice by clicking on the “Reboot” button. Done, the laptop has entered the BIOS!
Why is BIOS needed?
BIOS or its more modern version UEFI is designed to run all components of a personal computer at the so-called low level. Low level is the stage of computer operation before the operating system itself loads. In this software, you can change important standard settings, including the total system time, the boot order of certain devices, and even the system configuration of the personal computer.
UEFI has replaced the standard BIOS, which has existed since the eighties of the last century. It has higher performance, safety and user comfort. This software supports not only the keyboard, but also the controller - mouse.
How to go to BIOS on a Lenovo laptop: method 4
If you have Windows 10, then there is another way to load the BIOS, similar to the previous one. Here it is done a little differently:
- In the “Start” menu, click on “Settings”, select “Update and Security”;
- Open the “Recovery” tab and under the inscription “Special boot options” click on reboot;
- The device reboots, and we see a window for selecting an action. After you enter the desired menu, do everything as in the previous paragraph when starting the BIOS on Windows1.
If, when using this or the previous method, you do not see the “UEFI Firmware Settings” button on the screen, this means either that this laptop has an outdated version of the BIOS without UEFI, or that the OS was installed on the laptop in Legacy mode. Then working with UEFI is not available from the operating system - you will have to use the first two methods.
Why is BIOS needed?
BIOS or its more modern version UEFI is designed to run all components of a personal computer at the so-called low level. Low level is the stage of computer operation before the operating system itself loads. In this software, you can change important standard settings, including the total system time, the boot order of certain devices, and even the system configuration of the personal computer.
UEFI has replaced the standard BIOS, which has existed since the eighties of the last century. It has higher performance, safety and user comfort. This software supports not only the keyboard, but also the controller - mouse.
How to enter BIOS: method 5
The last method is the most radical, and can only be recommended to those users who already have good experience in disassembling such a device. Otherwise, you run a high risk of permanently damaging your Lenovo laptop.
The essence of the method is as follows: to reset all BIOS settings, you need to temporarily disconnect the special CMOS battery that is connected to the device’s motherboard. After performing this action, the device will “think” that the settings may be incorrect and will offer you to open the BIOS to correct them, or it will even enter it on its own.
BIOS batteries look different and are in their own place in almost every model, so you’ll have to dig around before you get to it and turn it off. But in general the procedure is as follows:
- Turn off the laptop, remove the battery;
- Access the CMOS battery and carefully disconnect it from the motherboard;
- Wait 15-20 minutes (this is necessary so that the CMOS chip is de-energized and the capacitors on the motherboard are discharged);
- Reconnect the battery, reassemble the laptop, connect the power and turn on the device;
- If you did everything correctly, you will see the BIOS settings screen.
We hope that one of the methods described above helped you find the answer to the question of how to enter the BIOS on a Lenovo P70, G50-80, Lenovo ThinkPad T400 or T440 laptop.
Acquaintance
The BIOS interface , as a rule, is a kind of text table, which can be navigated using keys on the keyboard. Setting up the Bios of almost any device allows you to set the operating frequency of hardware components connected to a personal computer, as well as their operating parameters, change power mode configurations, the startup order, and much more. Among other things, it allows you to select the operating system boot source, as well as the OS itself if several are installed at once.
Almost any user of a modern PC or laptop may be faced with the need to enter Bios . This may be required to configure any specific parameters, in order to diagnose devices connected to the computer, or to enable (disable) various types of hardware components. Basically, learning how to open and enter the BIOS is not at all difficult, but some users may have a problem with the fact that the laptop simply refuses to turn on the BIOS using standard, familiar methods. What to do in such a situation?
The thing is that on some laptop models, for example, from Lenovo, the Bios panel is entered in non-standard ways , which we will talk about in this article. After reading it to the end, you can easily open Bios on any laptop, including those manufactured by Lenovo, and even learn how to reinstall Bios yourself.
Removing the battery
If the owner of a Lenovo laptop is also an extreme sports enthusiast, he can enter the BIOS by partially disassembling the device case and taking the round battery out of the motherboard for a few seconds - and then installing it in place.
As a result, a minor system failure will occur, and with a high degree of probability, the next time you start the laptop, it will automatically boot into BIOS mode, without even asking for the owner’s permission.