The main advantage of a laptop is mobility. With it you can stay “in work” even outside the office. The only catch is the Internet connection. Therefore, users are often interested in the question of how to activate wireless communication. It will be easier to study the topic using a specific example. Today we’ll talk about how to enable Wi-Fi on a Lenovo laptop. For owners of this device, this is a fairly relevant topic. Simple instructions will allow you to always be online.
How to enable Wi-Fi on a Lenovo laptop
How to enable Wi-Fi on a Lenovo laptop? There are several ways to do this that even a beginner can handle. This can be done using a combination of hot keys, an adapter, etc.
It is worth noting that the developers of this company always take care of their users and therefore add special buttons responsible for this or that action. The clearest example is the key to go to the BIOS menu. But, unfortunately, they forget to indicate in the instructions the location of the treasured switch. Therefore, users have to think about how to connect Wi-Fi on a Lenovo laptop , and find on their own where the Wi-Fi button on Lenovo is.
Enabling the wireless adapter
You can enable Wi-Fi on a Lenovo laptop using a wireless adapter that needs to be activated. First you need to check if the adapter is working and if everything is in order.
- To do this, go to the “Run” command line. This can be done by holding down the “Windows” button on the Lenovo laptop + “R”.
- In the window that appears, write “ncpa.cpl”;
- By pressing the “Enter” key we confirm the search;
- The system takes us to the network list. You need to find an icon called “Wireless Connection”;
- If you click on it, a list of actions will open in which you need to select the “Enable” item. If instead there is a “Disable” button, it means that the adapter is active and you can work safely.
But how to enable Wi-Fi on a Lenovo laptop if the adapter is active, but there was no connection? Go to the same menu, deactivate the Wi-Fi adapter, and then proceed to the next item.
The device does not see any of the networks in the area
Problems like this happen quite often. This may occur due to the following reasons:
- lack of available wireless connections in a certain area;
- absence or malfunction of the network driver, which is responsible for the operation of the module. In this case, it will not be able to find any available connections;
- Wi-Fi function on the device is disabled;
- disconnection or failure of the network module.
Note! It is noteworthy that such an urgent problem most often occurs precisely because of incorrect operation or malfunction of the module. Software required for operation may be missing
Checking and fixing the problem can be divided into several stages.
Driver check
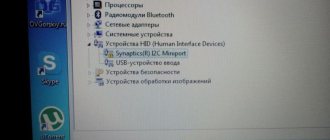
The absence of a driver or its failure can be indicated by a crossed out computer icon in the notification panel. This can be easily checked: you will need to open the device manager. Next you should perform the following sequence of steps:
- open the main Start menu;
- right-click on the “Computer” section;
- open the “Management” item;
- in the window that opens, find the special “Device Manager” tab;
- in it you can see the “Network adapters” subsection;
- Having gone into it, you need to find a device that would have a combination of Wireless or Wi-Fi in its name.
Often, the list should consist of at least two available devices: the network card will be indicated first, and the required module will be indicated second. If there is nothing like this in the list, then its installation is required.
Note! If an adapter is in the list, it should not have any additional icons next to its name. The found icon should be activated
To do this, right-click on the corresponding section of the pop-up menu. If the driver simply does not exist, then the system will need to install it. You can download firewood from the installation disk or download it from the Internet
The found icon should be activated. To do this, right-click on the corresponding section of the pop-up menu. If the driver simply does not exist, then the system will need to install it. You can download the firewood from the installation disk or by downloading it from the Internet.
Turning on the network
If there are no problems with the software, then you should check whether the driver itself is enabled. How to do it:
- right-click on the connection icon and go to “Network and Sharing Center”, where you will find “Change adapter settings”;
- select “Wireless network connection” - “Enable”.
After completing all the steps, the laptop will be able to find all available connections. You should select what you are looking for and make the connection. The availability of available networks will be indicated by the appearance of a Wi-Fi network icon with a yellow star.
Checking the installed driver
The first way to enable wireless communication on a Lenovo laptop if the adapter seems to work, but the Internet connection does not appear, is to check whether the required driver is installed. Let's look at how to enable Wi-Fi on Lenovo 560. The action plan is as follows:
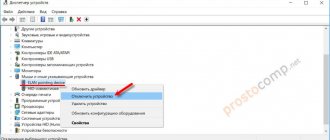
- Check whether the necessary driver was on the device at all. To do this, you need to open the command line and enter the command “devmgmt.msc”. The system transfers to the list of drivers where you can control everything;
Next, you need to select “Network adapters” from the list. In the list that appears, you need to find the “Ethernet” item; sometimes it may be called “Wireless”;- If this item is missing at all or is displayed but with a triangle symbol, this means that the driver is not installed. It is possible that the system will display some unidentified device;
- In this case, to solve the problem, you will have to download a specialized driver from the official website for a specific laptop model (in our case, for the Lenovo V560).
Device for LG TV
This is a WiFi USB adapter for LG TV, named AN-WF100. It is best suited for models that support wireless networking by default. The average cost of the device is 4,000 rubles.
The adapter expands the functionality of the designated devices. To properly configure the connection, you need to strictly follow the instructions or entrust this work to a specialist.
Adapter technical data:
- Complies with IEEE 802.11a/b/g/n standard.
- The optimal standard for streaming video is 802.11 n.
- Interface type: USB 2.0.
- Required current for consumption: 450 mA.
- Physical data: 6.7 (length) x 2.35 (width) x 0.9 (height) cm.
- Warranty – 1 year.
- The declared operational period is 3 years.
Operating frequency spectra (in hertz):
- 2.400~2.483.
- 5.150~5.250.
- 5.725~5.850.
Data transfer dynamics:
- 802.11a/g - 54 Mb/sec.
- 802.11b - 11 Mb/sec.
- 802.11n: 300 Mb/sec.
Switch
There is another way to enable Wi-Fi on Lenovo. As mentioned above, most often the developers of this brand place special switches. All that remains is to find them.
First, you need to examine the side panel of the device. The network button will look like a slider that you can move either to the right or to the left.
It also often happens that the Wi-Fi button on a Lenovo laptop is located next to the power button. Then it is green and looks like a regular key with a computer icon. In this case, there will also be switches nearby to enter the BIOS and a button to completely reset the system to factory settings. But don’t be afraid to press it accidentally, for example, while transporting the device: the system won’t return everything to standard settings so quickly.
If such keys, which, by the way, make life very easy for users, are not available on your laptop, then the following method will help.
Hotkeys
Fortunately for all owners of Lenovo equipment, engineers think through their developments well. If there is no button responsible for the wireless connection, then you can use hot keys. There are two options for enabling Wi-Fi on a Lenovo laptop.
Among the built-in keyboard there is a set of special keys that activate certain programs. Among them, you can try to look for a nondescript button with a picture of a Wi-Fi connection.
If such a button is not found, you can use the combination “Fn” (this button certainly exists!), for example, with “F2”. But when you reinstall the operating system, the combinations may change. The “Fn” key always remains the main one, but to determine which other button needs to be pressed simultaneously with it, you will have to experiment.
If you don’t want to “poke” everything, then you can open the “Control Panel” and study there which combination is responsible for what in a given version of the software.
Don't panic if the Fn key is completely missing on your standard keyboard. Some Lenovo owners still use outdated models that do not have this button. In this case, you can use the buttons that are on any PC and laptop - this is a set from “F1” to “F12”. On older laptops, these keys work without the additional “Fn”.
It may well be that the hotkeys simply do not work. The fact is that developers are sometimes lazy and do not install drivers for them. If this happens, you need to download them yourself on the manufacturer’s official website.
Turning on using the monitor cover
In order to enable Wi-Fi on the Lenovo Z50, there is a special method that will allow you to quickly deal with the problem. If the previous methods were ineffective, there is another, spare one. This is the most banal action, which turns out to be very effective on a specific model. Simply close the lid of your laptop monitor, hold it closed for a few minutes, and then open it again.
This action causes the network adapter to restart and start searching for available networks again. Oddly enough, the “trick” works great. Therefore, before trying all other methods, you need to check whether this will work with your laptop. Recently, this manipulation has begun to work on most Lenovo models.
With Lenovo Energy Management
If the wireless network on your Lenovo laptop still does not work, you will have to take more serious measures in the form of installing additional software. It will help enable hotkeys and solve the problem.
Most likely, the main reason why the wireless network does not work is that the adapter is turned off. And often you can turn it on only using special keys. Therefore, you will definitely need a utility to enable Wi-Fi on a Lenovo laptop.
The most current program at the moment is Lenovo Energy Management. You can find it without any problems on the manufacturer’s official website. Any version is suitable for installation. After the utility is downloaded and installed, it is recommended to completely restart the laptop for correct operation. After turning on the gadget, you can safely use key combinations.
If everything went according to plan, a dialog box will appear in the system in which you can select “Activate” or “Deactivate” the wireless network. When activated, the laptop should begin searching for all available networks to connect to. You can check this in the lower right corner.
The main advantage of the utility is that after turning on the adapter through a set of hot keys, you do not need to repeat the action every time you start the laptop again. The system will start the search automatically.
In rare cases, this method may not work, this will signal that something bad has happened to the general keyboard driver. Then you need to go to the official Lenovo website and download it again.
Using standard Windows tools to automatically diagnose problems
If your Lenovo laptop does not connect to your wireless network, the easiest solution in this situation is to use Windows automatic diagnostic tools. This function works successfully in the eighth version of Windows and higher, on all Lenovo laptops.
Pay attention to the Windows tray (quick access to the main running services in the lower right corner of the desktop). There should be a wireless network icon located there, which will most likely be crossed out with a red cross - right-click on it and select the line “Diagnostics problems” (left mouse button)
Then wait until Windows resolves itself or, if this is not possible automatically, determines the nature of the problem.
If there is no wireless icon in the Windows tray, or troubleshooting does not find any problems, proceed to the following recommendations.
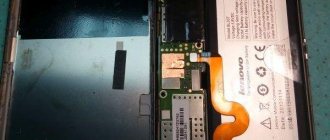
Connection on motherboard
If everything seems to be in order with the driver and adapter, but Wi-Fi cannot be turned on in the Lenovo laptop and the search for wireless networks still does not occur, then all that remains is to check whether the adapter antennas are connected to the motherboard. It is quite possible that the developers simply forgot to connect them or they fell off during transportation. At the same time, if the Internet is distributed from a mobile device, then the network will work stably, but if, for example, a router acts as a “distributor,” then the Internet will not function.
To check everything, you need to unscrew the back cover of the laptop and find the cable connections. They must be connected to the appropriate connectors. After such manipulations, all that remains is to launch the gadget and check the operation of the wireless network. This situation can happen even with a brand new laptop, so you need to be more careful, and most importantly, be more careful with electronics.
There can be a huge number of reasons why there is no Wi-Fi on a Lenovo laptop. But not all of them are related specifically to the network adapter. The operating system may have crashed or a virus may have appeared. Therefore, if, using the simple steps described above, it was not possible to “revive” the operation of the wireless Internet, then it is recommended to contact specialists with these questions.
"Windows could not connect to" problem
Sometimes users encounter problems with the router not working properly. This problem is not uncommon, and to solve it we first need to understand in which device the problem lies.
To do this, you need to perform just one simple step - connect any other device to the router. For example, a smartphone. If you can’t access the Internet even from your phone, the router is definitely to blame. And if everything is in order and a stable Internet connection is created, then the problem is in the laptop.
How to solve a problem
The first thing to try is to restart both the laptop and the router.
- Click the “Start” button, hover over the arrow next to “Shut down” and click “Restart”.
Click the “Start” button, hover the cursor over the arrow next to “Shut down” and click “Restart” - There should be a convex power button on the back of the router; press it. Wait a moment, click again.
Press the on/off button on the back of the router
What to do if the problem persists
If these simple procedures do not help, then update your computer drivers. Instructions on how to do this are below.
Also, check if your Wi-Fi is turned on and turn it on and off. There are also instructions above.
Interesting! Every year, attackers gain access to almost half a billion accounts through Wi-Fi vulnerabilities in public places.