Reason 1: Touchpad is disabled by hotkey
Some Lenovo laptops support touchpad control using keyboard shortcuts. Inexperienced users could unknowingly disable it by accidentally pressing one of these keys.
In office laptop models, you can most often find the F6 key, on which a crossed out touchpad is drawn.
In gaming models and some premium ones - the F10 key, with exactly the same icon.
For those who have multimedia functions for a number of F-keys, they only need to press the corresponding key to turn the touchpad on and off. In functional mode you will need to use a combination with Fn: Fn + F6 or Fn + F10.
If there is no key with this icon, it is easy to conclude that the Lenovo laptop model you are using does not support this touchpad control option.
Welcome to Ideation!
Ideation sections have been created for customers to engage with us by discussing and promoting ideas and improvements relating to Lenovo's products and services.
As a reminder, your participation in Ideation is governed by Lenovo's website Terms of Use and by Lenovo's Forums Community Guidelines. Additional terms governing the Ideation Program are included in the Ideation Terms and may be found here. For your convenience, here's a
Quick summary of the highlights:
- This area is for ideas – improving our products or suggesting entirely new products – please keep technical support issues on the other boards designated for that purpose
- You're giving your ideas freely for us to use so we can improve our offerings to you
- The ideas you give us are your own and are not confidential
- If we decide we want exclusive use of your idea, you're agreeing to sell it to us at a fixed price
By clicking on “Yes” below you certify that you have read and agree to the Community Guidelines and the Ideation Terms, and acknowledge that by submitting any ideas, material, or information on the Ideation site you grant Lenovo the right to use any such submissions by you in any way without acknowledging, notifying, or compensating you, as described in those documents.
Reason 2: Touchpad is disabled in BIOS
Sometimes the equipment is disabled already at the BIOS stage, which is why it will not work in any operating system (if several are installed) and even when using bootable flash drives. This can happen, again, due to user actions; less often it is disabled on a new laptop from a store.
Press the key configured to enter the BIOS immediately when you turn on the laptop. It is best to press it quickly and several times. If you don't know which key to launch the BIOS, read our separate article.
Read more: Options for entering BIOS on a Lenovo laptop
Lenovo may have several BIOS interface options, but not every model has the item responsible for the operation of the touch panel. In the proprietary version, this option is located in the following path: “Config” tab > “Keyboard/Mouse” section > “Touchpad/Trackpad” item. Use the arrow keys on your keyboard to get to the location you want, then with the item highlighted, press Enter and change its value to “Enabled.” Finally, press the F10 key to save the settings, exit the BIOS and turn on the laptop.
In the absence of the described option and tab, in principle, with a high degree of probability, we can say that the laptop model does not support touchpad control via BIOS.
In the standard program from the manufacturer
Laptop manufacturers, for example, Dell and ASUS, often release their own software with which you can enable and configure the touchpad. For ASUS, this utility is called Smart Gesture. Usually it is already preinstalled. You just need to launch it, and in it you can already disable the functions of deactivating the touchpad with connecting a mouse.
- Using Windows Search, find the Smart Gesture program if you have an ASUS laptop. The utility can also be launched through Windows Explorer. Open your system drive and Program Files folder. It should have an ASUS section. Find the file with the utility application in it and open it. Open Asus Smart Gesture in the Program Files folder on your system drive
- In the window of the standard utility from the company, go directly to the “Mouse Detection” tab. Remove o and click on “Apply”
- Let's remove o.
- For the settings changes to take effect, click on the “Apply” button located in the lower right corner of the window.
Reason 3: Operating system settings
Windows settings play an important role in possible problems with the touchpad. These can be either basic settings or some problems or conflicts in the operation of the OS.
Settings menu (Windows 10 only)
The “ten” has a new “Settings” application, which is gradually replacing the “Control Panel”. Anyone who has this version of the OS installed is recommended to contact it first.
- Call the program via Start.
- Click on the "Devices" tile.
- Through the panel on the left, switch to the “Touchpad” section.
- In the first block of settings, make sure that the switch is active - if it is not, the touchpad will not work. To be able to use it in parallel with a connected USB mouse, the checkbox next to “Do not disable the touchpad when connecting a mouse” must be checked. However, in rare cases this leads to a software conflict. If you cannot find the cause, contact Lenovo technical support, until this point using the devices alternately.
"Control Panel"
Unlike the previous one, this option is universal and suitable for all current versions of Windows.
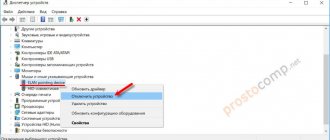
- Open the “Control Panel” in any convenient way and find the “Mouse” category in it. It is more convenient to do this by changing the viewing type to “icons” or through the internal search.
- In its properties you need the last tab, which is called differently: “Device Settings”, “Elan”, “UltraNav” or “ThinkPad”. In most cases, you will see an option similar to the following screenshot. Here you just need to click the “Enable” or “Activate device” button, and then “OK”.
- If there is a proprietary tab with settings for the touchpad and trackpad, check the box next to “Enable TouchPad” and click “OK”.
- For those who care that the touchpad works together with a connected USB mouse, you need to find the item “Disable internal control.” device when connected external decree USB devices" and uncheck it. In windows with a different interface, the name of the function will be similar, but in English.
Please note that the tab may not appear if there are problems with the driver. In this situation, go to Reason 4, and then if the touchpad does not work again, return to this instruction.
Disabling a conflicting service
Isolated cases of software conflict involve the operation of the touchpad driver and the handwriting panel service. Even if you enter text using the pen and touch screen, try disabling the service for a while and see if this affects the touchpad.
- In Windows 10, open the “Task Manager” using the Ctrl + Shift + Esc keys and switch to the “Services” tab.
In Windows 7, launch the Services application through Start. Find a service called "TabletInputService". - Right-click on it and select “Stop” or “Restart” from the context menu. It is advisable to restart the laptop, and if you use touch input, try re-enabling the service after restarting Lenovo and checking the touchpad.
Disable touch screen input service
In hybrid devices (tablet + laptop with a touch display), the following problem arises: the touchpad is prevented from functioning correctly by the touch screen input service, which controls the operation of the stylus.
To disable it, use the key combination win+R, then enter services.msc in the window that appears. A list of services will appear; you need to find TabletInputService in it and disable it. This solution will make the touch screen and touchpad panel more difficult to use. Later, you can remove the driver, rollback or update it, and then enable the service again.
Reason 4: Driver problem
The driver itself should not affect the basic functionality of the touchpad. Moving the cursor and pressing the left and right buttons can be done without it. However, its incorrect operation may cause problems with the hardware, so we recommend installing the driver manually. This can be done in different ways, and all of them are discussed in our separate article. Let us add that sometimes problems occur after installing the latest version of the software, so in extreme cases you can use one of the previous ones.
Read more: Download and install the driver for the touchpad of a Lenovo laptop
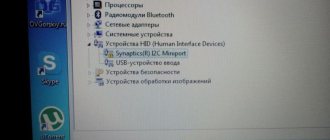
Local driver installation via Device Manager
In addition, we will tell you about the method of installing the driver locally over the current version. It is better to resort to it first, since it will not take much time, but it can correct the current situation.
- Launch Device Manager. This can be done by searching in Start or (in Windows 10) by right-clicking on Start and selecting the appropriate item.
- Expand the “Mice and other pointing devices” section - here you will find the touchpad and the connected mouse that you control. It won’t be difficult to recognize the panel - its name should contain the word “touchpad” or “trackpad”. But if the driver is missing or there are problems with it, the name will be “HID-compatible mouse” instead. In a situation with two identical names, identifying the line with the touchpad is easy: select any of the names and disconnect the external mouse from the laptop. If the selected line remains, it’s a touchpad; if it disappears, it’s a mouse. After reconnecting the mouse, the line with it will be the same.
- So, now highlight the line with the touchpad and click the driver update icon on the toolbar.
- In the window that opens, use the item “Select a driver from the list of available drivers on your computer.”
- A list of software will be displayed, from which you either select the one that contains “touchpad” / “trackpad” in the name, or, if there is none, “HID-compatible mouse” / “HID-compatible device”. Choose one thing from the list - if you fail, you can always return to it.
- Be sure to restart the laptop, check the operation of the touchpad and, if necessary, return to the list of drivers.
Reinstalling the driver
The considered manipulations may not help, so try the opposite option - removing the device from the system before the next time you start Windows.
- While in Device Manager, select the line with the touchpad again, but this time click the cross icon on the toolbar.
- A confirmation window for deleting the device will open. In fact, all of its drivers will be deleted, and if there is an additional item “Delete driver programs for this device”, check the box next to it and click “Delete”.
- Reboot your laptop. Ideally, the driver should install automatically when the operating system starts, but if it doesn't, try the methods listed above again.
If all else fails
If you have tried all the methods above, but the touchpad on your laptop still does not work, then the problem may be a hardware issue. In this case, you should contact the service center, they will determine exactly why the panel is not working and find the best solution. Without sufficient experience and knowledge, you should not try to carry out repairs yourself; even simple disassembly of a laptop can cause injury or be the basis for a complete write-off of the equipment.
You should also think about when the touchpad stopped working and what happened before that.
If everything worked properly and without complaints, but after installing the game, software or updating drivers, problems began, then these actions are probably the reason. Due to drivers, the touchpad buttons and the panel itself often do not work; after adding some programs, the touchpad is simply disabled in the system. It is necessary to revert all changes, remove installed software or updated drivers. It’s also worth figuring out how to enable the panel if it was disabled programmatically. Found a typo? Select the text and press Ctrl + Enter
Reason 5: Virus software
It may always turn out that the reason is not the operating system, but the malicious software installed on it. Be sure to check Windows for viruses using a built-in or third-party antivirus or a scanner that does not require installation.
Read more: Fighting computer viruses
Reason 6: Hardware problem
When no manipulations help, we can assume that the problem is physical. The touch panel, like any other device or equipment, can fail due to natural reasons or as a result of violation of operating conditions. The latter means use in unsuitable rooms, temperature conditions, strong external influence (shaking, vibration, falls), spilled liquid, incorrect assembly (after manual disassembly), power surge.
Accordingly, depending on the specific reason, the board could burn out, its contacts could oxidize, the cable could be damaged or come off. If it simply becomes disconnected, which happens either due to serious shaking of the laptop, or due to the carelessness of the person disassembling and assembling the laptop, it will be enough to repeat the disassembly and tightly connect the cable to the port. We do not recommend doing this yourself if you have no experience in this area, but if you are confident in your abilities, you can read our general article on the sequence of disassembling a laptop, applicable to older laptop models. After this, it is better to turn to YouTube and look for video instructions on how to disassemble your particular model. Modern Lenovo laptops have a monolithic body, the cover of which is much more difficult to remove and without improvised means (for example, a special suction cup) this will most likely lead to visual damage.
Dirty control device
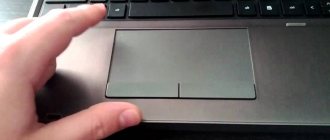
A touchscreen is a touch panel on a laptop. It must be kept clean so that it can always read finger touches.
If the touchpad, like the laptop itself, is not periodically cleaned of dust and dirt, then over time a layer will form that will interfere with the device’s normal functioning. In the most severe cases, when tea or other liquid is spilled on the laptop, the device may stop responding to the user's commands.
If you encounter a similar problem, alcohol and a cotton swab or napkin will help. Dampen a cotton pad with alcohol and wipe the touchpad. Perform this procedure with the laptop turned off.