What is a webcam and where is it located?
Most modern laptops are thoughtfully equipped with a built-in webcam. This is very convenient, since you do not need to additionally search for a suitable device and install it on your laptop.
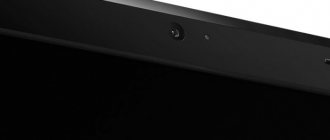
The camera is located directly above the screen. Outwardly, it looks like a small circle, similar to a mobile phone camera. This device provides many advantages. It will help provide video communication with any person, regardless of his location. If during a telephone conversation only the voice is heard, then here the interlocutors see each other.
Modern laptop models have cameras with built-in indicators. They light up when turned on. This provides additional security. The Lenovo laptop has the same functions. How to turn on the camera if you are not an advanced user?
How to find the camera in the software
How to enable the camera on a Lenovo laptop? There are two ways to find it in the software. One of them will certainly open the webcam for further configuration.
- Open the Start menu. Select the “Search” line. Here you should enter the word “camera”. After the operation, you need to choose the appropriate option.
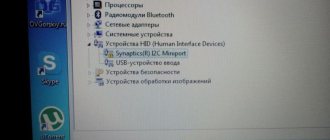
- Click on the “Start” menu, where we select “Control Panel”. Next, select the “Hardware and Sound” sub-item. Then, in the “Devices and Printers” section, click on “Device Manager”. The webcam will be displayed in the “Image processing devices” line.
- The easiest way is to download the program that requires the camera and carry out the settings directly in it.
- We are looking for a button on the keyboard with a camera image. Some laptop models have this hotkey. Press the button and Fn at the same time.
- Just invite a knowledgeable person to connect and configure everything. Still, sooner or later you will have to learn to do it yourself.
Having completed one of the steps, the question of how to turn on the camera on a Lenovo laptop will not arise.
The camera of a Lenovo smartphone or tablet does not work
The reasons for the camera not working are as follows:
- Update settings. When installing unofficial firmware, various problems and failures are common, including with the camera. You will have to roll back the system to its original state. To do this, go to the “Settings” section, use the “Backup” tab, click “reset to factory settings”.
- Viruses. The problem can be solved by scanning the device and deleting malicious files that are detected as a result of the scan.
- Dust on the sensor. Simply wipe the lens on the camera with a damp cloth.
- Cache clogged. To clear it, you should go to the “Settings” section, visit “Applications”, select “All applications” and “Camera”. Below you can see the “Clear Cache” button, click on it.
If all else fails, mechanical damage may be to blame. The camera on Lenovo does not work after falls or impacts. In addition, the module responsible for setting it up may be damaged. It’s worth showing the gadget to specialists.
Installing a separate camera
In cases where the laptop does not have a built-in camera, but you want to chat on Skype, you can resort to using a separate device. Most webcams come with drivers for installation. It is the presence of the driver that will help enable the camera on a Lenovo laptop. If the laptop cannot detect the driver, then the camera will not work.
What is a driver
Setting up the camera correctly on a Lenovo laptop depends on the driver available. Why do you need a driver for your laptop and camera?
This is a necessary link between the laptop and the devices that are connected to it. The computer recognizes most standard devices automatically and does not require driver installation. However, for other equipment not provided by the manufacturer, it is necessary to install a special program that will detect the type of object and install it correctly. Simply put, the laptop uses this program to gain access to device management.
Drivers for a Lenovo laptop camera are disks with a special program. Typically, they are downloaded and installed semi-automatically. All the user needs to do is click on the necessary buttons and wait for installation.
It is worth mentioning here that for standard devices such as a mouse and keyboard, drivers are pre-installed in the laptop software. Therefore, they do not need to be configured.
Why can't I connect to the camera on my phone?
Let's look at the reasons why the camera stops working:
- One of the reasons is a firmware update. If the camera fails after updating the Android version, the operating system should be rolled back and reinstalled.
- Damage to camera setup modules. This result is caused by serious mechanical impacts on the device, corrosion of the internals due to the ingress of liquid, and fatigue failure on old equipment.
- Virus programs. Malicious programs can interfere with the correct operation of the camera; they can easily enter the device’s computer if it is not protected by anti-virus applications.
- The module cache is clogged.
How to use the driver
How to enable the camera on a Lenovo laptop using a driver? This question will inevitably arise for any new user.
For example, a user bought a camera and connected it to his laptop. The computer recognized the device, but there was no video image. Now is the time to look into the box where the camera was. There should be a disk with drivers there. It must be inserted into the drive. Wait for the download and follow the instructions. Most external devices have detailed instructions on how and what to do. In addition, there are recommendations for troubleshooting errors.
The laptop will automatically install the drivers for the camera in the folder with system files. In addition, it will prudently display a shortcut on the desktop and in the Start menu. This is very convenient, since a novice user can accidentally uninstall a necessary program. And thanks to copying into several folders, he will always be able to find the camera shortcut and use it. Even if all shortcuts are completely lost, the installed program will remain. It should be located in closed system files.
Where to get and install drivers
What to do if there is no installation disk or it is lost? This is where many users begin to panic and get upset. And everything is quite simple if you have access to the Internet. All the necessary programs can be found on the Internet. Moreover, with the right request, they can be downloaded absolutely free.
How to enable the camera on a Lenovo laptop using the downloaded program? Here you need to do the following:
- find the file in the download folder;
- if this is a “rar” archive, then open the “setup” file (it is he who is responsible for the installation and subsequent operation of the camera);
- Install strictly following the instructions.
It is worth noting that finding the necessary programs is a very useful skill for all users. After all, everything can fail. For example, the installation disk is broken, and the camera refuses to start working. You need to find the name of the camera and search online on official websites for the necessary drivers. Then download them to your laptop and install.
To work and communicate online using a webcam, you need to be able to install and configure it. These skills will also be useful in troubleshooting problems that may arise. This should not be difficult, since by default all the operation of the laptop is intuitive and does not require special skills.
One of the advantages of laptops over desktop personal computers is the presence of various built-in equipment, including a webcam. For users who spend a lot of time talking in video chats, the failure of this device is quite unfortunate news.
Many problems with the webcam on a laptop can be resolved independently without the help of specialists. Let's look at why the camera may malfunction and how to fix it.
Webcam disabled by hardware
Almost all laptops have a special button responsible for turning the webcam on/off. Depending on the laptop model, the camera can be controlled by pressing one key or using a special (usually two-key) combination. The laptop may also have a mechanical switch that turns off the webcam at the hardware level, i.e. by breaking the electrical connection, but this method of controlling the device is now rare.
This is what the camera on/off button looks like on ASUS laptops model G751JY:
And here is an example of a Lenovo ThinkPad X1 laptop keyboard. To control the webcam here you need to press the “Fn” and “F7” keys simultaneously.
On other laptops, instead of pressing "F7" as in this example, you may need to press any other key. You can clarify this information in the technical documentation for the laptop or on the computer manufacturer’s website.
Be that as it may, before proceeding with any other actions, you should make sure that the webcam is turned on at the moment. Here you just need to press the corresponding keyboard button or key combination, and if there is a switch, set it to the desired position.
Reason 2: The camera is disabled by software
In Windows operating systems, almost all built-in or externally connected PC devices can be disabled programmatically. This can be done not only by the user himself, but also by any application that has access to system settings. Often, spontaneous turning off/on of the webcam occurs due to the fault of malware. To check whether the device is on or off, simply do the following:
- Press the key combination “Win + R” on your laptop.
- The Run window will open. Enter the command “devmgmt.msc” into the line without quotes, click on the “OK” button.
- In the newly opened “Device Manager” system application, find and double-click on the “Imaging devices” section.
- If the webcam does not have any software or hardware malfunctions, its name will be displayed in the section that opens, for example:
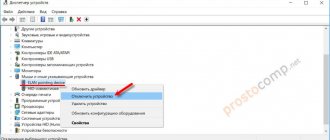
- Next, right-click on the name of the webcam. If the “Enable device” item appears in the drop-down list, click on it. The camera will have to work.
In some cases, due to system failures (usually driver problems) and other reasons, the webcam itself may freeze. In these cases, it is enough to turn it off programmatically and then turn it back on. Just right-click on the camera name, select “Disconnect device”, then again – “Enable device”.
If, while manipulating the webcam in Device Manager, any application was launched to work with it, restart it.
Available methods
A) Reboot
Users report that the camera starts working after rebooting the Android device. Sometimes you have to reboot the gadget several times to achieve the desired result. In any case, it makes sense to try this elementary method - turn off and turn on your smartphone or tablet again.
B) Reboot in Safe Mode
Every Android device has a boot into "Safe Mode" feature, which means you reboot the phone and turn it on, activating only essential apps and a limited number of available features. Safe Mode is great for troubleshooting, as downloaded applications will be disabled and you will be able to determine whether there is indeed a conflict between various third party software and system software related to the use of the camera.
To restart in safe mode:
- Turn off your device.
- Hold the Power button for a few seconds until the shutdown menu appears.
Confirm that you want to restart your device in Safe Mode.
When starting in Safe Mode, enable the system camera app. View a few photos, then exit the app.
- Turn it on again and see if it works.
If the camera works normally in safe mode, then you have narrowed down the search for the causes of the error. The problem is a conflict between third-party applications and system software. It is because of them that you cannot connect to the camera. Your next steps
:
C) Remove conflicting third-party applications
Try uninstalling third-party applications related to the camera. These are applications that can take pictures during their operation. For example: Snapchat, Whatsapp, etc. Surely there are programs on your smartphone or tablet with which you can take photos directly from the application and share them. Remove such programs sequentially, one after another, checking after each removal to see if the error has disappeared. If you were able to connect to the camera, you have found a third-party application conflicting with the system software. And one more thing: do not forget to switch between video, panoramic shooting and other modes during the test - the problem can appear in any of them, and it is important for us to restore the full functionality of the camera.
D) Try using a third party camera app
If the system app is the only program that has access to the camera on your Android device, and you receive the “Unable to connect to the camera” message, you might want to try using a third-party app to access it. The Google Play store offers many programs suitable for this purpose. Use the search function to find apps in the Camera category. Choose one of the popular applications - such as: Candy Camera, Open Camera, Camera 360, Camera MX or Camera for Android. Download and install the application, launch it.
If you managed to launch the camera from a third-party application downloaded from Google Play, then the problem lies in the official system application for it. Try this:
:
- Go to Settings -> Applications -> Cameras;
Reason 3: malfunctions in the program working with the camera
The reason for the webcam not working is not always due to system problems or hardware failures of the laptop itself. The application itself, through which the video is recorded or transmitted to the Internet, may fail. The cause of the malfunction may also be conflicts between two or more programs trying to simultaneously access the webcam. If, for example, one of the programs freezes in the computer's memory, the other will no longer be able to work with the device.
The first step is to close all applications that can control the webcam. If one of the programs is frozen in the computer’s memory, to exit it, open the “Task Manager” (keys “Ctrl + Shift + Esc”), find the name of the application in the list that appears, select it, then press “Del” to remove the task . After this, you can try again to launch the program through which you record/transmit video from the camera.
In some situations, you may need to remove a particular program. This can be done from the Programs and Features system application. To launch it, go to the “Control Panel” and select the appropriate item.
If only one program is installed or currently running on your computer that records or transmits video data, check that the settings in it are correct. Let's look at this using the example of the popular messenger Skype 8.25.0.5 (the latest version at the time of writing). The steps are as follows:
- Open the program settings menu, go to the “Sound and Video Settings” section.
- If the “Video” block indicates that the device was not found, this will indicate a problem with the camera, driver, or system as a whole.
- If there are no problems with the camera, it may simply not be selected as the default video recording device. In this case, simply click on the area opposite the “Camera” inscription, then enter the name of the webcam.
- Immediately after selecting a camera, a picture from the camera should be displayed at the bottom of the settings window.
In all programs that work with webcams, settings are made according to the same principle.
Failed to connect to camera
When entering the camera, a system message like “Failed to connect to the camera” may appear on the screen, the screen may simply turn black, and the application may close spontaneously. If you encounter such a problem, first inspect the lens. New packaged gadgets have a camera protected with a special film; perhaps you simply did not pay attention to it and forgot to peel it off. If the gadget has been in your possession for a long time, pay attention to the presence of dirt. A visual inspection can also detect the presence of mechanical “injuries” - such a situation cannot be avoided without paid professional intervention.
- Restart your phone and try logging into the camera again. Sometimes the problem goes away on its own.
- Run a scan for malware on any antivirus and remove it.
Sometimes simply cleaning your phone from unnecessary programs and files helps. Clogged memory simply does not have room to perform simple basic operations.
Consider whether you have installed any new components on your phone. They probably have a negative impact on the camera's performance. If there are any, remove them and check if the camera works.
Perhaps you recently changed something in the settings menu and accidentally disabled access to the camera. Carefully review your phone settings; the problem may be hidden there too.
If the above manipulations are not effective, only a specialist will deal with your problem. To carry out competent diagnostics and high-quality repairs, provide all the important points about the operation of your gadget, list recent events that likely affected its operation.
Reason 4: Driver problems
If the driver does not work, the name of the webcam will be displayed in the Device Manager application along with a yellow exclamation mark, which also indicates the presence of software problems (there may be a system failure). To fix the problem, the driver will need to be reinstalled, for which you must first remove it from the system:
- Find the name of the webcam in the list of the Device Manager application. It may not be listed in the Imaging Devices section. Also look at the Other Devices and USB Controllers sections.
- To remove the driver, right-click on the camera name, then select “Remove device”. Agree to deletion in the dialog box that opens.
Trouble-shooting
Important! If you do not find your webcam in Device Manager or it is marked with a yellow exclamation mark, then you need to update the driver.
To find a driver suitable for your webcam, it is best to go to the website of the laptop model manufacturer and download the one you need.
| Manufacturer | Website |
| Asus | asus.com |
| Aser | acer.com |
| Dell | dell.com |
| HP | support.hp.com |
| Lenovo | support.lenovo.com |
| MSI | ru.msi.com |
| Samsung | samsung.com |
| Sony | sony.ru |
| Toshiba |
Testing the webcam
If the camera is not functioning, you first need to make sure that nothing is interfering with it. For example, sometimes a webcam may be covered with a sticker. If there is one, then you need to remove it.
Next, you can try opening Skype or a similar application. Go to your video settings and see if the image captured by your camera is displayed. If the message “Camera not detected” appears, then to enable it you need to use the methods described below.
Method number 1. Keyboard shortcut.
On many Lenovo laptop models, the webcam is turned on by pressing the Fn button. Finding it on the keyboard is not difficult. If this does not help, then try holding down the Fn and Esc keys. Camera still not working? Then we move on to other methods.
Method number 2. Device Manager.
In order to get into it, you need to right-click on the “My Computer” shortcut and then select the appropriate item called “Device Manager”. Next we look through the list. If the webcam is correctly connected to the laptop, it will be listed as “Image processing device” or the like.
Important! If an icon with an exclamation mark is displayed next to the device, then most likely you need to install drivers for the camera.
How to solve this problem
You can try these methods:
- Clear cache. In settings, find the camera application, erase data and cache.
- Update your camera app. Perhaps its version is outdated and is not compatible with the current firmware of your phone.
- Try installing any other photo and video application. For example Camera Zoom FX. If it doesn't work, at least you'll know for sure that the problem is technical and not software in nature.
«>
How to install drivers for Lenovo webcam?
Any user who has even minimal computer knowledge can install a driver package for a webcam.
The sequence of actions is as follows:
- In the search bar, enter a query like “download drivers for a Lenovo laptop,” not forgetting to indicate the device model.
- Download the drivers (preferably from the official website).
- We install the software.
- Reboot the laptop.
- We check the functioning of the webcam in Skype (if the operation is successful, the device will work normally).
As you can see, turning on the camera is not that difficult. First of all, you need to establish why it refuses to work. If the webcam is disabled, then you just need to turn it on, but if it does not function, you should install the drivers.