Windows operating systems
14.08.20192112
An experienced user who remembers how to enter the BIOS on a desktop computer probably knows not only about the features and potential risks of the process, but also has an idea of how to exit the basic I/O system. Another question is laptops: there are countless models of them today, and for almost every one the manufacturer assigns its own key combination that allows you to get into the BIOS. Let's try to figure out how to do this on Lenovo laptops.
Keyboard shortcuts
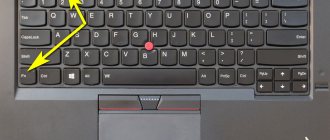
Fortunately, Lenovo has established a single key combination for almost all of its laptop models: Fn + F2 , where Fn is a special “function” button, usually located in the lower left corner.
Much less often, in order to enter the BIOS, you have to use another Fn + F1 or simply press the Delete (Del) key.
In general, the user's actions come down to two steps:
- Open the Start menu and, by clicking on the virtual power button, select one of the options - shutdown or restart.
- Turning on your Lenovo laptop again or waiting for it to start after a reboot and using one of the key combinations listed above to enter the BIOS is no more difficult than understanding the benefits of UEFI Boot.
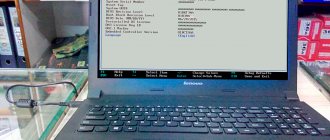
If everything is done correctly, the user will see the BIOS menu in front of him. Now he can configure the BIOS, set the operating system boot order and perform other required manipulations - if necessary, after entering the password.
Tip: if your Lenovo laptop starts up too quickly or you can’t enter the BIOS after rebooting, it makes sense to turn it off using a physical button by pressing and holding it for a few seconds.
Now, after giving the Lenovo laptop a little rest, you should start it again - and do not forget to use one of the combinations listed above in time to enter the BIOS.
Entering BIOS on a Lenovo laptop: method 2
Entering the BIOS on a Lenovo laptop is carried out in several ways - unfortunately, there is no one solution for everyone on how to get into the BIOS, but the methods for launching it are quite simple. So, let's move on to the first method.
The most popular solution is to use the keyboard - simultaneously pressing several laptop buttons immediately after starting it. Turn off your laptop (this method will not work if it is turned on), then press the power button and immediately one of the options:
- F2 button or Del button;
- Combination Fn+F2;
- F1 key
If the BIOS was launched incorrectly, the computer will boot the OS in normal mode. In this case, you will have to turn it off again and call the BIOS again, but using a new boot method. To avoid playing guessing games and launch the BIOS faster, you can also look at the instructions for your Lenovo laptop.
It also happens that the laptop starts up too quickly, and the user does not have time to press the required combination. To avoid this, turn off the laptop by holding down the power key for 10-15 seconds. Then hold down the desired combination to enter the BIOS, and then press the power button and release, while continuing to hold down the keys to enter the BIOS until the desired screen with parameters appears in front of you.
NOVO button
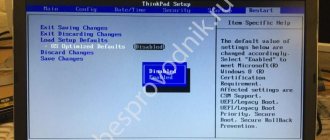
Owners of Lenovo laptops from the ThinkPad line, as well as some other models, can enter the BIOS without using key combinations - just use the special NOVO button, located next to the power button or on the end of the device.
After turning off your Lenovo laptop, press and hold NOVO for a few seconds; By selecting the BIOS Setup item in the window that appears, the user can finally enter the BIOS and continue working in the basic input/output system.
Tip: sometimes, instead of the NOVO button, there is a special hole on the device body, near which the same icon is located. In this case, you can open the BIOS menu by inserting a special paper clip for an iPhone or smartphone or a regular paper clip into the connector and lightly pressing the contact for two to three seconds.
How to enter the BIOS of a Lenovo laptop: method 1
Equipment manufacturer Lenovo has created its own software called Lenovo One Key Recovery - this is a system that includes the ability to backup data on a Lenovo PC and restore it. In order to turn it on, there is an additional button on the laptop - Novo. It is found on almost all the latest laptop models from Lenovo and is located either on the side panel of the case or near the power button. Sometimes, in the most modern models, there is a small hole with a microswitch inside. In this case, you need to use a thin, non-sharp object - for example, a paper clip.
And despite the fact that the direct purpose of this button is not to call up the BIOS, you can still get into the BIOS using it:
- Turn off the device by holding down the power key for 10-15 seconds;
- Hold the Novo key for 2-3 seconds and release;
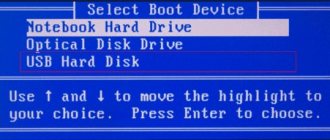
- Your laptop turns on and opens a small menu with a choice - click on the line labeled “BIOS Setup”.
Firmware Settings
To enter the BIOS on Lenovo laptops running Eight or Ten, you can use the built-in Windows option:
- Open the Start menu and click on the gear icon in the leftmost column.
- In the “Windows Settings” window that opens, go to the “Update and Security” section.
- Switch to the "Recovery" tab.
- In the “Special Boot Options” section, click on the “Restart Now” button. It is important to remember that the process will begin immediately and without additional prompts, so before clicking, you should close open documents, save changes made to the system, and take other precautions.
- In the “Select Action” menu, click on the “Troubleshooting” button.
- Next, go sequentially to the “Additional parameters” subsections.
- And "UEFI Firmware Settings".
- That's all - all you have to do is click on the “Reboot” button and wait until the BIOS menu appears on the Lenovo laptop screen.
Important: although theoretically the specified algorithm should launch UEFI, on Lenovo laptops the BIOS is set by default for the initial boot. In addition, even if the owner ends up in the “advanced interface”, he will be able to perform all his tasks in it, bypassing the basic I/O system.
How to enter BIOS: method 5
The last method is the most radical, and can only be recommended to those users who already have good experience in disassembling such a device. Otherwise, you run a high risk of permanently damaging your Lenovo laptop.
The essence of the method is as follows: to reset all BIOS settings, you need to temporarily disconnect the special CMOS battery that is connected to the device’s motherboard. After performing this action, the device will “think” that the settings may be incorrect and will offer you to open the BIOS to correct them, or it will even enter it on its own.
BIOS batteries look different and are in their own place in almost every model, so you’ll have to dig around before you get to it and turn it off. But in general the procedure is as follows:
- Turn off the laptop, remove the battery;
- Access the CMOS battery and carefully disconnect it from the motherboard;
- Wait 15-20 minutes (this is necessary so that the CMOS chip is de-energized and the capacitors on the motherboard are discharged);
- Reconnect the battery, reassemble the laptop, connect the power and turn on the device;
- If you did everything correctly, you will see the BIOS settings screen.
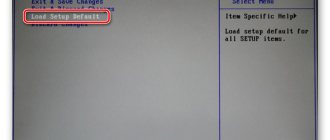
We hope that one of the methods described above helped you find the answer to the question of how to enter the BIOS on a Lenovo P70, G50-80, Lenovo ThinkPad T400 or T440 laptop.
Removing the battery
If the owner of a Lenovo laptop is also an extreme sports enthusiast, he can enter the BIOS by partially disassembling the device case and taking the round battery out of the motherboard for a few seconds - and then installing it in place.
As a result, a minor system failure will occur, and with a high degree of probability, the next time you start the laptop, it will automatically boot into BIOS mode, without even asking for the owner’s permission.
Is it possible to get to the BIOS without a keyboard?
Part of the problem that the BIOS does not start on an Acer laptop (or any other model) may be due to the failure of the keyboard. In this case, it is strongly recommended to check for functionality. You never know, maybe the button you need simply doesn’t function? The same goes for using wired or wireless keyboards. But the situation can be further complicated by the fact that the USB port or wireless adapter does not work. As is already clear, they will also have to be checked, which will require, if possible, to fully load the operating system and use at least the “Device Manager” to check the status of the device itself and its installed driver.
As for accessing the primary system without using any keyboard at all, it is believed that there are several ways, but they are so labor-intensive that the average user will not understand them. And that is why they are not considered. In 95% of cases, it is impossible to get to the BIOS settings without a keyboard.
But on non-standard models, special attention should be paid to special buttons located on the main panel and designed to call up special menus, through which you can often get to the parameters of the primary system. But not all laptops have such buttons.
Non-working video cards
You can often encounter situations where the BIOS on a laptop does not start due to a non-working video card. Unfortunately, such problems have been noticed with NVIDIA GeForce 8-series graphics chips and outdated AMD cards that are installed on Acer laptops. In this case, the easiest way would be to remove the problematic adapter immediately and try to enter the BIOS. If the firmware is not damaged, the card will have to be replaced. If failures occur, you can try to reflash the software environment of the primary system. Again, you need to look at the instructions for installing the updated software in advance.
Some experts recommend using special flashers like Flash Utility for DOS, but you must use only those versions that are suitable for the BIOS of a certain developer (Phonix, InsiderH2O, etc.). The process is quite complex and can be launched, as the name suggests, exclusively from the command console, but it is first recommended to create a special Crisis Disk media with a flasher and firmware file recorded on it.
Resetting the primary system to factory settings
Quite often you can observe that the BIOS on a laptop does not start under any pretext due to incorrectly set parameters in the primary system itself. The situation is quite serious, since some “too active” users sometimes set such options that the primary system simply “crashes”. The same applies to carrying out the firmware process when the power supply suddenly turns off. But this mostly applies to situations where the laptop’s battery operation is not provided for at all, or it is almost completely discharged (we’ll look at the firmware separately).
In this case, it makes sense to perform a complete reset of all parameters to factory settings.
Since the BIOS on the laptop will not start, you will have to disassemble the laptop and remove the CMOS battery from the socket on the motherboard for 10-15 minutes. In this case, all parameters will be reset automatically and without the necessary user access to the software shell of the primary system.
Problems connecting an additional monitor
You can also very often encounter situations where the BIOS does not start on a Lenovo laptop or a model from another manufacturer, where some function keys, when used together with Fn, are assigned the function of duplicating the screen or projecting an image onto a second connected monitor.
Here the situation can be resolved quite simply, and you do not need to have any special knowledge to perform further actions. If the BIOS does not start on the laptop (the black screen appears on the laptop), it is quite possible that projection is still active, and the second monitor is not currently connected. As is already clear, the solution will be to deactivate this function (Fn + F5, Fn + F8, etc.). If the user still needs a second monitor for work, he should simply turn it on and check if there is an image on it.
Overheating of chips
This is perhaps the simplest situation, but overheating can relate to both the graphics adapter and the BIOS chip itself. In this case, it is best to let the laptop “rest” for a while by completely de-energizing it and removing the battery to get rid of residual currents. Only after this can it be turned on again, after which one of the above actions can be taken. In particular, this helps Acer Aspire 7220, 7520, 5220, 5520, 4220 and 4520 laptops with NVIDIA MCP67 graphics cards. But it should be noted that such resuscitation is only temporary.