BIOS is a set of programs that are stored in the motherboard memory. They serve for the correct interaction of all components and connected devices. The BIOS version determines how correctly the equipment will function. From time to time, motherboard developers release updates that fix problems or add new features. Next, we will talk about how to install the latest BIOS for Lenovo laptops.
Update BIOS on Lenovo laptops
On almost all current laptop models from Lenovo, the update occurs in the same way. Conventionally, the entire procedure can be divided into three steps. Today we will look at each action in detail.
Before starting the process, make sure that your laptop is connected to a good power source and that its battery is fully charged. Any even slight fluctuation in voltage can cause failures during the installation of components.
Step 1: Preparation
You definitely need to prepare for the update. You are required to do the following:
- Find out the current version of your BIOS to compare it with the one found on the official website. There are several determination methods. Read more about each of them in our other article at the link below.
Disable your antivirus and any other security software. We will use files only from official sources, so you should not be afraid that malicious software will get into the operating system. However, the antivirus may react to certain processes during the update, so we recommend disabling it for a while. Read about the deactivation of popular antiviruses in the material at the following link:
- Restart your laptop. The developers strongly recommend doing this before proceeding with the installation of components. This may be due to the fact that the laptop is currently running programs that can interfere with the update.
Step 2: Download the updater
Now let's proceed directly to the update. First you need to download and prepare the necessary files. All actions are carried out in special auxiliary software from Lenovo. You can download it to your computer like this:
- Use the link above or through any convenient browser to go to the Lenovo support page.
- Scroll down a little and find the Drivers and Software section. Next, click on the “Get Downloads” button.
In the line that appears, enter the name of your laptop model. If you don't know it, pay attention to the sticker on the back cover. If it is erased or you cannot make out the inscription, use one of the special programs that help you find out basic information about the device. Check out the best representatives of such software in our other article at the link below.
Among the list of drivers and software, find the “BIOS” section and click on it so that it opens.
Click on the “BIOS Update” title again to view all available versions.
Find the latest build and click on “Download”.
Wait for the download to finish and run the installer.
It is better to launch and further actions under an administrator account, so we strongly recommend logging in under this profile, and only then proceeding to the next step.
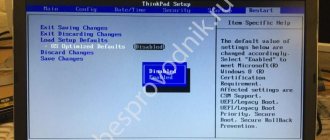
How to flash laptop BIOS
BIOS update
- This is a very useful, but at the same time extremely dangerous procedure. Useful in that after releasing their products, manufacturers continue to improve them based on feedback from service centers and their research. Over time, data about errors and their corrections appears. So, it is precisely solutions to hardware-level problems, additional options in the settings that appear in new versions of the BIOS management firmware. The danger of this procedure lies in its complete inoperability after an unsuccessful BIOS flashing. In most of these cases, the operation of the motherboard or laptop can only be restored at a service center. And sometimes such a recovery procedure is impossible or involves removing the chip from the motherboard and then flashing it in a special programmer. And all this costs money.
Attention!
Flashing the BIOS involves the risk of losing the functionality of the equipment.
Reflash it only as a last resort, and with sufficient experience for this! If you decide to flash your BIOS to follow a buzzword, don't do it! So, you have decided to flash the BIOS on your laptop. In this article we will try to help you.
Before flashing the laptop BIOS
The safest and most reliable method is to flash it from DOS using a USB flash drive.
The general principle of flashing the BIOS from DOS is as follows. It is necessary to copy the file of the new BIOS version, as well as a special flashing utility (flasher) to a bootable USB device. Reboot the laptop, boot from the flash drive. Using the command line, launch the flash program and follow further instructions. What you need to know before flashing the laptop BIOS:
1. Download the latest BIOS version only from the official website of the laptop manufacturer
. Don't download the beta version. You should download the latest tested and working version.
2. The laptop must be turned on via the power supply and not run on battery power.
The best option would be to connect the laptop to the mains via an uninterruptible power supply (UPS)
.
3. The USB flash drive used must be reliable and proven to work. If you notice any errors in the operation of a USB storage device related to data loss, then do not use it under any circumstances.
4. Never disconnect power from your laptop during the BIOS update process. Also, never press any keys or buttons on the laptop during this time.
How to flash laptop BIOS
Let's look at the process of updating the BIOS using the example of a Dell Inspirion 1525
.
1. Create a bootable USB flash drive
. Read the guide on how to do this quickly and reliably. If you don’t have a standard USB flash drive at hand, but your laptop supports booting from the built-in card reader, then use it. To do this, you need to make a bootable memory card from a camera or phone, having previously saved the data from it.
2. Download the latest BIOS version
from the official website of the laptop.
It is best to use the serial number from the sticker on the underside of the laptop case for this. Many manufacturers provide a service on their website to search for the necessary files to download by serial number. On our laptop this is Service Tag
.
By entering it on the manufacturer's website we find the BIOS file. At the time of writing this article, this is version A17 dated December 2, 2009. Moreover, everything we need is already contained in one file with the *.exe
.
So, from the official Dell website, download the file 1525_A17.EXE
and copy it to our bootable USB flash drive. Be sure to remember or better write down the name of the downloaded file!
3. Booting from a USB flash drive
.
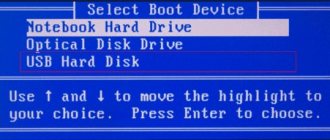
To do this, we set boot from a USB device in the laptop BIOS itself. Or we use special keys when turning on the laptop to call up the menu for selecting boot devices. On Dell laptops this is the function key F12
. After loading we will see the DOS command line
4. Enter the command to run the BIOS flashing program (file name): Code:
| C:>1525_A17 |
5. The programmer shell from DELL will start
The program itself will check the BIOS file for errors and for compliance with its laptop model.
If the verification procedure was successful, press any button on the keyboard to continue. When you are ready to start the BIOS flashing process, press the “ Y
”
The laptop BIOS update process will begin.
and checking the result of the BIOS update
Wait until the update process finishes! Do not turn off the laptop or press any keys during this time! After the BIOS flashing is completed and it is successfully checked, the laptop will be rebooted
When the laptop goes into reboot, it may turn off and not turn on for several seconds. This is fine! Just wait until the laptop turns on on its own.
6. After flashing the new BIOS version, go into it and set all the settings you need.
Flashing on different laptop models and from other manufacturers, of course, may differ. Usually, along with the BIOS files, instructions for flashing it are also supplied. Be sure to read it. But in general, all actions are very similar to each other. The main thing is to take your time and do everything thoughtfully!
What to do if the BIOS flashing process fails
If after updating the BIOS your laptop stops turning on or displays an error, do not panic.
Save the flash drive with the BIOS file that was used for flashing. Many modern laptops have an emergency system for restoring the original BIOS version. This is just for such cases. Just run this firmware rollback process.
If you don’t know what to do in this case, contact your nearest service center. Bring the BIOS file you used. It's paid, but they will help you there.
Disclaimer of Warranties
The fact of flashing the firmware itself is not considered a violation of the manufacturer's warranty.
But if the result is unsuccessful, you may lose your warranty! The administration of our resource and the author of the article are in no way responsible for any damage resulting from an unsuccessful BIOS update performed by you yourself! This is only a description of the update process, and not a clear guide to action!
How to enter Bios on a laptop
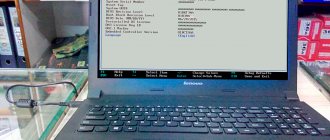
The BIOS starts immediately when turned on. In older models, the letters are clearly visible in the upper left corner of the screen immediately after loading begins. Then they disappear and are replaced by images of the OS launching, since control of the laptop is transferred to it.
First you need to determine the laptop model. Here are typical methods for popular brands:
- ASUS: When turning on, hold down the F2 key.
- Compaq: F10 key.
- DELL: classic DEL, F2, extremely rare - Ctrl-Alt-Enter.
- HP: F2, ESC keys.
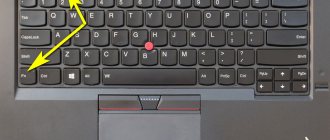
- LENOVO: Del, F2.
ACER: also F2, DEL. More exotic keys: Ctrl-Alt-ESC or F1.
A complete list would take up too much space. So if none of these combinations worked, please contact us in the comments below.
If everything worked out for you, a window similar to this should appear.
Don't forget that you must reboot first. The BIOS window is visible only in the first seconds of operation.
By the way, if you press Pause, the letters in the upper left corner freeze on the screen. You can see the version and other BIOS details.
Step-by-step instruction
The first thing you should do is go into the BIOS and find out its version. It will be displayed on the start page of the subsystem. To enter the subsystem, reboot/turn on your laptop and press the “F2” or “DEL” key (depending on the device model) while it boots (before the OS loads).
After that, go to the official Lenovo website, and in the “Support and Warranty” menu section, select “Drivers”.
In the window that appears, select “Laptops and Netbooks” and indicate the model of your device.
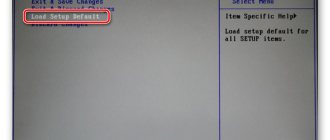
After which the page will load, on which you will see all the utilities available for your laptop model. Among them, find the latest BIOS version. Let’s immediately make a reservation that the OS bit depth does not matter, so download the version that is the latest.
Bios update procedure
- Go to the manufacturer's website and find the support page for your model on the website. It's better to use the search. Any leading brand has a list of laptops of at least a hundred devices of varying vintages. Below, for example, is the ASUS support page.
The support page usually requires you to select the Drivers and Utilities section, then select your operating system. The menu items we need should be called BIOS and BIOS utilities. The first contains information about the latest versions of the basic input/output system, and in - Determine the available BIOS version. Please note that many manufacturers publish a list of changes that the update brings . If the solution to your problem is not in the list, then it is likely that the problem is not in the bios, but in installed programs and operating systems
- Now we determine the current BIOS version: launch the MSInfo application, press the Win key and start writing the first letters of the program name. We find the section about BIOS and look at the version.
Assembly 216 has been installed and only 216 is available. If you have an older version than on the manufacturer’s website, then move on. - Download the BIOS update utility.
Previously, only DOS programs were used for firmware. Now everything can be done with a regular application, for example, WinFlash directly from Windows. - Install the program and launch it.
Note. Utility installation files and firmware files are usually supplied in zipped (ZIP) form. They must first be unpacked into a directory created on the C: or D: drive. And only then launch it.
- Download the latest bios from the manufacturer's website. Be sure to remember the directory where you extracted the file.
- During startup, the BIO C update utility immediately asks for the path to the firmware file. We find the directory into which we unpacked it and select it with the mouse.
- Be sure to connect the power supply and make sure that the battery charge is at least 20%. Otherwise, the program will not even start working. If there are power failures, you risk getting a dead piece of iron and plastic instead of a working laptop with an outdated BIOS version.
- In the window of the update utility, in our case WinFlash, we will again see the installed version, and the option from the manufacturer’s website. If they match, the Flash button will be disabled. Otherwise, click on Flash and wait for the procedure to complete.
After rebooting, the laptop will work with the new version of the basic input/output system. There is no need to look for obvious signs of renewal. The changes are usually unnoticeable. You can confirm the fact of the update using the same MSInfo program.
Instructions for updating Bios on a laptop
In recommendations for laptop maintenance, you can find mention of the need to update the BIOS. Few users know why. However, without BIOS it is impossible to work on computers in principle.
BIOS is a basic input/output system that serves as an intermediary between the operating system: Windows, Linux or iOS, and the laptop components. It may contain errors, and updating them will remove them. Installing a new version may be required for another reason. Sometimes manufacturers include support for new memory modules or processors.
How to enter the BIOS of a PC or laptop?
Reference! To launch this software, you must click the button responsible for launching this application. On some devices, you may need to combine several keystrokes.
Basically, the following buttons on the keyboard are used to perform this process:
Some versions of PCs or laptops, when they are turned on, independently indicate to the user which key to press. In this case, upon startup, the message “Press “Key” to enter SETUP” will be displayed.
Lenovo ideapad G50-30 Laptop BIOS Update for windows 7 8 8.1 10
Supported Operating Systems
Microsoft Windows 7, Microsoft Windows 8, Microsoft Windows 8.1, Microsoft Windows 10
Important Information
BIOS, an abbreviation of Basic Input/Output System, is integrated into ROM chip on Lenovo ideapad G50-30 Laptop main board, which contains the basic input/output program, system configuration information, system startup self-check and pre-setup programs. BIOS provides most basic low-level hardware operations; it controls the connection between software and hardware, and the interfacing window of hardware and operating system.
Note: Make note of any settings you have changed in the Lenovo ideapad G50-30 Laptop BIOS Configuration Utility. These settings you have to be re-entered after updating the BIOS.
Attention: Do not power off or restart your Lenovo ideapad G50-30 Laptop during the BIOS flashing process, which will cause serious damage and improper functioning of your Lenovo ideapad G50-30 Laptop.
Downloading the Lenovo ideapad G50-30 Laptop BIOS Update
Lenovo ideapad G50-30 Laptop BIOS Update for windows 32 bit Download (3.89 MB)
Lenovo ideapad G50-30 Laptop BIOS Update for windows 64 bit Download (4.06 MB)
Click the download link to download the file from the web page. When prompted, select a drive and directory in which to save the downloaded file.
how to Install the package in Windows
BIOS firmware on Lenovo laptop
You should resort to the BIOS update procedure only if it is really necessary. Never experiment with the BIOS just for fun! Lenovo laptop repair specialists will help you professionally update the BIOS.