Powering on with the system key
Every laptop, regardless of configuration and manufacturer, has the function of launching the BIOS from the keyboard. The specific button depends on the motherboard model and software version. Since we are talking about Lenovo >F2 laptop. It must be pressed on the initial startup screen (before the operating system starts) and held for 1-2 seconds.
After this, you will immediately be taken to the BIOS settings menu. If the laptop's firmware or components have changed, the key may change. For example, this function will use the Fn key.
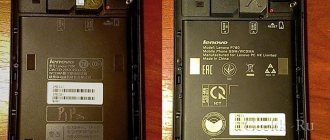
Lenovo Y700 laptop - review, unboxing, first launch Lenovo IdeaPad
Lenovo laptop review
Y700 (17.3 / i7-6700HQ / 16GB / 128 1000 GTX960M FHD).
Packaging contents, first launch
.
Next, find the “Boot menu” and set the boot priority there. To do this, look for the inscription “First boot device”, select it and select “CDDVD-Rom” from the list that appears. Sometimes a list of boot device selections is not offered, then we simply go to the “CDDVD-Rom” position and move it to the very top by pressing the - keys. Then we simply find an exit from the SETUP program - select “SAVE ALL and EXIT” and “Yes”.
For G500 series models, it is recommended to first reset all settings to default (“Load Defaults”) and only then set the desired boot priority.
Also check that on the “Startup” tab the “UEFI/Legacy Boot” value is set to “Legacy Only”
Some people wonder if some special version of Windows is needed for a laptop, as opposed to a personal computer? No, Windows is the same for everyone, it is only important to choose the right version: XP or Seven, depending on the configuration of your laptop.
To install Windows 7/10, in most cases, it will be enough to know that you have at least one gigabyte of RAM. Another point is that if the laptop came with a disk with drivers for Windows 7/10, and you, for some reason, need to install Windows XP, then before installing it you will have to download all the drivers for this OS.
Next, boot from the boot disk with the operating system distribution and follow the instructions of the installer. The procedure will not differ from installation on a regular computer. For more information, see my free video course “How to Install Windows 7”
Branded BIOS launch button
Lenovo installs the proprietary Lenovo One Key Recovery program on its computers. The utility allows you to start a system restore from a backup or change the boot priority of drives. This menu also contains the function we need - entering the BIOS.
In the Lenovo IdeaPad 330, the creators abandoned the prominent Novo Button on the body and left a small hole with a hidden button. A similar solution can be found on smartphones in the design of the SIM card tray. Proceed in exactly the same way: take a paperclip or other thin object, press into the hole until it clicks slightly.
After a few seconds, a menu of four items will appear on the screen. Of these, you need to select the second position using the arrows on the keyboard and press Enter. Through the Novo Button Menu you can also change the boot priority without entering the BIOS settings.
What is the NOVO button?
All Lenovo Idea series laptops have a special small button (or a hole for a paper clip, like on smartphones) “NOVO”, indicated by a reverse arrow resembling an inverted “U” Novo button icon.
Pressing this button launches a special menu that allows you to enter BIOS settings, launch Lenovo OneKey Recovery, or choose to boot from another device. Typically, the “NOVO” button is located on the front panel of the laptop, next to the power button, but on some models it may be located at the end of the case, as is the case with the Lenovo IdeaPad 110.
On the official Lenovo support website, all this information is available, both in the general section about BIOS (UEFI) https://support.lenovo.com/us/ru/solutions/ht062552, and if you use the search for the specific model of interest.
I will provide another link from the official Lenovo website about the recommended methods of entering the BIOS for IdeaPad series laptops https://support.lenovo.com/ru/ru/solutions/ht101636
So, to get into the BIOS on the Lenovo IdeaPad 110, you should use a paper clip, pressing its end into the hole marked with the “NOVO” icon until it clicks. The laptop, of course, must be turned off (we don’t touch the laptop’s power button; it will turn on on its own when you press the “NOVO” button).
If you find the article useful, do not be lazy to like and share with your friends.
[Solved] Thunderbird. Failed to connect to the IMAP server. How much money do we spend on charging smartphones and laptops? PTR records on the DNS server The most cunning Windows XP password removal in my practice Self-repair of Samsung LCD monitors Lenovo laptop screen blinks. The cause of the malfunction and how to solve the problem.
Via the diagnostic menu
Now let's move on to ways to launch the BIOS through the operating system. This option is not very convenient, but it can be useful if the system keys refuse to perform their function. Use this guide:
- Open the Settings window and go to the Update & Security section.
- Open the “Recovery” tab and in the block called “Special boot options” click on the “Restart now” button.
- After this, your computer should restart. And when you turn it on, it’s not the operating system that will start, but the options from the screenshot. You need to click on “Troubleshooting”.
- At the next stage, you need to go to “Advanced options”, and then select the item marked in the screenshot.
- The computer will now reboot again and you will be taken to the BIOS settings.
You can use the same method without “travelling” through Windows windows. To do this, open the Start menu and click on the PC shutdown button. In the action selection list, you must click on “Reboot” while holding down the Shift key. After which the computer will begin to reboot as usual, but will launch the above-mentioned menu.
This method also works on the Windows lock screen. You also need to click on the shutdown button and select the option to reboot while holding down the key.
How to connect to a Wi-Fi network
To connect a Lenovo laptop with Windows 10 installed to a wireless network, you must:
- Find the Wi-Fi icon in the taskbar in the form of outgoing waves (sometimes an Internet symbol in the form of a globe is displayed, or a conventional image of a computer screen).
- Click on the icon. The system will display a list of all wireless networks within the coverage area of which the laptop is located.
- Select your network and click “Connect” (if you wish, you can check the “Connect automatically” box).
- If you have not connected to this network before, you will have to enter a security key (in other words, your Wi-Fi password).
- After a few seconds the system will establish a connection.
If you are unable to connect, click the “Network and Internet settings” link, which is located below the list of available networks. (You can also go to: Start - Settings - Network and Internet).
Go to the Wi-Fi tab and make sure the wireless network option is turned on. Next, go to the “Status” tab and run the “Network Troubleshooter”. Often the system finds the cause of the problem and tells the user how to fix the problem.
How to enter BIOS
On different Lenovo models, the methods for entering Bios on a laptop may differ. First, try the standard login method - when you start your personal computer, you need to press the F2 button on the keyboard, sometimes holding down the Fn key first. Next, the PC settings menu will be called up.
But this method does not always work. For some Lenovo models, the BIOS does not load when you press F2 or Fn+F2 - for example, Lenovo Legion Y520, Lenovo G70, G50-30 or G500. If you tried to enter bios using the method described above and it did not work, the following instructions are for you:
- There should be a special small key with a curved arrow on the side of the laptop (where the charging socket is usually located) or right next to the power button. It's called Novo Button, One Key Recovery or One Key Rescue System. You need to turn off the laptop and click on it.
- If you pressed the correct button, the laptop will start, and on the screen you will see that we go to a special start menu:
- Normal Startup (normal download);
- Bios Setup (parameters);
- System Recovery (system recovery);
- Boot Menu (boot menu).
- As you most likely guessed, to enter the BIOS on Lenovo, you need to go to the BiosSetup item. After you select it, you will see that the laptop has entered the BIOS and you can configure it as you wish.
Entering BIOS on Lenovo
The newest laptops from Lenovo have a special button that allows you to launch the BIOS upon reboot. It is located near the power button and is marked with an icon with an arrow. The exception is the Ideapad 100 or 110 laptop and similar budget devices from this line, since they have this button on the left side. As a rule, if there is one on the case, then it should be used to enter the BIOS. After you click on it, a special menu will appear where you need to select “BIOS Setup”.
If for some reason there is no this button on the laptop case, then use these keys and their combinations for models of different lines and series:
- Yoga. Despite the fact that the company produces many different and dissimilar laptops under this brand, most of them use either F2 or the combination Fn+F2 to enter. On more or less new models there is a special button to log in;
- Ideapad. This line mainly includes modern models equipped with a special button, but if there is none or it is faulty, then F8 or Delete can be used as an alternative to enter the BIOS.
- For budget devices like laptops - b590, g500, b50-10 and g50-30, only the Fn+F2 key combination is suitable.
However, some laptops have different login keys than those listed above. In this case, you will have to use all the keys - from F2 to F12 or Delete. Sometimes they can be combined with Shift or Fn. Which key/combination needs to be used depends on many parameters - laptop model, serial modification, configuration, etc.
The required key can be found in the documentation for the laptop or on the official Lenovo website by searching for your model and finding basic technical information for it.
It is worth remembering that the most common keys for entering the BIOS on almost all devices are F2, F8, Delete, and the rarest are F4, F5, F10, F11, F12, Esc. During the reboot, you can try pressing several keys (not simultaneously!). It also happens that when loading, a message with the following content “Please use (the desired key) to enter setup” appears on the screen for a short time; use this key to enter.
Entering the BIOS on Lenovo laptops is quite simple, even if you don’t succeed on the first try, then most likely you will do it on the second. All “incorrect” keys are ignored by the laptop, so you don’t risk disrupting its operation with your mistake.
We are glad that we were able to help you solve the problem.
Add the Lumpics.ru website to your bookmarks and we will be useful to you. Thank the author and share the article on social networks.
Describe what didn't work for you. Our specialists will try to answer as quickly as possible.
Two secrets for launching Bios
But if you still haven’t been able to start the BIOS using one of the methods described above, and the Windows 8.1 or higher operating system is installed on your laptop, we’ll tell you two startup secrets.
- You need to turn on your PC. With the computer running on the desktop, drag the mouse pointer to the lower right corner of the desktop (call up the side menu).
- A menu opens for us where we select “Options” - “Update and Recovery” - “Recovery”.
- Here, in the “Special boot options” section, click on the “Restart now” button.
- Next, a blue screen with tiles will open. Open the “Diagnostics” tile, clicking on which will take you to additional options.
- You need to open the “UEFI Firmware Settings” item and click the “Reboot” button. Ready! You are in BIOS!
Second secret. Many Win 8.1 users make a mistake when trying to enter Bios. Everyone knows how to get into the BIOS - you need to press a certain button on the keyboard. To do this, the user clicks on “Shutdown”, waits until the laptop turns off, and then presses the button to enter the Bios, but the computer starts as before - the OS is loading.
The whole problem is that the Windows 8.1 operating system initially works with a quick startup function, which is based on sleep mode - enter the BIOS without turning off the PC, but rebooting it.
Some useful tips:
- After entering Bios, go to various settings for system parameters and boot in the BIOS itself. Be very careful and careful, and it’s better not to touch something you don’t know, as there is a risk of doing something wrong and completely losing your computer. And after making all the changes, go to the “Exit” section and select “Save & exit”. After this, the laptop will reboot, and when it starts again, all the settings that you previously had to set will be taken into account.
- If the above methods for entering the BIOS on a Lenovo laptop do not work, try pressing and holding the F12 key when starting the device until the BIOS starts - this method works on some Lenovo models.
- Very rarely, but it still happens - in some models the F1 key works (you need to press it several times until the laptop turns on).
- Manufacturers recommend configuring PC settings in Bios only with a fully charged laptop battery, since if during the setup process your laptop turns off due to being discharged, this will most likely cause some system problems in the future.
- Before exiting the BIOS, be sure to save all changes so as not to go astray.
Wi-Fi does not connect to the network or does not find it at all
The problem may lie in the software or physical part of the laptop, in the settings of the router, or in failures on the provider's side.
The reason is in the laptop or router
As noted, the first thing you need to do is run the troubleshooter. To do this, you don’t have to go into Windows settings: you can immediately right-click on the wireless network icon and go to diagnostics.
If the diagnostic module does not find any problems, examine the router. It must be in working order and Wi-Fi mode must be activated.
Reference! Try connecting to the router via a network cable. This way you can check your Internet access and configure your router.
To configure the router, you need:
- Open any browser and enter in the address bar: 168.0.1 or 192.168.1.1
- Log in to the system (standard login and password – “admin”). If you can’t log in, look at the information on the bottom of the router or in its documentation.
- Change the name of the Wi-Fi network (must consist only of Latin letters and/or numbers).
- Check the Wireless Mode section. b/g/n should be set there.
Save your changes, log out and try connecting again.
The network is connected, but there is no Internet connection
Sometimes it happens that the laptop successfully connects to the network, but the Internet is still unavailable. In this case, it is recommended:
- make sure the router is working (refer to the previous point);
- check the integrity of the cable connecting your router to the Internet cables in the entrance (it is quite fragile and is often damaged by furniture or animals);
- call your provider and ask about the state of the Internet (perhaps your access is blocked, or there are technical failures on the line).
If there are problems with the router or cable, sometimes you have to call a specialist, for which you need to contact your provider again.
Device driver not installed
Important! Often, a Lenovo laptop refuses to connect to a wireless network due to driver problems.
To check the driver status, you need to follow these steps:
- Press the Win + R key combination to bring up the Run menu
- Enter the command “devmgmt.msc” and press Enter.
- The device manager will open, among which you need to find the “Network adapters” item.
- In the list of devices, look for an item that contains the words “802.11n”, “Network” “Wireless”, or something similar.
- Right-click on it and go to the Driver tab.
- Look at the driver development date.
There are several scenarios in which the driver needs to be updated or reinstalled:
- it is not displayed at all among the network adapters, but there are unidentified devices;
- the driver is displayed, but is marked with a yellow triangle;
- The driver was released more than 5 years ago.
If the driver is still present in the system, right-click on it and select “Update Driver”.
Reference! The system will offer you to automatically search for drivers using Windows, or install them yourself.
In the second case you need:
- Go to the official Lenovo support site.
- Enter your laptop model into the search bar.
- Select the required driver from the general list and download it.
- Go to the device manager, in the main menu select the “Actions” tab - “update driver”.
After installing or updating the wireless driver, the problem should go away.
Other
Sometimes the Wi-Fi module can only be activated using a special Lenovo Energy Management program. Once installed, the program will prompt you to turn on your wireless network adapter and then begin searching for all available Wi-Fi signals.
Finally, in exceptional cases, the problem occurs due to a physical breakdown of the wireless module. In such a situation, all that remains is to contact the service center.
Lack of Wi-Fi connection is a common problem on Lenovo laptops. Often, the problem can be easily resolved on your own, and only as a last resort, the help of specialists is required.
Common login methods on a Lenovo laptop
The most common and well-known way to enter the BIOS is to press the Delete key on the keyboard. However, some computer and laptop manufacturers, including Lenovo, have defined other login methods for their systems.
When choosing a Lenovo manufacturer when purchasing, you must remember that the computer equipment of this company is produced, as a rule, with an already installed operating system. If you want to reinstall software on your laptop, you may encounter a problem: almost all modern models ignore the operating system you want, trying to return the computer to the original one. This is why you will need the ability to enter the BIOS yourself to get around this problem.
Depending on the Lenovo model, you can enter the BIOS in several ways:
- press and hold the F1 or F2 keys;
- press the DELETE button;
- press the Novo Button.
a Novo Button on their panel or side edge . Finding it is not difficult. The manufacturer has highlighted it with a corresponding design - a curved arrow.
If you need to get into the BIOS on a Lenovo laptop, then instead of the power button you need to press Novo Button. When booting, the system will enter the BIOS.
Please note that the BIOS will not appear on the monitor immediately. To enter the program, you need to perform one more step - find in the “ Novo Button ” menu the option to boot the laptop “ BIOS Setup ”, which is selected with the mouse button. After making your selection, press the Enter key on your keyboard. You are logged into the software.
What to do first after buying a new laptop
A new laptop with the Windows operating system installed is a blank slate from which you can make anything. The further fate of the device, its lifespan, and the quality of its work depend on the user’s first actions. It is very important to secure the device from external threats from the very first start and configure it for your needs.
It is impossible to list all possible Windows settings and settings. However, the fact that the operating system needs to be optimized for daily use is almost mandatory. Some system processes take up RAM and processor power. And the more these devices work under increased load, the shorter their lifespan. Therefore, it is very important to turn off everything unnecessary right away.
However, not everything needs to be turned off. Some system components, on the contrary, need constant updating. A striking example would be updates to drivers and main system components: standard Defender and processor security, Adobe Flash Player and many other things. When installing an operating system, store technicians do not always install the current version of Windows and, as a result, the relevance of the databases is called into question. The store’s task is to sell the products, and the rest is in the hands of the user.
Checking the operating system for updates
The first thing to do with a new laptop is to check Windows and all system components for updates:
- To do this, press the Win+I key combination, then open the “Update and Security” applet.
In the “Options” menu, go to the “Update and Security” applet
Follow the link “Advanced options”
We allow you to update not only the system, but also all its components
In the “Update Center” tab, click the “Check for updates” button
It is possible that during the update process the laptop will have to be rebooted several times, since much depends on the outdatedness of the system version and security components. After restarting Windows, you must run the verification procedure again to ensure that the OS is intact and up to date.
Checking drivers for relevance
Another important component of laptop performance is the availability of an up-to-date driver database. These software products allow you to conduct a “dialogue” between Windows and devices connected to the motherboard. By default, almost all devices receive basic drivers during OS installation, but these utilities cannot unlock the full potential of the video card, network adapter, and so on.
Often, running a scan in the Update Center checks all drivers for relevance, but based on my experience, I can say with confidence that this function sometimes works crookedly. Therefore, it is better to double-check the possibility of updating manually. It is most convenient to use the built-in Device Manager platform.
There are several ways to open this service, the fastest is the Windows menu:
- On the keyboard, press the Win+X keys, and in the drop-down list, open “Device Manager”.
Through the Windows menu, open “Device Manager”
Right-click on the device and select “Update Driver”
Select “Automatic search” to scan Microsoft servers
All antivirus systems scan systems in approximately the same way:
- After installation, the application icon will be located in the “Icon Bar”. Open the antivirus program, and in it go to the “Protection against viruses and threats” applet.
Open the antivirus interface through a special icon
In the protection environment, open “Scan Settings”
Select “Full Scan” and start the process
If the standard antivirus program does not suit you, you can replace it by simply installing another defender. Now the market is overflowing with high-quality free programs, they are almost as good as their paid counterparts. For everyday use, I recommend one program from the list to choose from:
- AVG AntiVirus Free;
- Avira Free Security Suite;
- Bitdefender Antivirus Free Edition;
- Comodo Internet Security;
- Avast Free Antivirus;
- Kaspersky Free.
Configuring System Settings
Settings is a new, special Windows management environment. This platform is designed to gradually replace the outdated Control Panel interface and with each new update it takes on more and more functions. Already now you can write a small book on settings that can be changed in Windows “Settings”. However, the main ones that concern the user in terms of initial setup are “Personalization”, “Time and Language” and some tabs of the “System” applet.
Some Options applets require initial configuration
“Personalization” is an important element of customizing the operating system. In this environment, you can customize the appearance of Windows to your liking or use a ready-made display option. If you open the applet, you will notice several tabs, each of which is responsible for configuring a specific element of the system:
- “Background” - allows you to customize the main image of the desktop, as well as the nature of its display. Here you can set a setting that will allow the system to change the image after a certain period of time;
In the “Background” tab you can set pictures for your desktop
“Colors” paint windows in shades selected by you or the system
Setting the correct time is an important step, since the display of most Internet sites depends on this parameter:
- To correctly set the date and time zone, open the corresponding applet.
- We turn off the automatic installation toggle switches, then set the correct time zone and click the “Change” button.
To make changes to the date, disable automatic settings
Insert the date and time and click “Change”
Also in this applet you can configure language settings and add another layout:
- Go to the “Language” tab. To add a layout, click the plus button.
Click the “Add language” button
Select a layout from the list and click “Next”
After selecting the layout, click the “Install” button
The most important setting in the System applet is the Display setting. This tab has many important parameters:
- desktop extension management;
- brightness setting;
- work with multiple monitors if they are connected;
- scaling setting.
All these parameters greatly influence the eye’s perception of what is happening on the monitor. Therefore, it is better to use the recommended settings.
Manage privacy and background programs
Speaking of Settings, it's also worth mentioning the Privacy applet. This environment allows you to configure several things - first of all, it sets parameters for collecting data about the computer's operation, and also stores settings for applications that run in the background and do not occupy the user's attention.
Personally, I recommend removing unnecessary things, even if the load on the network and RAM is small, but as you know, a penny saves the ruble. And refusing to run unnecessary programs means optimizing the system and extending its lifespan.
How to work with this parameter:
- Open the “Privacy” applet.
In the settings environment, open the “Privacy” applet.
Disable all parameters in the “Windows permissions” column
Clear the activity log and prevent it from making entries
Open the “Background Applications” tab and prevent them from running in the background
Video: How to turn off background programs in Windows 10
Removing unnecessary software
Sometimes the equipment adjusters in the store try too hard in their work and install a lot of unnecessary things in terms of programs, games and other utilities. In such cases, it is recommended to remove the excess. There are several reasons:
- programs are written to the hard drive and take up space from really important things;
- the registry becomes cluttered, making navigation through it more difficult;
- some programs run in the background, especially if they are included in Startup. By doing this, they unnecessarily consume RAM and processor resources.
In such cases, it is better to uninstall unused applications:
- Through the Windows menu, open the “Applications and Features” item.
Through the Windows menu, open the “Applications and Features” item
Select the application from the list and delete it
After this, the uninstallation process will begin, depending on the program, user participation may be required to give additional consent to the removal.
Disabling unnecessary services
Windows services are special program codes without an interface, the main task of which is to ensure the operation of system components and devices that are connected to the motherboard. However, there have always been too many “Services” and they were invented for all occasions. For example, if you connect a fax to your computer, one of these utilities will guarantee its operation. However, you must agree that the likelihood of using a fax on a home PC is negligible. At the same time, there are services that provide system updates, guarantee the operation of antiviruses, and so on. When disabling these products, it is important to remember that many of them are extremely important:
- In Windows search, enter services and open the best result.
Through the system search, open the “Services” environment
In the service properties, change the startup type to “Disabled”
List of services that can be safely disabled:
- "Fax machine";
- NVIDIA Stereoscopic 3D Driver Service (for NVidia graphics cards if you are not using 3D stereo imaging);
- “Net.Tcp Port Sharing Service”;
- "Working folders";
- "AllJoyn Router Service";
- "Application Identity";
- "BitLocker Drive Encryption Service";
- "Bluetooth Help" (if you don't use Bluetooth);
- “Client License Service” (ClipSVC, after disabling, Windows 10 Store applications may not work properly);
- "Computer Browser";
- Dmwappushservice;
- Geographic Location Service;
- "Data Exchange Service (Hyper-V)";
- "Guest Shutdown Service (Hyper-V)";
- "Pulse Service (Hyper-V)";
- "Hyper-V Virtual Machine Session Service";
- "Hyper-V Time Synchronization Service";
- "Data Exchange Service (Hyper-V)";
- “Hyper-V Remote Desktop Virtualization Service”;
- "Sensor Monitoring Service";
- "Sensor Data Service";
- "Sensor Service";
- “Functionality for connected users and telemetry” (this is one of the options to disable Windows 10 “tracking” of the user);
- “Internet Sharing (ICS)” (provided that you do not use Internet sharing functions, for example, to distribute Wi-Fi from a laptop);
- "Xbox Live Network Service";
- Superfetch (assuming you are using an SSD);
- "Print Manager" (if you don't use printing features, including Windows 10's built-in printing to PDF files);
- "Windows Biometric Service";
- "Remote registry";
- "Secondary login" (if you don't use it).
How to enter the BIOS on a Lenovo laptop from the Windows 8.1 operating system
This login method is not as common as the previous ones, but, nevertheless, it is successfully used by both ordinary users and programmers. It is proposed by experts for cases where the laptop keyboard or BIOS entry keys are faulty. Let's look at how to enter the BIOS in this case.
Logging into the program requires the following steps:
- Boot a laptop with Windows 8.1 already installed.
- Select “ Settings ” with the mouse pointer in the lower right corner of Win 8.1.
- Go to “ Change user settings ” and select “ Update and recovery ”.
- Select with the mouse pointer “ Recovery ” - “ Special boot options ”.
- Then you need to reboot the system by selecting “ Restart now ”.
- The Diagnostics tab will appear on the monitor . Here you need to select the “ UEFI Firmware Settings ” function.
- Reboot the laptop again.
Booting a Lenovo laptop from a flash drive via BIOS
Most often, this operation is performed by specialists in order to cure a laptop from viruses. Various software are recorded on removable media, but booting from it is usually not so easy. The problem is that all the latest Lenovo laptop models, starting from the 2013 release, have UEFI BIOS software that has certified Secure Boot security keys. They allow you to boot your laptop only when using a licensed Windows 8 installation disc.
In order to boot from media in such a BIOS, you need to disable Secure Boot in it by following these steps:
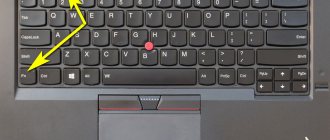
- Immediately after turning on the laptop, press two keys Fn + F2 on the keyboard or use the BIOS entry via the Novo Button button.
- By entering "InsydeH20 Setup Utility"(as a rule, this is what is installed in all the latest Lenovo models), go to the section "Security».
- Then select Disabled position Secure Boot , thereby disabling the security protocol.
- Boot section, change the installed “ UEFI ” option to “ Legacy Support ”.
- Save your changes by going to the "Exit" and selecting the option "Exit Saving Changes" From the options offered by the computer, select “ Yes" and wait for the reboot to happen.
- We insert the removable drive into a free USB input and again get into the BIOS by pressing the keys required for this Lenovo model.
- In the “ Boot ” section we see the flash drive that appears. As a rule, it is listed in the menu as a USB HDD. By simultaneously pressing the Fn + F6 keys, we determine the media first in the list of devices for booting the system.
- We repeat the steps described in paragraph 5.
After all the steps have been completed, the laptop will begin the next boot from the flash drive.
Please note that for some Lenovo models, disabling just one Secure Boot option may not be enough. To boot the system from removable media, you may need to enable compatibility mode.
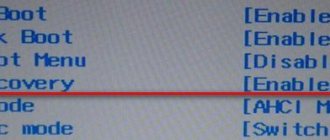
In various models it may be called CSM OS, CSM Boot, Legacy BIOS, UEFI and Legacy OS, or simply CSM.
BIOS capabilities in Lenovo laptops
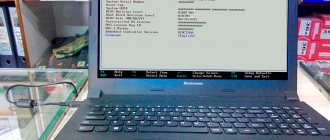
Since the main task of BIOS software is to test the laptop, the program itself is displayed on the monitor in the form of a table, divided into a number of additional tabs. They inform the user about the laptop configuration, show the main technical characteristics of this model, make it possible to boot and configure the security system. All these sections are displayed on the screen as “ Information ”, “ Configuration ”, “ Boot ”, “ Security ”, “ Exit ”.
Pay attention to an important detail. When moving into the BIOS, the mouse connected to the laptop stops working, so while in the software menu, navigation is carried out using buttons with pointers. It must be remembered that in all configurations without exception, the changed settings begin to work only after they are saved and the laptop is rebooted.
Remember that BIOS, like any other software, requires regular updates. Do not use dubious sites and blogs to download. All products installed in Lenovo laptops can be downloaded and updated from the manufacturer’s official website. And it is preferable to do this on the same computer where you are going to change the software. The BIOS version can be found by going through the POST procedure by pressing the Pause/Break key.
You already know how to enter the BIOS.
How to turn on a Lenovo laptop
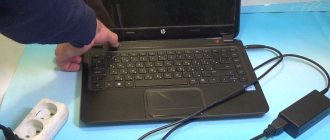
To find out which button turns on your Lenovo laptop, examine the top of the keyboard. The power key looks like a circle with a dash at the top. It is usually separate from the rest of the keyboard keys, but there may be situations where it looks like one of these buttons and is located in the corner.
To start your PC, just press this key. If it doesn’t work, then you may need to hold it for 1 to 5 seconds.