The other day I was asked to install Windows 7 instead of Windows 8 on a Lenovo B590 laptop. As usual, I tried to enter the BIOS via F2, then through other keys and oops... it didn’t work. I had to dig around and find a way out, or rather an entrance. What I am happy to share with you today. On the Internet I also saw quite a lot of questions from those who wanted to change the “eight” to the “seven”, but everyone had problems entering the BIOS.
How to enter BIOS on a Lenovo laptop
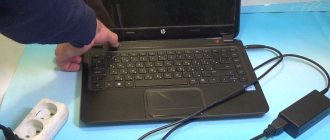
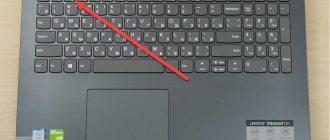
First, turn on the laptop and insert the Windows 7 disk into the drive. Turn it off, remove the battery, and disconnect the power from the laptop. We put the power in place and start the laptop from the NOVO . This is such a small button that is located next to the power button.
After a few seconds you will be taken to the service menu. Select Russian language , keyboard layout - Russian . Next we select
Diagnostics - Advanced Options - UEFI Firmware Options
Now the laptop will require a reboot - click the Restart and voila! We entered the BIOS.
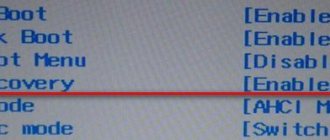
Now use the arrows on the keyboard to go to the Security , use the down arrow to select Security Boot and press Enter . Set Secure Boot parameter Disabled .
We return to the main BIOS menu with the Esc and use the right arrows to go to the Startup . Select Boot - press Enter . In this section, use the arrows to find your hard drive - ATA HDD... and use the + (plus) button located on the right side of the numeric keypad to move it to the very top of the list. If it doesn’t rise to the very top, then select Windows Boot Manager and use the - (minus) key to lower it down. In the same way, we raise the CD-ROM drive to second place - ATAPI CD1 .
Next in line can I put the device from which Windows will be installed in the event? unless it's a built-in drive.
Return again with the Esc , click down on the UEFI/Legacy Boot UEFI Only parameter , change to Legacy Only .
Save the configuration with the F10 and agree with the Enter .
Keep in mind: if you forgot something, changed it, or configured it incorrectly, you can only enter the BIOS on the Lenovo B590 to restore the default settings by removing the back cover of the laptop (no big deal - just 2 screws) and removing the CMOS battery for a while. Then be sure to set the correct date and time.
FAQ
Some people wonder if some special version of Windows is needed for a laptop, as opposed to a personal computer? No, Windows is the same for everyone, it is only important to choose the right version: XP or Seven/10, depending on the configuration of your laptop or all-in-one.
To install Windows 7/10, in most cases, it will be enough to know that you have at least two gigabytes of RAM, and for x64 versions you need 4GB or more. Another point is that if the laptop came with a disk with drivers for Windows 7/10, and you, for some reason, need to install Windows XP, then before installing it you will have to install it under this OS.
Next, boot from the boot disk with the operating system distribution and follow the instructions of the installer. The procedure will not differ from installation on a regular computer. Also, reinstallation is no different from installation. Only at the stage of selecting the target disk, you need to format it, i.e. erase old data. For more information, see my free video course “How to Install Windows 7”
Comments • 70
thanks bro. Everything was explained clearly. Beautiful, keep posting videos.
Thank you, dear man! Good luck!
thank you very much, you saved me from liking and subscribing
Thank you very much, it took me a day and the whole point was that the Intel crap was turned off in the BIOS.
thank you kind fellow.
I put it. Well, it’s much easier to install, for example, Windows10_Enterprise_LTSC_2019_v1809_by_LeX_6000 (trimmed assembly) Installed in half an hour, no need to look for drivers, it works just as quickly.
Thanks bro. I wish there were more people like you. Everything worked out )
Really helped, thanks!
Many thanks to you. Everything worked out.
Thank you very much, I've been fussing with installing Windows for a week
2020 works. Alexey has the only working method. Download the latest firmware from the website 2.07 and strictly according to the instructions. I work with laptops myself, but this one blew my mind!!))
It helped, thank you very much, it works even on Lenovo g580
Handsome! Many thanks to you!
My friend, you are the best. I was sweating for 2 days and my head was boiling. I seem to have done all the manipulations. Already freaked out, took it apart, put the hard drive on the computer and installed seven, this infection fell into a blue screen. Resetting the BIOS settings helped))) and reinstalling Windows on the laptop. Thank you.
Thank you very much I spent half a day on this problem Model B50
Thank you, it was very helpful for Linux! There are no problems with installations in Linux, but when you install 7, the dancing with the tambourine begins!
Thank you friend for helping. like from me
Buddy, you're a genius. Thank you, it helped. All the best to you
handsome, I was sitting there racking my brain, thank you
Screw half the video about the firmware, why the fuck?
I didn’t have to update the BIOS; on the same laptop, all I had to do was change the settings in the BIOS. thanks for the video! Windows continued installation from the HDD)
everything worked perfectly! THANK YOU!
I just updated the BIOS and that's all, everything that is written here did not help on this laptop, there was a blue screen, reset the BIOS settings and do not set anything, you will be happy)
I would kiss you! True, I still brought the USB up.
Thank you very well explained)
Thank you! It helped! Handsome!
Thank you brother, it helped a lot
Thank you. I clicked exite disablet and immediately Windows 7 started working.
Thank you for your work. I took some of the recommendations from you, but I had to figure out some of them myself. The fact is that after updating the BIOS (version 2.09), there are no items that many had, in particular, such as: “OS optimized Default, change in its meaning from Win8 64 bit to Other OS". We repeat the action in the video after the author, and then do it according to the following algorithm: 1. Go to the BIOS, then Set OS Optimsed Default to [DISABLED]; 2.Save the changes and exit (FN+F10); 4.Go to BIOS, Load Default Settings item, reset; 5.Save the changes and exit (FN+F10); 6. Re-enter the BIOS and check that after the reset (step 4) the BOOT item should have the value “Legacy support”, just like in the video, just, for example, my values were reset to UEFI and only 2 reboots and what I described above helped; PS I did the reboot exactly 2 times, which helped, apparently, to apply the changes; PSFlash drive used 3.0 and win7 x64bit, definitely USB 3.0 PS Also, you can install not by chance, but using FN+F12 and select your bootable flash drive. Good luck!
make a video on how to unblock the advance tab on insydenH20 rev 5.0
Source: https://clip-share.net/video/_ds7punCUbs/%D0%BA%D0%B0%D0%BA-%D1%83%D1%81%D1%82%D0%B0%D0%BD% D0%BE%D0%B2%D0%B8%D1%82%D1%8C-windows-7-%D0%BD%D0%B0-%D0%BD%D0%BE%D1%83%D1%82% D0%B1%D1%83%D0%BA-lenovo-b50-10.html
Preparing to install Windows
Reboot your laptop and go into BIOS. Each Lenovo model has its own way to enter the BIOS. The information should be in the instructions for the device. For most models, the F2 or Delete button is suitable.
Now you are in the BIOS main menu, at the bottom of which there is a navigation section.
The first step is to disable the protection. To do this, go to the Security → Secure Boot section and press Enter.
In this window you need to set the value to Disabled to disable protection.
After this, you need to return to the Main Menu by simply pressing Esc once.
Go to the Boot tab (it can also be called Startup).
The first section of this tab should display your flash drive. Select it and move it to the top of the list using the navigation keys.
Then find the UEFI/Legacy Boot item and select Legacy Only mode. Sometimes this needs to be done before changing the boot order, depending on system requirements.
Booting via Boot Menu
To boot Lenovo from a USB drive, you do not need to do so through BIOS Setup. Lenovo laptops have a special “Boot Menu” for this purpose.
To enter the boot menu, you must:
- Turn on the system and immediately press the “F12” button.
Common problems when installing Windows
The most common among users are two typical mistakes, the admission of which in the process of preparing to install Windows can make the successful implementation of the upcoming event impossible.
Firstly, the wrong choice of format at the stage of formatting the flash drive.
Secondly, using the wrong boot image. Windows installation discs fall into two categories:
Thus, there is nothing super complicated about installing Windows on Lenovo yourself: you just need to consistently follow the relevant recommendations. Follow the instructions you have studied, be careful at every stage, and everything will definitely work out.
Source
How to partition a Windows 7 hard drive
Next, you will go to the hard drive settings, where you will have to delete all existing partitions .
ALL DATA WILL BE ERASED.
Everything is required, otherwise you will not be able to reformat the screw from CDA to NTFS. To delete, click on the right Disk setup - select partitions one at a time and click Delete .
And don't forget to consider that you will be voiding your factory warranty. And if changing the operating system is more important to you than guarantees, then we continue dissecting the hard drive.
Now we need to create 2 partitions, another one that the system will create itself with a size of 100 MB, we do not count. To do this, click Create , select the desired size (I set it to 200,000 MB - slightly less than the second partition) and click OK . We do the same with the rest of the unoccupied space, only we don’t set the size, but leave it as the system suggests.
We are done with partitioning the hard drive, select the second partition (the first is occupied by system files and has only 100 MB of space) and click on installation. There will be no further special features, Windows 7 installation will proceed as usual, just follow the system instructions.
Source
How to install Windows 7
Make sure that the version you want to install is 64-bit. This is important because you simply won’t find the necessary drivers for a 34-bit one.
The manufacturer has set the boot order in such a way that the operating system will boot only from the internal hard drive, so you need to disable protection and change the settings in the BIOS.
To start the BIOS mode, after turning on the device or rebooting, after waiting 1-2 seconds, when the Lenovo manufacturer logo appears on the screen, press the Fn + F2 keys several times. It is important to be in time before the OS loading itself begins. The F12 key allows you to move between sections, and the +/- keys are used to change menu items. The F5 and F6 keys are used to navigate between menu items.
If you are interested in the question of how to install Windows 7 on a Lenovo Ideapad 100-15IBY laptop, then there is a Novo key to open the BIOS menu; the manufacturer emphasizes that the computer must be turned off.
Also, depending on the laptop model, the key combinations may differ. Options include the Del, F2, or Esc keys.
In order to set the settings we need in the BIOS, select BIOS Setup.
Next, move to the Exit item and set the parameters:
Go to the Boot menu item and set the following settings:
The external USB drive should already be connected to your laptop. Now you need to go to the boot menu by pressing the F12 key or the Novo key and select Boot Menu, where your device will be displayed to install the OS. You need to select it and then Windows itself unpacks the files. Then you should select the full installation.
Next, you need to divide the workspace into sections using the “Create” button. Keep in mind that for full operation, it is better to leave at least 30 GB for the system. When you have finished dividing all the available space, you need to select the partition allocated for the system and click install. Follow the instructions of the setup wizard and feel comfortable using the familiar interface!
Source
Windows installation
The BIOS is configured and the boot device is prepared. Let's proceed directly to installing Windows. To do this, insert a disk or flash drive into the laptop and reboot the device. The laptop will independently “understand” how it needs to boot. As a rule, no additional user action is required. Some models “ask” to press any key to boot from a removable drive - we do this.
We wait for Windows to unpack the files, then select “Full installation”.
Further events can develop according to 2 scenarios:
Here we can divide the free space into several sections. To do this, click the “Create” button, indicate the desired size (preferably 30–60 GB for the system) and confirm your actions. We repeat until we have allocated all the available space on the hard drive.
Select the partition reserved for installing the operating system and click on installation. There will be no further features that require detailed individual consideration. You need to follow the installer's instructions.
Lenovo S920 smartphone, characteristics of the fast IdeaPhone
Another interesting solution from Lenovo is the Lenovo IdeaPhone S920 smartphone.
- screen: IPS 5.3″, 16 million colors, 1280×720, touch, capacitive, multi-touch;
- Processor: 4-core MTK 6589, 1.2 GHz, PowerVR Series5XT video;
- memory: 1 GB RAM, 4 GB built-in + 32 GB microSDHC, microSD;
- phone type: monoblock, 159 g, 154×77.7×7.9 mm;
- phone charging connector: micro-USB;
- communication type: GSM 900/1800/1900, 3G;
- navigation: GPS, A-GPS;
- interfaces: Wi-Fi, Bluetooth, USB;
- platform: Android 4.2 with ideaDesktop proprietary shell;
- Battery: Li-Pol 2250 mAh, 25 h rpm. (GSM), 12 h up. (WCDMA);
- camera: front 2 MP, rear 8 MP, flash, face and smile detector.
The IdeaPhone S920 boasts two SIM cards, but it is equipped with one radio module, which, for example, does not allow it to download a file on the Internet during a telephone conversation.
The S920's photo quality is very good, but the ideaDesktop doesn't shine with its design. The battery allows the smartphone to work intensively for a day on one charge, which is a very good indicator. The speaker of the phone is high quality and loud.
The Lenovo IdeaPhone S920 isn't an outright bestseller, but it's a good choice for an all-in-one device, highlighted by its good camera, long battery life, and dual-SIM capabilities.
Video - How to boot from a flash drive or disk on a Lenovo laptop
Did you like the article? Save so you don't lose!
The buyer of a Lenovo laptop can get one of three operating systems: Free Dos, Linux, or Windows, which is limited in terms of functionality.
Usually this situation does not satisfy the user, and he installs a full-fledged and familiar version of Windows. You can cope with the task on your own, eliminating the need to hire third-party computer specialists and avoiding unnecessary costs.
You will learn how to do this as you study the information below. The instructions are relevant for modern versions of Windows. Reinstallation differs from installing from scratch in that in the first case, at the appropriate stage of work, it is strongly recommended to format the hard drive partitions in order to avoid confusion and reduced performance in the future.
Installing Windows from a USB flash drive
If the preparatory steps were successful, after restarting the laptop, the Windows Installer will appear on the screen. After downloading it, confirm that you agree with all the terms of the license agreement by checking the appropriate box (as in the figure below) and clicking Next.
The unpacking process will take some time. You need to be patient, and then select “Full installation”.
In the case where the laptop’s hard drive initially consisted of partitions, and the file system was formatted in NTFS, then everything is simple. Otherwise, you will have to delete the hard drive partitions. Just click "Disk Setup" and delete all partitions.
Now you can divide your free space into sections yourself. To do this, click on “Create”, select the partition size you need and confirm your choice. Do this until you have divided all the available space.
Now click on the partition where you want to install Windows and get started, just follow the instructions that appear on the monitor. During the Windows installation process, your laptop will restart, do not be alarmed by this, and do not interrupt the installation process under any circumstances.
Don't forget to select your language and set the date and time. Ready!
Source