Hello everyone, in this article I will tell you and show you how to disassemble a Lenovo IdeaPad 3 laptop with your own hands, and of course, assemble it. Why are we going to do this? It’s just time to clean off the dust and replace the thermal paste, because... After prolonged use, our Lenovo IdeaPad 3 laptop begins to heat up and the fans make noise. In what cases and how often you need to disassemble and clean laptops you can read here. In order to disassemble the laptop, we need a tool, namely a screwdriver for small work, or they are also called a “precision screwdriver” or a set of precision screwdrivers, as in the photo below.
And so, we will do the following work:
- Let's disassemble the Lenovo IdeaPad 3 laptop
- Let's clean it from dust and replace the thermal paste
- Let's put it back together
Attention! Before starting work, be sure to remove the battery from the laptop to avoid problems! Although in this model of the IdeaPad 3 laptop it is located inside (as if built in), I’m just warning you for the future, for other models where the battery is removed from the outside (not built in).
Disassembling the Lenovo IdeaPad 3 laptop, detailed instructions
1. Turn our laptop over and unscrew all the screws (there should be 9 screws)
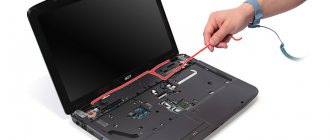
2. After you have unscrewed the screws, remove the cover; it can be removed freely. It's better to pick it out with something, I used a utility knife.
3. Disconnect the cable from the system board.
Caution: Use your fingernail to pull on the connector to disconnect it, do not pull on the cable itself. Then remove the four screws and carefully remove the battery.
3. Unscrew the 4 screws to remove the radiator.
4. Disconnect the fan wires that are connected to the system board and release the cables from the hooks.
5. Next, unscrew 3 screws and remove the fan.
Workflow Sequence
Why it is necessary to carry out preventive work on your computer is clear. Now let's look at the Lenovo G580/Lenovo (laptop): how to disassemble and clean this device correctly.
- So, first you need to remove the battery and unscrew the two bolts securing the back cover, then slide the cover and remove it.
- Next, the contents of the laptop open before us. Here you need to unscrew the bolts holding the hard drive, which needs to be moved and pulled out, and then unscrew the bolt securing the CD drive and pull it out.
- Next in line is disconnecting the coaxial cables from the wireless module. To do this, remove the fastening screw and remove the module from the connector that contains the Lenovo (laptop).
- How to further disassemble and remove the keyboard? We continue to follow the sequence of these actions: now unscrew all visible bolts on the bottom of the laptop and turn the device over. Now you can easily remove the keyboard. For this you will need something thin: a medical spatula will do. At the top end of the keyboard there are recesses through which spring-loaded clasps are visible. Press on them with the tool and carefully lift the keyboard. Here you have access to the keyboard cable: carefully unfasten it and disconnect the keyboard. In the same way, we disconnect the cables from the touchpad and from the power button.
- Under the keyboard we then find more bolts connecting the laptop. They need to be unscrewed. At this stage, we proceed directly to opening the laptop. To do this, use a spatula or a plastic card to carefully unclip all the latches around the perimeter and lift the top cover.
- Next up is the motherboard. It is necessary to remove it by first disconnecting the peripheral connector cables, speaker wires, charging connector cable, matrix cable and unscrewing a couple of bolts securing the board to the laptop body. After removing the board, the case can be cleaned of dust and put aside. But that is not all.
- After the work has been done, you need to take hold of the motherboard: disconnect the fan cable, unscrew the bolts securing the cooling system and carefully separate it from the board itself.
- Let's start cleaning the cooling system: the processor and other microcircuits need to be cleaned of old thermal paste. If it is difficult to remove, you can use solvents.
- At the next stage, unscrew all the screws of the fan cover to clean the radiator from dust. Also, for prevention, you can remove the fan blades and lubricate the bushing with machine oil (in no case with vegetable oil!).
- After cleaning and lubricating the cooling system, you need to reassemble it and apply thermal paste to the chips where it was previously. The layer of thermal paste should be even and thin. Then you should install our cooling system back on the board, tighten all the bolts in the order indicated on the system itself, and connect the fan to the board.
- Finally, you can begin assembling the laptop in the reverse order of disassembly. After completing this process, you need to turn on the device and check the operation of the cooling system using diagnostic programs. For this purpose, we run a system stability test and check the result.
Replacing thermal paste and lubricating fans on a Lenovo IdeaPad 3 laptop
After this, you can replace the thermal paste on the processor and chips, as well as lubricate the fans. I don’t describe this process in detail; read how to lubricate the cooler and replace thermal paste here.
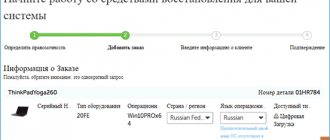
If you need to add additional RAM to your Lenovo IdeaPad 3 laptop, or replace the hard drive, then you can do all this yourself. A more detailed service manual for Lenovo IdeaPad 3 can help you with this. You can view or download the service manual for the Lenovo IdeaPad 3 laptop here.
The laptop is assembled in the same way as it was disassembled, only in the reverse order.
That's all, now you know how to disassemble a Lenovo IdeaPad 3 laptop and clean it of dust, as well as replace thermal paste. If you have any questions, ask them in the comments to this article, I will be glad to help you.
How to clean a Lenovo (laptop). How to disassemble the device
Why disassemble and clean your laptop? The laptop is like a vacuum cleaner: it sucks in air, passing it through the radiator to cool the processor. Along with the air, indoor dust also enters the radiator, thereby polluting the radiator and impairing its performance. When the laptop overheats, it becomes unstable. First, throttling appears - this is the processor’s protective system. In other words, when the processor overheats, it begins to lower its operating frequency in order to reduce heat generation. If this does not work, then the laptop simply turns off. A constant and regular process of overheating will definitely lead sooner or later to the need for expensive repairs.
For example, let's take an arbitrary device - a Lenovo G580 laptop, and consider how to disassemble and clean it. This will prevent problems with the device and extend the life of the laptop.
Glue
One way to restore laptop hinge mounts is with epoxy resin or epoxy. This adhesive is two-component and consists of the resin itself and a hardener. Its cost is low, and the quantity in the jar is enough to repair a couple of hundred fasteners.
You need to mix in the specified proportion. For the task at hand, a plastic bottle cap is sufficient. The author filled the mold using a pipette, having previously prepared the solution.
It must be remembered that the surfaces must be cleaned of contaminants (alcohol) and, preferably, scratched to increase the contact area.
While the glue has not hardened, the nuts need to be aligned. The less distortion, the easier the future assembly.
It makes sense not to wait for the resin to completely harden, but to try on the plate in advance. This will make it easy to adjust, since any “extra” protrusion will subsequently cause additional problems.
And at this stage they can all be cut off with a knife.
At room temperature, the resin hardens for almost a day, so during this time the cooling system can be inspected.
How to open the tablet cover without using tools?
An old plastic card with pointed ends is suitable for this. Any thin plastic object will also work. You can use a suction cup, a soldering kit, a thin knife, tweezers, or double-sided tape.
We all use tablets for different purposes, and usually there are no difficulties when using them. But sometimes there is a need to replace individual components. For example, the battery has deteriorated due to prolonged use, or the display has broken. In this case, contacting a specialist is quite expensive. This is also impractical if you live in a small town. Therefore, it is much easier to find out how the tablet is disassembled in order to make simple repairs yourself. Of course, each model is designed differently. But in this article we will provide you with a generalized tablet disassembly diagram. After familiarization, you will be able to generally understand how this device works.
Method number 3. Feint with a bell
This option is also good for phones released five years ago. This bug has already been fixed in modern versions of the software. How to unlock a Lenovo phone? You don't really need to know your PIN code for this. All actions are extremely simple. But this will require another smartphone that can make calls. Algorithm of actions:
- We call our phone from another device.
- During a call, lower the curtain and enter the settings.
- Let's go to security settings.
- Disable the password or pattern.
- We end the call.
- We use the phone.
An extremely simple option, which, unfortunately, does not work on all devices. If it didn’t work on your Lenovo, then only the last resort remains. The most radical. But with a 100% guarantee. After using it, the password or pattern will definitely disappear.
Chip cooling
Remove old thermal paste from copper pads using cotton wool.
The heat exchanger fins must be clean and free of dust.
By unscrewing three small screws, you can remove the fan assembly cover. From here it is easier to clean and also get to the electric motor. Its impeller typically uses bushings rather than ball bearings, so the system becomes noisy over time. If you overcome the attraction of the magnet and pull the impeller, it will be removed, opening access to the bushings and armature.
Everything here needs to be cleaned. A brush, cotton wool and a screwdriver come to the rescue to remove stuck dirt from the blades.
The rod on the blades and the bushing in the middle of the armature winding need to be lubricated. It is not recommended to use oil, as it drains quickly. The author used a small amount of silicone grease. It is important to maintain a balance here: if there is too much lubricant, it will additionally collect dust, and if there is not enough, it will be ineffective.
The order of work to be done
The process of removing the cover from the tablet consists of several stages:
Inspection of the tablet. Some models have fasteners that must be unscrewed. There are also models that also provide latches; they have to be snapped off.
- Unscrewing the fastener. Screws and screws should be unscrewed using appropriate screwdrivers.
- Opening the lid. It is necessary to carefully pry the lid of the tablet with a pick or other thin instrument or a card. Inside there are fragile components that cannot be damaged. The vast majority of equipment opens this way, but there are also devices that are quite difficult to unwind.
One important point
As you know, in any laptop the lid, which is also the screen, allows you to close the keyboard block and the inner surface of the case. The rotary-locking mechanism consists of two specially designed canopies and sets of washers that hold the display in the selected position.
Over time, the force required to move the cover becomes greater, so the canopy fastener fails, simply breaking off at the installation site. If you study the reviews of laptop owners, this is a fairly common problem. For repairs, service centers ask, depending on the model, from 2 thousand rubles, which cannot be considered an affordable cost. Therefore, when using a laptop, you need to not only clean it from dust, but also periodically inspect the hinges. In planned mode, you can easily do all this yourself.
Remove the battery
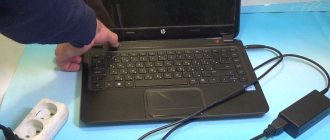
Turn off your computer. Slide the latch and disconnect the battery. This will save the components from static electricity. In addition, in almost all laptops the battery interferes with removing the cover and hides the mounting screws.
In some models, the non-removable battery is located under the cover. In this case, you need to disconnect the battery cable from the motherboard after removing the back panel.
Browningate YouTube channel
How to open the tablet
First of all, when disassembling the tablet, the back cover is removed. After this, the main parts will appear in front of you: board, battery, etc. Now we will tell you how to properly dismantle the back cover.
Removing the cover
Many tablets have slots on the side for SIM cards and a flash drive. They are closed with special caps; they should be disconnected first. This is done to make it easier for us to remove the cover.
Next, you should unscrew all the screws located along the edges that secure the cover. Be sure to check the slots for flash drives and SIM cards . Often additional fixing screws are located in these places.
Important! We recommend placing the screws for attaching the lid into a plastic bottle cap. When you unscrew the tablet board, these screws need to be placed in another cover.
This is done so as not to confuse them. Because if you tighten other screws, you can damage the threads.
Removing the cover
Next, using a plastic spatula or card, you need to pry off the latches of the rear wall. To do this, place the tablet with the screen facing you. Then carefully insert the spatula into the gap between the body and the cover . You need to insert the scapula until you hear a characteristic click.
Then you need to slowly move the spatula along the body so that all the latches come unfastened . When removing the cover, make sure that there are no wires or cables holding it in place. If there are cables, then you need to use a spatula to pry the latch up . After this, you can remove the cable and put the cover aside.
Method number 2. We use special programs
There is such an interesting file manager Aroma Filemanager. It allows you to boot the device in recovery mode, find the file responsible for the pattern key, and delete it. This is another answer to the question of how to unlock Lenovo. The phone will not be damaged. Unless something else is accidentally deleted. The algorithm of actions is as follows:
- Download the program from the developer’s official website and copy it to a USB flash drive.
- We insert the flash drive into the smartphone.
- Reboot the device into recovery mode (Volume Up button plus Power).
- Open the explorer that was previously downloaded to the flash drive.
- Find the file “gesture.key” and delete it.
- Reboot the smartphone in normal mode.
- We use it.
This method may help. But it is more suitable for older models. In the new ones, manufacturers have blocked the bootloader. But still, this is another answer to the question of how to unlock Lenovo. The phone will remain safe and sound. If this option does not help, then move on to the next one.
Remove the back cover
Unscrew all the screws on the back panel using a screwdriver. Mark with colored stickers the areas with screws of different lengths.
Well, or lay out the screws on the lid and take a photo.
Check that there are no fasteners under the rubber feet. Carefully inspect the entire back surface of the laptop, the drive niche and the sides. Make sure all screws are removed.
Pry the cover with a pick or plastic card in several places around the perimeter of the case and remove it.
YouTube channel Open Me Up
Method number 4. Reset to factory settings
This option should be used only as a last resort and with a certain degree of caution. It has consequences if you do something wrong. But this is another answer to the question of how to unlock Lenovo. The phone will lose all user data: applications, contacts, music, videos and pictures. In general, everything that is stored on the internal storage. But the device can be turned on. So what should you do? The algorithm is very simple:
- First of all, turn off your smartphone.
- Then press the “Volume+” button together with the power button.
- We go into recovery and immediately go to the “Wipe Data and Factory Reset” menu.
- Click on the “Wipe All” item.
- We confirm the action.
- We are waiting for the process to complete.
- We return to the main recovery menu.
- Select “Reboot now”.
- We are waiting for the phone to fully boot.
- We enter all the necessary data and set up the first launch.
- We use it.