Important Safety Information
Page 2
- Image
- Text
Important Safety Information
Before using the information in this manual, be sure to read and understand all safety information regarding this product. See Safety and Warranty Guide
supplied with this product for the latest safety information. Knowing safety precautions reduces the chance of injury and product damage.
Dangerous!
Possibly extremely dangerous or even deadly
situations.
Attention!
Damage to programs, devices, or data may occur.
Note.
Please note the following important information.
© Copyright Lenovo 2010.
Hard Reset for Lenovo A2010
Instructions on how to do a Hard Reset on Lenovo A2010 (factory reset). We recommend that you familiarize yourself with a visual guide called resetting settings on Android. .
Reset codes (open the dialer and enter them).
- *2767*3855#
- *#*#7780#*#*
- *#*#7378423#*#*
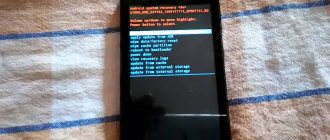
Hard Reset via Recovery
- Turn off your device -> go to Recovery
- "wipe data/factory reset"
- “yes - delete all user data” -> “Reboot System”
How to log into Recovery?
- hold down Vol(-) [volume down], or Vol(+) [volume up] and the Power button
- A menu with the Android logo will appear. That's it, you are in Recovery!
Resetting settings on Lenovo A2010 can be done in a very simple way:
- Settings->Backup and reset
- Reset settings (at the very bottom)
Contents Contents Important Safety Information...
Page 4
- Image
- Text
1
Content
Content
Important Safety Information
Chapter 1
Using computer equipment…..1
1.1 Front view of the panel………………………………………………………..2 1.2 View of the computer on the left and right……………………………………21.3 View of the computer rear ………………………………………….31.4 Computer stand …………………………………………41.5 Computer connection ………… …………………………………….51.6 Important information on using your computer ……..91.7 Wired keyboard and mouse ………………………………………………………10
Chapter 2
Working with the Rescue System program …………………11
2.1 Installing drivers and programs that
supplied with the computer……………………………………..12
2.2 OneKey Recovery ………………………………………………………..13 2.3 File management ………………………………………………………………. 152.4 OneKey Antivirus ………………………………………………………16
Chapter 3
Working with programs…………………………………………19
3.1 Power2Go - Burning discs……………………………………..203.2 WinDVD……………………………………………………………………… ..21 3.3 McAfee Security Center ………………………………………………………….22
Chapter 4
System maintenance and recovery………..23
4.1 System recovery ……………………………………………24 4.2 Backup status and settings ………….244.3 Disk cleanup ……………………………………………………… …………………….25 4.4 Checking and eliminating errors on the disk …………………….25 4.5 Defragmenting disks ……………………………………………..254.6 Daily Maintenance Tasks…………………………….26
KV.by
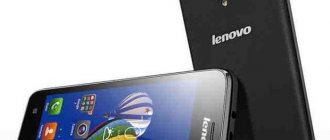
As promised earlier, we offer you a review of a budget smartphone from Lenovo.
As of August 2015, the first market for the Lenovo A2010
became India, where the device was offered for about $77. In September 2015, sales of the smartphone started in Russia, and soon, quite naturally, it ended up in our country with a price of about $110.
Everything would be fine, but the device supports LTE, comes with a pre-installed Android 5.1 Lollipop OS, and, given the cost, is not short of other technical characteristics - it was interesting to test the device.
Appearance, design
The KV test included a pre-production sample, without delivery kit or packaging. According to information from the Internet, the smartphone comes in a standard cardboard box with the same package contents:
- the device itself;
—
charger with USB output;
— USB-micro USB interface cable;
— stereo headset;
— a set of paper documentation.
In my hands there is a black copy, although there are also white ones - Black
and
Pearl White
respectively.
The smartphone body is completely plastic, overall dimensions are 130.5x66.5x9.9 mm, weight - 137 g. The screen size is 100x56 mm, the buffer zones around it are clearly visible: about 17 mm at the bottom, 12 mm at the top, 5 mm on the sides.
The corners, bottom and top edges, as well as the back panel are rounded, which gives the design softness and improves the tactile properties of the device. Plastic feels inexpensive, but there is no negative attitude towards it. In general, the smartphone fits comfortably in the hand, although it is primarily not so much the coating and shape of the case that affects this, but rather the use of a smaller 4.5-inch screen in today’s realities.
In addition to the screen, there are three touch Menu
,
Home, Back
(there is no backlight) on the bottom and a front camera lens with a speaker on top. The latter, by the way, is covered with a nice mesh.
On the reverse side, in the top center, is the main camera lens with an LED flash, and below is a scattering of perforations covering the second, multimedia, speaker.
The left side of the smartphone is empty, on the right there are two traditional buttons: power/lock and volume control.
A micro USB port for charging and pairing with a computer, as well as a headset connector are located on the top edge; on the bottom there is a hole for a spoken microphone, plus a small groove for removing the back cover.
There is also a removable battery behind the removable cover. There are two slots for installing microformat SIM cards and a slot for a memory card. One of the SIM cards is inserted freely, the second, as well as the memory card, is inserted only after removing the battery.
Hardware platform, performance
For its price, the smartphone has quite acceptable technical characteristics:
— 4.5″ screen with a resolution of 854x480 (219 ppi);
— 64-bit Mediatek MT6735 processor (4 Cortex-A53 1.0 GHz cores, Mali-T720 video chip);
— RAM 1 GB;
— built-in memory 8 GB (4 GB available to the user);
— main camera 5 MP, front camera 2 MP;
— battery with a capacity of 2000 mAh;
— Bluetooth 4.0, Wi-Fi 802.11 b/g/n, GPS, LTE support;
— OS Android 5.1 Lollipop.
This particular pre-production copy did not have Google Play, so the installation of benchmarks was done in less obvious ways. Without pretending to be completely reliable, the smartphone nevertheless showed good performance in all types of tests.
In everyday use, there were also no complaints about the operation of the interface and applications - everything functioned moderately smoothly, without freezes or slowdowns.
Software usage and functionality
Despite the budget and, as a consequence, the low ppi indicator, the picture from the screen does not “hit” the eyes: the graininess is noticeably small, the brightness and color rendition are sufficient, viewing angles are acceptable, and the touch input is two-point. The main disadvantage is that the display is difficult to read in bright sunlight. All.
There are no complaints about the sound either. The audibility of the interlocutor is good, detail does not suffer, and there is a reserve in volume. The same goes for the multimedia speaker.
Interaction with two SIM cards is intuitive and has long been studied in past reviews of the company’s smartphones.
The budget nature of the model had to show up to a greater extent somewhere, and this happened on cameras. There are enough settings, shooting modes too ( photo, live photo, beautiful face, panorama, polygonal view
), but the picture itself somehow didn’t work out.
And even shooting in HDR mode doesn't help.
But the autonomy of the Lenovo
A 2010
is fine; one charge lasts for 2.5-3.5 days. Moreover, a smartphone with a certain degree of proximity somehow doesn’t care whether you use it or not - it discharges the same way.
Finally, the software - interaction with the interface, menu design, installed applications, etc.
Reset to factory settings, the smartphone greets the user in German. There are a minimum of pre-installed applications; in fact, you can call, write a text message, go online, listen to an audio recording, view photos and videos, and open a file manager. You will have to install the rest of the software yourself - I would like to believe that the Google Play application store will appear in production copies.
Settings on your smartphone are available via a separate shortcut. Menu button
is therefore responsible for launching the Application Manager. The settings themselves are standard, with considerable attention paid to energy-saving functions.
Conclusion
So, the bottom line is: a budget but quite passable screen, mediocre cameras - these are rather disadvantages. There are more advantages: high-quality build, modern processor, Android 5.1 out of the box, two SIM cards, a memory card slot, and yes, LTE support (this is already relevant). Regarding 1 GB of RAM and available 4 GB of ROM, you can be patient.
Conclusion: for its price, the Lenovo
A 2010
turned out to be quite a worthy device and will be suitable, subjectively, for a wide range of users, from schoolchildren to retirees.
PS, according to information from reviews of serial copies of the model, its software is still in order: there is Google Play and a number of other familiar applications. But autonomy has dropped somewhat - apparently these same applications also made their contribution.
Ruslan Lankovsky
Chapter 5 Diagnostics and Settings Check
Page 5
- Image
- Text
2
Content
Chapter 5
Diagnostics and checking settings………………………27
5.1 Troubleshooting Display ……………….285.2 Diagnosing Audio Problems ………………..29 5.3 Troubleshooting Software ……………………………..295.4 Diagnostics disk drive problems
optical drives and hard drives………………………30
5.5 Special notes for Windows diagnostics……..31
A short guide to updating your smartphone to newer versions of Android.
Since users of this device are unlikely to see Android 6.0, much less 7.0, everyone will have to use so-called “custom firmware.” That is, suitable for this phone, but externally no different from the original Android firmware 6.0 or 7.0.
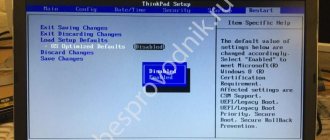
First you need the Flash Tool program. It won't be difficult to find it online. But it is better to download from trusted and authoritative sites, for example, w3bsit3-dns.com. Then you need to find the firmware you are interested in. By the way, this can be done on this same website.
The Flash Tool itself usually does not require installation. You can simply unpack it into the desired folder. However, sometimes problems occur when placing them in standard desktop directories and using Russian names in titles. Therefore, the most optimal place for the program is the root of the hard drive. Somewhere nearby you can unpack the archive with the firmware.
After launching the Flash Tool, you need to specify the Scatter firmware file using the Scatter loading button. The program will pull up all other files itself.
Now we need to prepare the device. It is worth removing the back cover and taking out the battery.
After this, in the program you need to click Firmware → Upgrade. Now you need to connect your smartphone and computer with a USB cable. The program itself will determine the connection and activate the firmware process. Its start will be indicated by a yellow progress bar at the bottom of the working window.
Once completed, you can simply close the program and disconnect your smartphone. Now it's worth trying to run it. You need to remember that the first launch may take some time. There is no need to worry - this is normal.
By the way, in exactly the same way you can “roll back” to the initial version of the firmware if something goes wrong. True, you will have to download its original version.