Greetings, dear friends, to my website! In today's article, I will tell you two ways to reset your Lenovo laptop. Resetting a Lenovo laptop to factory settings is easier than a laptop from any other manufacturer. Lenovo laptops have proprietary software “ OneKey Rescue System”
"(sometimes also called "
OneKey Recovery
") is intuitive even for a novice personal computer user.
If you are unable to reinstall the system, then there is only one way left: resetting your laptop to factory settings. However, if you have forgotten the administrator password, you will not be able to reset the settings. In today's article we will talk to you about how to reset a Lenovo laptop to factory settings without a password? This article will show you how to use the OneKey feature and get your laptop back up and running.
These methods apply to Lenovo ThinkPad, IdeaPad, YOGA laptop models
Hotkeys
Let's start with the standard method, which is present on any laptop computer. We are talking about special keys programmed to turn on the BIOS. Typically, this button does not depend on the device manufacturer, but on the motherboard model and the installed software version. If we take the Lenovo IdeaPad 320, then with the original firmware and hardware, the user needs to press a button on the initial power-on screen.
If this option does not work, then try the + key combination. This is because the system buttons can only be activated using the auxiliary key. You can also find out the exact button on the initial startup screen, where information about the BIOS manufacturer and software version is located:
Expert opinion
Basil
Project manager, comment moderation expert.
Ask a Question
The described method is suitable not only for Lenovo products. All motherboards on laptops and desktop computers use this method of starting the BIOS. Only the power key changes.
Reset Lenovo password using software
If you haven't created a password reset disk, you still have the option to reset your lost Lenovo password using third-party software called Windows Password Key. It can easily and quickly reset Lenovo password for local administrator and user account and fully supports Windows 8.1/8/7/Vista/XP and also 10 version password reset.
1. Download and install the Windows Password Key on an accessible computer.
2. Insert the CD/DVD or USB flash drive into your work computer. Specify the CD/USB burning drive and click "Burn" to burn the password reset disk.
(lenovo password)
3. Insert the newly created password reset disk into your Lenovo computer. Set to BIOS to boot your computer from CD/DVD or USB.
(lenovo password)
4. After this, the Windows Password Key will appear on your screen. Follow the steps to reset Lenovo laptop password.
(lenovo password)
Running through the operating system
The last launch method is universal and is suitable for any computer that is controlled by the Windows 10 operating system. To do this, you will need to do the following:
- Launch the Settings application. You can right-click on the “Start” icon and select the item of the same name in the menu that opens.
- Now go to the Update & Security section.
- A list of thematic tabs will appear on the left. You need to open "Recovery".
- Then a list of functions will appear on the right. Find the "Reboot Now" button and use it. Before doing this, be sure to close all important documents and applications so as not to spoil them.
Now the computer will reboot, and instead of the operating system on the screen you will see a special menu. First you need to go to the “Troubleshooting” subsection. In it, open additional parameters and click on the marked button.
This action will cause the laptop to reboot again. As a result, the BIOS settings menu will open, in which you can perform the necessary actions.
You can access the same method through the “Control Panel” or the “Start” menu. The last option is the simplest and most convenient. You just need to open the “Shutdown” list and, while holding down the button, select the reboot option. The same function works on the lock screen of the operating system.
Reset Lenovo password with Microsoft account
For Windows 8 and later, you can sign in with a local password or a Microsoft account, with a new security mechanism. So if you decide to log into your computer with a Microsoft account, you're in luck with how easy it is to reset your password without much effort.
Perhaps it will help: how to reset Acer to factory settings?
(lenovo password)
Steps to recover your Microsoft account password:
- Step 1: Find a regular computer that you can use.
- Step 2: Go to the password reset page from here for your Microsoft account.
- Step 3: Enter the correct email address or phone number associated with this account.
- Step 4: Check the email or text message field and enter the code you received.
- Step 5: Set a new password for the account and log in with the new password.
How to recover BIOS password on Lenovo laptop?
Resetting BIOS password is another password issue that bothers many Lenovo users. The BIOS password is used to prevent a computer system from turning on or making changes to some of the most sensitive areas of computers. If you forget it, you will not be able to change BIOS settings.
Here is the complete article on how to reset your BIOS password.
By following the steps, you can bypass BIOS password on Lenovo laptop.
- 1. Open the computer case and locate the CMOS battery. Remove the CMOS battery and wait 10 to 25 minutes before putting it back again.
- 2. Put everything back in, turn on the computer and enter the BIOS again. Now there is no more BIOS password.
(lenovo password)
Main sections and settings
How to enter BIOS
I believe that the first place to start this article is with the question of entering the BIOS (otherwise there will be nothing to configure).
In most PC/laptop models, to enter the BIOS you need to press the F2 or Del (sometimes F1 or Esc) immediately after turning on the device. Some laptops (for example, Lenovo) have a special Recovery button (which is pressed instead of the power button). After this, a sign usually appears (as in the photo below) - to configure the BIOS, you need to select the BIOS Setup item.
BIOS Setup
I also recommend that you read the articles on my blog about logging into the BIOS (links below).
- How to enter BIOS (UEFI) on Windows 10? All ways
How to enter BIOS on a computer / laptop - https://ocomp.info/kak-voyti-v-bios.html
How to enter BIOS on a Lenovo laptop - https://ocomp.info/kak-zayti-v-bios-na-noutbuke-lenovo.html
Control buttons
In the BIOS, all settings have to be set using the keyboard (which is somewhat scary for novice users who are used to doing everything with the mouse in Windows). It is also worth noting that all settings are set in English (however, most of the settings are easy enough to understand what they mean, even for those who have not studied English). And so, about the buttons...
I draw your attention to the fact that in almost every BIOS version, all the most basic control buttons with which it is configured are written at the bottom of the screen (or on the right).
Control buttons at the bottom of the window // Dell Inspiron laptop
Generally speaking, the buttons are as follows:
- arrows →↓↑← - used to move the cursor (change parameters);
- Enter - the main key for entering sections (as well as for selecting certain parameters and switching items);
- Esc - exit the BIOS without saving settings (or exit a specific partition);
- +/PgUp or -/PgDn — increase/decrease the numerical value of a certain parameter, or switch it;
- F1 - quick help (only for settings pages);
- F2 — hint for the highlighted item (not in all BIOS versions);
- F5/F6 - change the parameters of the selected item (in some BIOS versions they can also be used to restore changed settings);
- F9 - system information (loading secure settings);
- F10 - save all changes to the BIOS and exit.
Important! In some laptops, in order for the function keys (F1, F2... F12) to work, you must press the combination of buttons Fn+F1, Fn+F2... Fn+F12. Typically, this information is always indicated at the bottom (right) of the window.
Sections and Tabs
Information
The main tab in the laptop BIOS that you see when you log in. Allows you to get basic information about the laptop:
- its brand and model (see photo below: Product Name Lenovo B70-80). This information is extremely necessary, for example, when searching for drivers;
- BIOS version (if you decide to update the BIOS, this information will be extremely useful);
- the serial number of your device (not available everywhere, and the information is almost useless);
- processor model (CPU - Intel Core i3-5005U 2.00GHz);
- hard drive model;
- CD/DVD drive model and other information.
information
In general, it is highly recommended to visit this tab when you want to find out information about your hardware. Also in cases where you connected new equipment and you don’t know whether it was detected correctly.
Configuration
One of the main tabs for setting many parameters. In different laptops, the tab contains different settings; the main parameters include:
- System Time/Date - setting the date and time (the time is often lost in Windows, and sometimes it cannot be set at all until the corresponding tab is configured in the BIOS);
- Wireless - Wi-Fi adapter, here you can disable it (note: Enabled - on, Disabled - off). If you do not work with Wi-Fi networks, it is recommended to disable the adapter, as it significantly consumes battery power (even when you are not connecting to a Wi-Fi network);
- Sata Controller Mode - hard drive operating mode. This is quite a broad topic. Here I will say that the operation of your hard drive (for example, its operating speed) significantly depends on the selected parameter. If you don’t know what to set, then leave everything by default;
- Graphic Device Settings - a parameter that allows you to configure the operation of video cards (in laptops that have two video cards: integrated and discrete). In some cases (for example, when working with Windows XP, or when you want to save battery power as much as possible), you can disable the discrete video card here (note: there will likely be a decrease in gaming performance);
- Power Beep - enable/disable the tweeter speaker. In my opinion, for a modern laptop in everyday use, this is a useless thing (it was relevant earlier, about 10 years ago);
- Intel Virtual Technology is hardware virtualization that allows you to run multiple instances of operating systems (guest OS) on one physical computer. In general, not for novice users;
- BIOS Back Flash - if you want to update your old BIOS to a new version (i.e. flash) - enable this option;
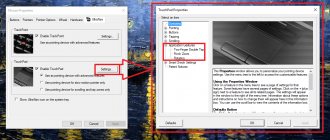
- HotKey Mode - mode of operation of function keys. If the option is enabled: instead of the usual, say, F1-F12 to refresh a page in the browser or get help, you will be able to use multimedia capabilities - turn up or turn off sound, brightness, etc. To use the usual F1-F12 values, you need to press them together with the key Fn.
Configuration
Security
Tab for setting security (for some users - one of the main ones). Here you can set an administrator password to access BIOS settings or to access the hard drive.
Important! Use these passwords very carefully. The fact is that if you forget it, in some cases you will have to contact service centers. You can also try to reset the password on your own, I talked about this here: https://ocomp.info/kak-sbrosit-nastroyki-bios.html
The main settings items in this section:
- Set Administrator Password - set the administrator password;
- Set Hard Dick Password - set a password to access the hard drive;
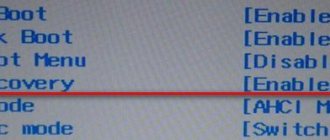
- Secure Boot—secure boot (enabled/disabled). By the way, Secure Boot is only displayed if you have the UEFI boot mode set.
Security
Boot
Download section. It is also one of the most frequently used sections; it is almost always necessary for editing when installing Windows OS.
The boot mode is also set here: UEFI (new standard - for Windows 8/10), or the old boot method (Legacy, for Windows 7, XP). New items for editing the download queue will appear after saving the settings and entering this menu again!
Note: if support for the old mode is enabled, then you can (even need to!) change the boot priority from devices (for example, first check USB devices, then try to boot from CD/DVD, then from HDD).
What is the difference between creating bootable flash drives for UEFI boot mode and for Legacy - you can find out from this article: https://ocomp.info/cozdanie-zagruzochnoy-fleshki.html
Basic settings in this menu:
- Boot Mode: boot mode, UEFI or Legacy (the difference is described above);
- Fast Boot: fast boot mode (the logo will not be displayed, only built-in devices will be supported during boot: keyboard, display, etc.). Works only in Boot Mode: UEFI.
- USB Boot: allow/disable booting from USB devices.
- PXE Boot to LAN: the option enables booting the computer over the network (initially, an attempt will be made to boot the operating system from the server using the local network. In my opinion, for most users, a useless function).
Boot
Note: it is worth noting that in the new version of UEFI, the ability to raise menu items using the F6 button has stopped working, but it remains possible to lower another item using the F5 button.
Exit
I think everyone knows this word - it is translated from English as a way out. This section is also used in almost all laptops (and PCs) to reset settings to optimal (or safe).
Key points:
- Exit Saving Changes - exit and save the changed settings in the BIOS;
- Exit Discarding Changes - exit the BIOS without saving the settings;
- Discard Changes—discard all settings changes made during the current session;
- Save Changes — save settings changes;
- Load Defaults Changes - load the default BIOS settings (as they were when you purchased your laptop). Usually used in case of unstable operation of the device, or in cases when the user has changed something and no longer remembers...
- OS Optimized Defaults - settings optimized for specific operating systems (not all laptops have this option. It somewhat simplifies and speeds up BIOS setup).
Exit
How to choose which device to boot your laptop from (Boot Menu)
In order not to mess around with the BIOS settings and not to select (not set) the boot queue, it is very convenient to use the boot menu, calling it only when you need to boot from a flash drive (for example). I will provide a reference article on this topic here (link below).
Hot keys to enter the BIOS menu, Boot Menu, recovery from a hidden partition - https://ocomp.info/goryachie-klavishi-dlya-vh-bios-boot-menu.html
By calling the Boot Menu, you will see the usual list of devices from which you can boot. Most often this list contains (example in the photo below):
- HDD;
- USB flash drive, disk;
- ability to boot over the network (LAN).
Booting from a Kingston USB flash drive
To select a device to boot, use the arrows and the Enter key. In general, the same as with normal BIOS setup.
*
This concludes the article.
Good Luck!
RSS(how to read Rss)
Other entries:
- After files are restored, they do not open. Is there any way to view these photos, videos,...
- I can't beat the game! Helper programs, codes and tips for games...
- How to find out the memory capacity of a video card, its type and other characteristics
- How to watch TV via the Internet - online TV viewing: the best programs and channels
- Windows cannot be installed on this disk. The selected disk contains an MBR partition table
- How to find out what video card I have: determining the model to search for drivers
- This site cannot provide a secure connection - Chrome Browser Error
- My VKontakte page: how to log into social media. VK network without entering a password and what to do if you can’t log in...
Author: · 03/12/2019
The BIOS menu is a tool for selecting computer settings at the hardware level. This functionality is used when changing the boot priority of hard drives, to check the equipment and its condition. In addition to the general methods for starting the BIOS, there are unique methods for each computer manufacturer. Let's figure out how to enter the BIOS on the Lenovo IdeaPad 320.