When a smartphone is brand new, it usually works as it should. However, over time, errors, freezes and bugs appear. Very often this is due to the firmware, updating which usually solves the problem. If your device was released recently, then software updates may arrive over the air. But what to do when the device is not the newest, for example, such as the S820 from Lenovo? Step-by-step instructions for flashing Lenovo S820 will help with this.
What you need to know
Firmware for Lenovo S820 comes in two types: custom (firmware modified by advanced users) and official, in turn, the official version is divided into Chinese multilingual and European. Links to download official firmware can be found at the end of the article, and custom versions can be found on the Internet, for example on NeedRom.
When choosing firmware, be careful; Lenovo S820 is available in two variations: 4Gb RAM and 8Gb RAM, and accordingly they come with different firmware.
You can flash a smartphone in several ways: using a computer or through recovery mode. If you use a computer, then you will need the SP Flash Tool. You can read how to use it in our article here; also in this article you will find how to correctly install gadget drivers. Firmware for SP FLASH TOOL is packaged in an archive with a *.rar extension and if you unpack it you will see many files. In this archive, you need to make sure that there is a scatter file “MT6589_Android_scatter_emmc”, see Figure 1 below.
As for the recovery mode, there are ROM firmware for CWM Recovery and TWRP Recovery. CWM and TWRP Recovery are small programs (something like the BIOS on a computer) that allow you to flash your Lenovo S820, update it, install various patches, and even install applications or games. As a rule, when you find a firmware for yourself, the developers indicate what to flash: CWM Recovery or TWRP Recovery. Such firmware is also archived and has a *.zip extension.
Characteristics
- Standard: GSM 900/1800/1900, 3G
- Type: smartphone
- Operating system: Android >
- Touch screen type: multi-touch, capacitive
- Diagonal: 4.7 inches.
- Image size: 720×1280
- Automatic screen rotation: yes
- Scratch-resistant glass: yes
- Type of ringtones: polyphonic, MP3 ringtones
- Vibration alert: yes
- Camera: 12 million pixels, LED flash
- Camera functions: autofocus
- Video recording: yes
- Front camera: yes, 2 million pixels.
- Audio: MP3, FM radio
- Voice recorder: yes
- Headphone Jack: 3.5mm
- Interfaces: USB, Wi-Fi, Bluetooth 3.0
- Satellite navigation: GPS
- A-GPS system: yes
- Internet access: WAP, GPRS, EDGE, email POP/SMTP, HTML
- Processor: MediaTek MT6589W, 1200 MHz
- Number of processor cores: 4
- Video processor: PowerVR SGX544
- Built-in memory: 4 GB
- RAM capacity: 1 GB
- Memory card support: microSD (TransFlash), up to 32 GB
- Additional SMS features: text entry with dictionary
- MMS: yes
- Battery type: Li-polymer
- Battery capacity: 2000 mAh
- Talk time: 10 h
- Waiting time: 140 h
- Sensors: light, proximity
Preparing the phone for firmware
So, you have a smartphone, a computer and a data cable and you need to flash the Lenovo S820. To do this, first charge the gadget, then download the drivers for MTK devices (for a switched off body), the SP Flash Tool program can be downloaded here. After this, you need to decide on the choice of firmware (official or custom) and download it. Now you have everything to start the process of flashing your phone. But before flashing, it is strongly recommended to make a backup of the stock firmware.
Sewing process using SP Flash Tool
After you have made a backup of your firmware, you can start flashing it. Now turn off your phone, launch the SP Flash Tool program and specify the path to the scatter file by clicking the “Scatter-loading” button, see fig. 2.
By specifying the path to the file, blocks that will be flashed will appear in the lower field. You need to make sure that all the blocks have a check mark, and “Preloader” too. Next, check the “DA DL All With Check Sum” checkbox and press the “Firmware->Upgrade” button, see fig. 3.
The Flash Tool will begin to create a firmware image (pink progress bars will run at the bottom), while turning off the phone (if it is connected to the computer, then disconnect it), remove the battery and connect the phone to the computer while it is off. If everything is done correctly, the firmware process will begin (first a red and then a yellow progress bar will run at the bottom). If for some reason the progress line stands still and does not move, then try disconnecting the gadget from the PC, reconnecting the battery, and connecting it to the computer again. It didn’t help - then the problem is with the drivers, you’ll have to reinstall them (naturally, the firmware process needs to be interrupted). After the firmware process is completed, a window with a green circle will appear, see Fig. 4.
Congratulations, you have managed to flash Lenovo S820. Now you can disconnect your smartphone from your PC and turn it on. The first download is long, about 5 – 10 minutes.
Links to download official firmware:
Good luck! If you need any help, write.
We are not responsible for any damage caused to your phone if something goes wrong.
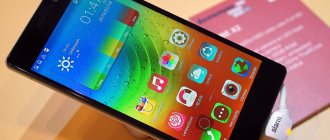
Lenovo S820 Smartphone Android 4.2 MTK6589 3G 4.7 Inch HD Screen 13.0MP Camera- White
The phone was ordered for my sister on September 25, sent by the store via Singapore Post on September 29, received at the Simferopol post office on October 28, in total the phone was in transit for 30 days. In Ukraine, a certified s820 costs around $360!!! Phone packaging:
The phone is packed in a white box made of durable cardboard, with a stenciled inscription of the phone model. Inside is the actual box with the phone and accessories.
Equipment
— Phone — Charging — Micro-USB cable — Headphones — Adapter for Euro sockets — Instructions and warranty card
Specifications
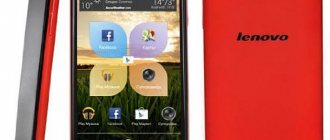
— Processor: Mediatek MTK6589, 4 cores, ARM Cortex A7, 1.2 GHz. - GPU: PowerVR SGX 544 - OS: Android 4.2.1. — Case: Monoblock. Colors: red, white. — Support for cellular networks (one radio module): WCDMA/HSDPA/HSUPA: 900MHz/2100MHz. GSM/GPRS/EDGE: 850/900/1800/1900MHz. — Screen: TFT IPS, 4.7″, capacitive, HD: 720×1280. — Rear camera: 13.0MP (autofocus, flash) — Front camera: 2.0MP — ROM: Nand Flash, 4Gb. — RAM: DDR, 1Gb. — SD support: up to 32Gb. — Battery: 2000mAh, Li-Pol. — Connectors: microUSB, 3.5 audio. — Dimensions: 139.5 x 69.7 x 8.95 mm. — Weight: 145 g (with battery). — OTG support: absent. — Additional functions: GPS, FM radio, Bluetooth 4.0, WIFI 802.11 b/g/n
Screen
The phone screen is 4.7″ in size and made using OGS technology (this is when the touchscreen and matrix are a single whole), the technology almost completely eliminates glare and expands the viewing angles of the screen.
The matrix is made using IPS technology. The manufacturer claims that the phone has so-called 2.5D curved glass, this special glass prevents the refraction of light rays for maximum image clarity and clarity (similar technology is used in the LG Optimus G phone). The backlight is uniform without side glare, like many Chinese phones. In general, the screen evokes only positive emotions, bright, rich, natural colors, excellent viewing angles. Photo of the screen
The photographer from me still took the photo as best he could. Comparison of ZOPO C2 (left) and Lenovo (right):
Different viewing angles:
Touchscreen supports five simultaneous touches. I didn’t notice any phantom clicks in two days of use. Every touch is processed accurately.
Appearance and controls
The phone is made of plastic, as for me it is varnished and interspersed with small sparkles. Assembling the phone for 5. Nothing holds together and does not play.
On the top of the smartphone there is a power button on the right, and a 3.5 audio output on the left.
On the right side of the smartphone there is a volume rocker.
The left side of the smartphone is free from any controls.
The microUSB connector is located at the bottom of the smartphone.
Above the screen there is a 2.0MP camera, as well as a light and proximity sensor.
There are three touch control buttons located under the screen; they work clearly, without the need to press several times.
Under the touch buttons there is an LED indication of missed events.
On the back of the smartphone there is a camera, flash and speaker.
The phone fits comfortably in your hand and is also easy to operate with one hand. In general, my IMHO is that this is one of the most convenient sizes, 4″ is not enough, 5″ is already too much and is difficult to operate with one hand. I judge in comparison with ZOPO C2.
Performance tests
Battery
The battery has a capacity: 2000 mAh. Battery weight: 39 g.
On the Lenovo forum I found a test of this battery on the IMAX B6AC smart charger. The battery charge showed a capacity of 1998 mAh. The discharge on the same charge of a charged battery in the phone showed 1943 mAh.
The smartphone itself consumes charge very economically, losing no more than 3 percent of its charge overnight.
Quote from Lenovo forum
Under heavy load (screen brightness on automatic, 3G mode on SIM-1, mobile Internet and GPS disabled): 35 minutes of calls, 8 hours of WiFi (of which about 4 hours of Internet surfing), screen on for 5 hours, enough battery charge for 3 days 7 hours!
A bug was discovered, during the charging process it reaches 99% and that’s it, it doesn’t reach 100%, so the charging process does not turn off. It’s not yet clear what to do with this; calibration with Lenovo’s utility did not help.
Software
The phone has Android 4.2.1 installed, with a shell from Lenovo. Lenovo Launcher was immediately replaced with Nova Launcher, because... There were slowdowns when opening the application list, and flipping through screens or the dock bar.
The ROW_S114 firmware was installed on the phone from the factory; after connecting to WiFi, the phone offered to update to the next firmware version. The update was carried out in stages, from the beginning I updated to version 117, then 118, then a couple more updates to 118 and finally to version ROW_S119_130922. As you can see, updates come out quite often.
Root can be obtained without problems through the Framaroot android application.
There was a lot of software pre-installed on the phone (twitter, facebook, skype, etc.), the applications are not system ones, so they can be removed without problems using standard means. Also, several unnecessary programs were removed after receiving root.
Memory
The phone has a 4GB EMMC module. Of these: 1Gb is reserved for user files. 1Gb is reserved for user applications and settings. 756Mb is allocated for OS. The rest of the space is used according to the needs of the OS
Connection
The phone has one radio module installed. Simple SIM cards are inserted, no need to cut anything. The phone supports the following standards: SIM-1: GSM 850/900/1800/1900MHz, WCDMA IMT-2000 (3G 2100MHz)/GSM-900 (3G 900MHz) for and SIM-2: GSM 850/900/1800/1900MHz. The quality of communication is not satisfactory, the network works well. The audibility is excellent.
Radio
The phone has a radio receiver and can work without connecting a headset. The reception quality is average.
WiFi
The wireless network works great, connects quickly, and the signal holds well. Signal power measurements. The first picture is at a distance of a couple of meters from the router, the second is through one reinforced concrete wall.
GPS
The GPS started up without dancing with a tambourine, a cold start without an Internet connection took about a minute, found 7 satellites. The weather outside was quite bad, clouds, fog.
Camera
The phone's camera is quite mediocre, I didn't like the color rendition. Takes better pictures than my ZOPO C2. For shooting, a proprietary application from Lenovo “Super Camera” is used.
Sample pictures
Photo using digital zoom:
Photos using the effect, many of which are available in the Super Camera application
The camera writes video in MPEG-4 format and wraps it in a .3gp container. Upload the original video.
MediaInfo
Format: MPEG-4 Format profile: 3GPP Media Release 4 Codec ID: 3gp4 File size: 31.5 MiB Duration: 12s 331ms Overall bit rate: 21.5 Mbps Encoded date: UTC 2013-10-30 11:48:20 Tagged date: UTC 2013 -10-30 11:48:20 Video ID: 1 Format: MPEG-4 Visual Format profile: [email protected] Format settings, BVOP: Yes Format settings, QPel: No Format settings, GMC: No warppoints Format settings, Matrix: Default (H.263) Codec ID: 20 Duration: 12s 263ms Bit rate mode: Constant Bit rate: 21.4 Mbps Nominal bit rate: 256 Kbps Width: 1,920 pixels Height: 1,088 pixels Display aspect ratio: 16:9 Frame rate mode : Variable Frame rate: 30.000 fps Minimum frame rate: 29.990 fps Maximum frame rate: 30.030 fps Color space: YUV Bit depth: 8 bits Scan type: Progressive Compression mode: Lossy Bits/(Pixel*Frame): 0.342 Stream size: 31.4 MiB (99%) Title: VideoHandle Writing library: MTK_ENCODER_V3 Language: English Encoded date: UTC 2013-10-30 11:48:20 Tagged date: UTC 2013-10-30 11:48:20
Audio ID: 2 Format: AAC Format/Info: Advanced Audio Codec Format profile: HE-AAC / LC Codec ID: 40 Duration: 12s 331ms Bit rate mode: Constant Bit rate: 128 Kbps Nominal bit rate: 96.0 Kbps Channel count: 2 channels Channel positions: Front: LR Sampling rate: 48.0 KHz / 24.0 KHz Compression mode: Lossy Stream size: 193 KiB (1%) Title: SoundHandle Language: English Encoded date: UTC 2013-10-30 11:48:20 Tagged date : UTC 2013-10-30 11:48:20
conclusions
I definitely recommend this phone for purchase, the build quality is excellent. A bright and juicy screen, good energy efficiency, and the absence of glitches in the firmware will allow you to enjoy owning this smartphone.
The disadvantages include: — Confusion with the battery charge only up to 99%; — Weak camera; — Changed android settings menu (this is purely my opinion); — There is no OTG support.
If you have any questions, ask in the comments. I'll try to answer.
PS A Nilkin bumper was also purchased for the phone, costing $7, now the price has risen to $8.10. It was ordered later than the phone, sent by China Post, but arrived a week earlier than the phone. The bumper is plastic, corrugated, and comes with a protective film for the screen. Fits the phone perfectly.
Photo
Flashing Lenovo S820 via SP Flash Tool
When a smartphone is brand new, it usually works as it should. However, over time, errors, freezes and bugs appear. Very often this is due to the firmware, updating which usually solves the problem. If your device was released recently, then software updates may arrive over the air. But what to do when the device is not the newest, for example, such as the S820 from Lenovo? Step-by-step instructions for flashing Lenovo S820 will help with this.
How to get root rights
This is knowledge loaded so to speak. We can recommend two universal applications for this case:
These are the latest versions at the time of writing, there may be newer ones, this can be viewed on the websites of these programs
- ZYKURoot 2.2 – (website zykuroot.info)
- Rootkhp Pro 2.7 – (website rootkhp.pro)
These programs have a list of supported devices, but this list is updated haphazardly, so it happens that a device has been supported by the program for a long time, but the developers forgot to write about it.
What you need to know before flashing and what firmware versions exist
First of all, the user needs to know that there are two types of firmware for this smartphone. The first ones are official ones, which were created by the manufacturer, and the second ones are called custom ones. The latter were created by other users and may contain various innovations that are not in the original. But it’s worth noting that these may have unexpected bugs and malfunctions. Therefore, you need to think carefully about installing custom firmware at your own peril and risk, or installing the official one and not having problems.
Before you download the firmware for Lenovo S820, you need to know that each smartphone model has its own software version. It is important to understand that if you install a shell that is designed for a device, for example, with a large amount of RAM, then there may be problems, including the destruction of the entire device.
There are several ways to install a new system. However, we will look at the simplest and most effective of them - flashing Lenovo S820 firmware via a computer using the SP Flash Tool program.
Why update firmware on Android
The answer is as simple as three pennies, often in the software, specifically in the shell made by the smartphone manufacturer based on the Android OS, for example, FlymeOS, there are many shortcomings and bugs. As a result, the user faces various problems and inconveniences. Let's look at examples:
- Terrible photo quality with a good camera, for example, you have a top-end camera, like the LG G5, and the photos are a blurry mess, “neither fish nor fowl”.
- The smartphone does not want to turn on or reboots on its own
- Hanging and dulling
- Very strong heating, in this case it is advisable to lower the processor clock frequency, that is, do a downgrade
- The SIM card disappears or blinks (the problem may also be in the hardware, but it’s worth trying to reflash it)
- Touch screen problems, slow response
- Some other problems
There are other reasons, for example, I wanted to get new functionality or look at a new Android.
Installing drivers
Before flashing Lenovo S820, you need to install the necessary drivers (driver1 and driver2) on your PC. To do this you need:
- Connect the switched off phone to a personal computer;
- Go to device manager;
- Find the designation (name) of your phone;
- Right-click on it and select “Update Driver”;
- In the window that appears, click “Install the driver from a specified location” and look for the path to the previously downloaded and unpacked driver;
- We wait for installation and disconnect the phone.
Hard Reset for Lenovo A820
Instructions on how to do a Hard Reset on Lenovo A820 (factory reset). We recommend that you familiarize yourself with a visual guide called resetting settings on Android. .
Reset codes (open the dialer and enter them).
- *2767*3855#
- *#*#7780#*#*
- *#*#7378423#*#*
Hard Reset via Recovery
- Turn off your device -> go to Recovery
- "wipe data/factory reset"
- “yes - delete all user data” -> “Reboot System”
How to log into Recovery?
- hold down Vol(-) [volume down], or Vol(+) [volume up] and the Power button
- A menu with the Android logo will appear. That's it, you are in Recovery!
Resetting settings on Lenovo A820 can be done in a very simple way:
- Settings->Backup and reset
- Reset settings (at the very bottom)
Find out the version of the smartphone and download the necessary firmware
Another important thing before installation is to understand what version of the smartphone we have. The model was produced in different modifications in 2013 and 2014; you need to download the firmware according to the year of manufacture of the smartphone and its amount of RAM. This is necessary for the reinstallation of Android on the Lenovo S820 4Gb smartphone to be successful. You can find the necessary information on the box of your mobile device. After you understand what kind of phone you have, you can, in fact, download the official firmware for the Lenovo S820.
Firmware
For clarity, step-by-step instructions for Lenovo S820 firmware were created:
- Turn off the smartphone.
- We turn on the SP Flash Tool program, in it you need to select the path to the firmware file. To do this, click on Scatter-loading and select the desired path.
- Next, blocks of update files will appear; you need to make sure that all of them are checked.
- Then check DA DL All With Check Sum and click on the Firmware->Upgrade button.
- Next, the firmware image will be generated. While this is happening, you need to connect the switched off smartphone to the computer. If everything was done correctly, the firmware installation process will begin automatically.
- When the firmware is completed successfully, a green circle will appear on the screen.
After the process is completed, you can disconnect the phone from the computer and turn it on. The first launch will take quite a long time, so no need to worry.
–>takewi Ahmetov android story Love rom Mods –>
1. So, first you need to install the original Chinese firmware with pre-installed recovery according to these instructions:
The author of the idea is dear javum. This means that we need to FIRST make a full backup: instructions.
Next we will need a preloader from the P780 phone: preloader.7z 51K 857 times downloaded Download the Chinese CN firmware (any), I personally took this one: S820_S139_130723 Next on the list:
Before starting the firmware, click on PRELOADER and select the file from the archive that you put in folder with the firmware.
After flashing the firmware, again via FT, install TWRP 2.6.3
(With other firmware with CN markings that are sewn via FT, you need to do the same manipulations)
In order not to do the above mentioned manipulations, I post
ready-made CN firmware for Lenovo S820 8Gb with built-in recovery TWRP 2.6.3 (install as standard via Flash Tool)
:
DOWNLOAD
Everything is ready, you have received a device on which you can install absolutely any firmware from 4gb without patches, fixes and other things. I personally tested it: I installed VIBE UI 1.5 and everything works great.
I don’t think it’s worth reminding that you do all these actions at your own peril and risk.
If you do everything correctly, then “scaling” will not happen!
Acknowledgments – javum author of the idea (full text – lenovo-forums.ru )
Step-by-step instructions for flashing firmware for phones based on MTK MT65xx via SP Flash Tool For MT6513/6573/6515/6575/6517/6577/6589/8389
- Download and install drivers for the firmware (the easiest option is here)
- Download the required firmware in the format for the SP Flash Tool from the Firmware for your device section and unpack the archive with the target_bin . There should not be Russian Chinese or other non-Latin characters on the path to the firmware!
- Download and unpack the program SP Flash Tool . There is no need to chase the latest version; it is recommended to use the version recommended by the manufacturer (it is also usually present in the archive with the factory firmware). There should not be Russian Chinese or other non-Latin characters in the path to the program!
- Run Flash_tool.exe , click the Scatter-loading and select MT65xx_Android_scatter_emmc.txt (xx is the number 75, 77 or 89 and depends on the processor of your device) from the firmware folder
- Be sure to check the DA DL All With Check Sum checkbox (otherwise you will get a “half-brick”).
- Checking the modes in the Options
- Click the Firmware-Upgrade .
- Connecting switched off phone
- If everything is correct, the colored status bars will flash and a green circle will appear, indicating the success of the operation.
- We turn off the phone and use it.
- If you need to flash only one partition, for example, recovery, then in step 8 click DOWNLOAD and agree when asked. And then follow the instructions. (In Firmware-Upgrade , one partition cannot be flashed! )
- With the phone turned off, press the power button and hold it for 1-2 seconds, then press the volume rocker “+” and “-” at the same time and release the power button, hold the rocker until you enter recovery. If it doesn’t work out, then you need to practice. The whole point is to press the rocker until lenovo appears, and release the power button after it appears.
- Using the Mobileuncle Tools (available in the market), select Into Recovery Mode .
6. Next, using a short instruction, I figured out the menu and how to install the firmware (zip file):
Installing firmware, updates, kernels and other things on Andro >
All alternative firmware, custom kernels, cracks, add-ons, decorations, application packages that can be installed on a tablet or phone using TWRP recovery are packaged as zip files.
Before installing anything on your device, do not forget to make a complete backup copy of the current firmware, so that later you can painlessly return your tablet or phone to its original state.