[—ATOC—] [—TAG:h2—]The Lenovo Vibe P1m smartphone review, which is presented on the site, is a simplified version of its “big brother” Lenovo Vibe P1. It has quite good characteristics, allowing the mobile device to work for a long time without recharging, its body is reliably protected from moisture penetration. In addition, the device can work with standard LTE networks, approved relatively recently by the 3GPP community. This radio interface allows owners of this device to transmit information at maximum speed and use a number of other technologies. The smartphone is designed for two micro-SIM cards, and its cost is an order of magnitude cheaper than its brother.
Why you need to update the firmware on Android
The main point of updates is to eradicate bugs, problems and shortcomings, of which there are plenty in the Android operating system:
- For example, system applications freeze or crash.
- Problem with one of the camera modes.
- The smartphone does not turn on at all.
- The smartphone goes into an endless reboot.
- Heavy power consumption when wi-fi is turned on, for example, the battery runs out in an hour.
- There can be a lot of glitches; there are times when the phone itself starts calling the first number in the phone book. Hardly anyone is happy with this behavior.
However, there are those who simply want to install everything new in order to get new functions and capabilities, so to speak, to start changing something in their life from a small point of view.
Preparatory stage
Despite the fact that each subsequent firmware version brings a lot of new functions, after the update some smartphones are unstable. This happens when the user ignores the preparation step.
Before installing updates on Lenovo Vibe P1, you need to meet 2 basic requirements:
- charge your smartphone at least 30%;
- perform a factory reset.
And if everything is clear with the first point, then the second raises many questions for some people. Resetting to factory settings completely deletes files from the smartphone's memory. This allows you to avoid errors when installing updates.
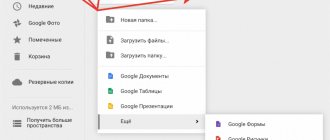
Of course, no one wants to lose personal data, so before resetting you need to create a backup:
- Open settings.
- Go to the "Storage and Backups" section.
- Click on the Google Drive heading.
- Activate the backup.
Performing these steps will result in the backup file being uploaded to cloud storage. After updating Android, it can be restored.
If there is not enough space on Google Drive to save all the data, it is recommended to create a backup copy through the “Backup and Restore” item. The resulting file should be moved to another device (for example, a computer) during the flashing process, and after the process is completed, return it back to the phone’s memory.
If the backup has been successfully created, you can safely proceed to restoring the phone to factory settings:
- Launch device settings.
- Go to the "Backup and Reset" section.
- Select “Reset settings”.
- Click the Reset Phone button.
- Confirm the operation.
Now you need to reboot your smartphone, and then proceed directly to the process of installing new firmware.
Instructions on how to install firmware on Lenovo Vibe P1
By using the instructions you agree to this document. Just in case, make a backup of the files that are dear to you!
- Charge your phone to at least 40%. It is important.
- In order to flash the device, download the TWRP Manager , you can download it yourself or get it in the archive with the firmware you choose below.
- Install TWRP Manager on Android (installation is as simple as any application)
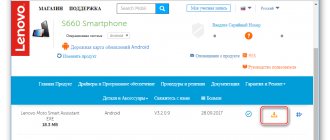
- Now download the firmware file by placing it on your smartphone’s memory card. The file itself is located at the bottom of the article; first, you can read the instructions.
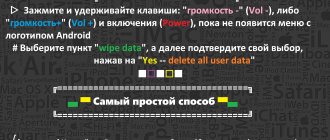
- We launch TWRP recovery mode - turn off the phone, then press the power button and the volume up button at the same time, soon you will see the inscription “ recovery ” on the screen and a menu will appear as in the screenshot below.
- The first thing you need to do is reset; to do this, press the Wipe button. The data will be cleared.
- After that, press back and select Reboot recovery and confirm your action by swiping across the screen (by dragging the slider to the right)
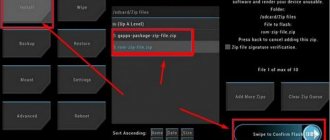
- Next, click on the Install button, select the file with the firmware and confirm the action again.
- Attention! The firmware process is not displayed on the display! All you have to do is make coffee and wait for the process to complete.
All! Now you have brand new firmware and new features.
Download firmware
Our opinion does not claim to be the truth of the first instance, but we would like to recommend installing Android no lower than seven, because everything lower is already obsolete.
- Android 9.0 or just a pie is a new step in the development of mobile operating systems, the height of the genius of overseas programmers! URL: yourtopfile.info/android9pie
- 8.1 Oreo is the former peak of genius of the same overseas programmers. URL: yourtopfile.info/android8oreo
- Seven Nougat is a good operating system for mid-range or budget hardware. URL: yourtopfile.info/android7nougat
- Six Marshmallows - you can install it only if you are nostalgic for the sixth Android, otherwise it is not necessary, the same can be said about the fifth version. URL: yourtopfile.info/android6
- Android 10 Q 2021. URL: yourtopfile.info/android10
- Android 11 2021. URL: yourtopfile.info/android11
How can I reflash a device?
The simplest and easiest way to update the software on a laptop is to contact a service center, where professionals will do it. But you can do this yourself using a desktop computer or laptop. In fact, installing updates on your smartphone is quite simple. The main thing is that you need to take a responsible approach to the firmware process and strictly follow the instructions of the specialists.
How to get root rights
In the field of obtaining root rights, there are two universal programs (universal because they support a lot of devices) that get root in 1 click, this is ZYKURoot 2.2 - (site zykuroot.info), maybe there is a newer version, you need to look at this on the site
And Rootkhp Pro 2.6 – (from the Rootkhp pro website). The version may also not be the latest; you need to check their website.
In general, instructions for them are not needed, everything is as usual, connect the phone to the computer and click Root. Then we sit and wait for what the program says.
How to flash a device through a modified recovery
Modified (custom) recovery environments have a much wider range of capabilities for working with Android devices. One of the first to appear, and today a very common solution, is the recovery from the ClockworkMod team - CWM Recovery.
Installing CWM Recovery
Since CWM recovery is an unofficial solution, you will need to install a custom recovery environment on your device before use.
- The official way to install recovery from the ClockworkMod developers is the ROM Manager Android application. Using the program requires root rights on the device.
Download, install, launch ROM Manager.
On the main screen, tap the “Recovery Setup” item, then under the “Install or update recovery” inscription, tap the “ClockworkMod Recovery” item. Scroll through the list of device models that opens and find your device.
The next screen after selecting the model is the screen with the “Install ClockworkMod” button. Make sure that the device model is selected correctly and press this button. The recovery environment begins downloading from the ClockworkMod servers.
After a short time, the required file will be downloaded completely and the installation process of CWM Recovery will begin. Before you start copying data to the device’s memory section, the program will ask you to grant it root rights. After permission is received, the process of recording the recovery will continue, and upon completion, the message “Successfully flashed ClockworkMod recovery” will appear confirming the success of the procedure.
For devices built on the MTK hardware platform, the SP Flash Tool application is used.
Lesson: Flashing MTK-based Android devices via SP FlashTool The most universal method, but at the same time the most dangerous and complex, is flashing recovery via Fastboot. The steps taken to install recovery using this method are described in detail at the link:
Firmware via CWM
Using a modified recovery environment, you can flash not only official updates, but also custom firmware, as well as various system components represented by cracks, add-ons, improvements, kernels, radios, etc.
It is worth noting that there are a large number of versions of CWM Recovery, so after logging in on different devices you can see a slightly different interface - background, design, touch controls may be present, etc. In addition, some menu items may or may not be present.
The examples below use the most standard version of the modified CWM recovery. At the same time, in other modifications of the environment, when flashing the firmware, items are selected that have the same names as in the instructions below, i.e. A slightly different design should not cause concern to the user.
In addition to design, the management of CWM actions differs in different devices. Most devices use the following scheme:
- Hardware key “Volume+” – move one item up;
- Hardware key “Volume-” – move one item down;
- Hardware key “Power” and/or “Home”—confirms the selection.
- We prepare the zip packages necessary for installation into the device. We download them from the Global Network and copy them to a memory card. Some versions of CWM can also use the device's internal memory. Ideally, the files are placed in the root of the memory card and renamed using short, clear names.
Enter CWM Recovery. In most cases, the same scheme is used as for entering the factory recovery - pressing a combination of hardware buttons on a switched off device. You can also reboot into the recovery environment from ROM Manager.
Before us is the main recovery screen. Before you start installing packages, in most cases, you need to “wipe” the “Cache” and “Data” sections - this allows you to avoid many errors and problems in the future.
- If you plan to clear only the “Cache” partition, select the “wipe cache partition” item, confirm the deletion of data - select “Yes – Wipe Cache”. We wait for the process to complete - the following message will appear at the bottom of the screen: “Cache wipe complete”.
Let's move on to the firmware. To install the zip package, select “install zip from sdcard” and confirm your choice by pressing the corresponding hardware key. Then select the item “choose zip from sdcard”.
A list of folders and files available on the memory card opens. We find the package we need and select it. If the installation files were copied to the root of the memory card, you will have to scroll to the bottom of the list to display them.
Before starting the firmware procedure, recovery again requires confirmation of awareness of your own actions and understanding of the irreversibility of the procedure. Select “Yes – Install ***.zip”, where *** is the name of the package to be flashed.
The firmware procedure will begin, accompanied by the appearance of log lines at the bottom of the screen and the filling of the progress bar.
Firmware via TWRP Recovery
In addition to the solution from the ClockworkMod developers, there are other modified recovery environments. One of the most functional solutions of this kind is TeamWin Recovery (TWRP). How to flash devices using TWRP is described in the article:
This is how Android devices are flashed through recovery environments. It is necessary to take a balanced approach to the choice of recovery and the method of installing them, and also flash only the appropriate packages obtained from reliable sources into the device. In this case, the process proceeds very quickly and does not cause any problems later.
Thank the author and share the article on social networks.
What should you do if your Android smartphone suddenly starts to freeze and behave as if it wanted to live its own life? How to reflash Android? This question is asked by many users of modern gadgets of various brands - from top-end Samsung and Sony to the increasingly popular Chinese Xiaomi (more often colloquially - Xiaomi) and Meizu.
Restoring stock firmware
If you didn’t like the custom firmware or didn’t take root, there is always the opportunity to return everything to its place. Many people ask the question: “How to restore Android through Recovery, namely the stock version?” The answer lies in the point above. Roughly speaking, returning everything to normal occurs in the same way as making the initial changes.
All you need to do is download the firmware from the manufacturer to a flash card or internal memory, then select the appropriate “Recovery” menu item and do a complete reset of settings/content. In principle, nothing complicated.