Recently, many laptop manufacturers, in addition to the ability to use troubleshooting tools available in the installed operating systems themselves, have begun to include their own tools that allow you to perform almost similar actions without using system applets or removable media, even in cases where the device does not boot at all. under what pretext? Next, let's look at Lenovo laptops. Restoring the system by resetting all parameters to the factory state can be done precisely by using the tools provided by the manufacturer itself. In addition to the main material, there will be several tips for performing similar operations, but taking into account Windows tools, which every self-respecting user should know about.
System recovery on a Lenovo laptop: basic options
Bringing the operating system to laptops from this manufacturer can be done using several simple methods. Conventionally, they can be divided into the use of built-in tools, so to speak, “hard-wired” directly into the computer system (a hidden partition with the original backup copy on the hard drive), and the use of installed operating systems in cases where the partition with the factory tools is damaged, the user made upgrading/downgrading the operating system or changing the hard drive. You should immediately pay attention to the fact that with the recommended factory reset, all user files will be completely deleted. How advisable it is to use this particular remedy is up to everyone to decide for themselves. However, in some cases you can do without this, but if the system does not boot and no other methods help, this tool will be the most effective.
Chapter 5: Troubleshooting, Frequently Asked Questions
Page 33
- Image
- Text
29
Chapter 5: Troubleshooting
FAQ
— — — — — — — — — — — — — — — — — — — — — — — — — — — — — — — — — — — — — — — — — — — — — — — — — — — — — — — — —
This section contains frequently asked questions and information on where to find detailed answers. For information about each publication included with your computer, see the Setup Cheat Sheet
Lenovo G465/G565.
What precautions should you take when working with a computer?
See “Chapter 1: Important Safety Information” in the Lenovo Safety and General Information Guide.
How to prevent problems with your computer?
See “Chapter 2: Use and Care Information” in the Lenovo Safety and General Information Guide.
What hardware does this computer have?
See Chapters 1 and 2 for more information.
Where can I find detailed specifications for my computer?
See https://consumersupport.lenovo.com.
I want to upgrade my device
or replace one of the following devices: hard drive, memory, keyboard.
See “Appendix A: CRU Instructions” on page 36 of this manual.
What are recovery discs?
This computer did not come with a recovery disc. For alternative recovery methods offered by Lenovo, see “Chapter 4: OneKey Rescue” on page 27.
How to contact the Customer Support Center?
See “Chapter 3: Getting Help and Services” in the Lenovo Safety and General Information Guide.
Where can I find warranty information?
For information about the warranty that applies to your computer, including the warranty period and type of warranty service, see “Appendix B: Lenovo Limited Warranty” on page 46.
What is important to know before starting a rollback or hard reset?
Before proceeding with a direct description of the reset, it should be noted that on different models of Lenovo laptops, system recovery in terms of the actions performed may differ slightly. Firstly, the toolkit itself can be called differently (OneKey Recovery, OneKey Rescue System, etc.). In most cases, such built-in utilities are available on almost all devices of the IdeaPad line or G series. But on ThinkPad devices, this procedure is quite different (we will dwell on it separately).
How to run Lenovo system recovery using built-in tool?
Now let's move on to considering the reset process. First, let's look at system recovery on the Lenovo IdeaPad, Essentials, and models like the G50.
On all such devices, next to the power button or on the side panel there is an additional button, which is responsible for calling the system reset tool without using any removable media or tools from an existing working or even damaged operating system. To begin system recovery on the Lenovo G50 or other similar models, you first need to turn off the laptop completely, and then press the same Novo Button instead of the power button to launch the built-in tool.
Step by step description of the reset process
After turning on the computer device in this way, a menu for selecting actions appears on the screen, in which from the presented items you must use System Recovery or OneKey Recovery (depending on the model). Next, a special task selection menu appears with two items.
We assume that the user did not create his own backup copy, so we select the option to restore the Lenovo system from the original backup for the G50 model. After this, you need to agree to the warnings about starting the reset and deleting all user data. Next, the recovery process itself starts, and upon completion, you will need to click the “Finish” button, after which you can also select a reboot in manual mode, since an automatic restart option is simply not provided here.
But that's not all. The next step in Lenovo system recovery involves entering data and selecting options, just as you would when installing an operating system. But on IdeaPad devices you do not need to perform such actions. On these devices, the reboot will be performed automatically after the reset is completed, and you will end up with a “clean” system, as it was when you purchased the laptop.
Android Recovery Menu - decryption
A similar program is a recovery mode for the Android system. The factory version has limited functionality. But you can still perform a reset and subsequent restoration of settings and firmware.
There are certain important items in the program menu. Each of them is responsible for performing its own function:
- Install zip from sdcard. Responsible for installing an archive with previously completed updates onto the phone’s built-in memory card.
- Wipe data/factory reset. With its help, you can completely clean the installed system partition and return them to their original position.
- Wipe cache partition. Used to clear the cache. It should be activated when replacing the smartphone firmware.
- Backup and restore. Responsible for backing up the OS and restoring a special backup.
- Mounts and storage. Ensures the operation of built-in partitions and monitors the correct installation and connection.
- Special additional settings and descriptions responsible for processes such as rebooting, deleting cache and resetting settings.
This Android recovery menu is not presented in Russian, so you need to know its decoding, know what mode and other words mean. Used by competent users or programmers. The selection of items is carried out by scrolling, that is, by turning the volume down or moving the volume up.
Creating a custom backup
In principle, you can take care of creating a backup in advance, and it is not at all necessary to use Windows tools for this. Such tools are also available in the built-in utility.
For example, for Windows 8.1, you can initially select to launch the pre-installed OneKey Recovery application from the list of programs, after which you either agree to save a copy in the section offered by the utility itself, or specify a different path.
To launch a system rollback from a user backup when calling the recovery tool described above, when selecting a recovery task, you will need to specify not the original copy, but your own, using the browse button to access it and select the Backup.wsi file. In this case, unlike the first option, neither disk partitions nor user data will be deleted.
Creating a backup
Having installed the program, the first thing, as mentioned, is to create a system backup - that reference backup to which we will constantly roll back Windows if problems arise in its operation. This can be done immediately after reinstalling the system, installing drivers, making the necessary settings, installing the programs used, etc. In general, we tailor the system ideally for ourselves and in the main program window click “OneKey System Backup” .
Here we will be offered a choice of two types of backup creation: the first is the one with the creation of hidden partitions and storing a Windows image on them for recovery, the second is storing a Windows image on a regular user partition of the disk. The second type can be used in addition to the first if necessary. We can create as many additional backups as we want with different system states and store these backups on one of the disk partitions. In this case, check the “Backup system to other location” and simply indicate the path to save the backup file. But since in this article we set a goal to implement functionality similar to the factory Recovery one, therefore, we will store the main, reference Windows backup on hidden partitions. We leave the first type active by default with backup storage on Recovery partitions.
Now we need to tell the program where to create these hidden Recovery partitions. We need to click on any of the disk partitions that have enough free space to create a backup. If some heavy third-party software has not been introduced into the system, 20 GB of free space will be enough. The program itself will separate the free space from the partition we specified and create its own hidden partitions in this place. We can specify any of the custom sections.
Or we can directly indicate partition C , where Windows is installed, if this partition has plenty of free space. Well, then click the “Start Backup” to get started.
The program will warn us that in order to complete the task it will need to restart the computer and enter its WinPE . Click “Yes” .
In the WinPE environment, we observe the progress of the operation and wait for its completion.
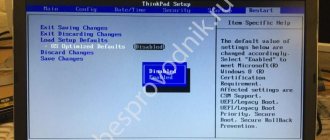
System recovery on ThinkPad series models
Now a few words about restoring the Lenovo ThinkPad system. Here the actions are somewhat different from what was presented above.
To access the recovery environment at the boot stage of the laptop, you need to press the F11 key, select the desired language, click the continue button, enter the user password (if set), and then activate the Lenovo Factory Recovery item in the menu that appears. Next, a process begins that is very reminiscent of a regular Windows installation. At one stage you will need to agree to the restart, and then set the necessary parameters.
Using Windows Operating System Tools
If we are talking about Lenovo laptops and restoring the Windows 10 system, you can also use the tools of the OS itself.
For a complete reset, use the update and recovery section in the options menu, where there is a corresponding item.
It is also sometimes possible to download diagnostic tools that allow you to fix problems when starting the operating system while saving user data. If none of the proposed solutions (for example, in the case of replacing the hard drive or accidentally damaging the partition with factory tools) does not help, you can try to perform similar procedures when booting from removable media with a distribution kit or using disk programs like LiveCD. By the way, it is not always recommended to restore the Lenovo system in terms of a complete reset. Quite often, you can fix some problems through the command console (Shift + F10) using the Bootrec.exe tool, disk check and system component integrity (SFC), etc.
Information for the news
- 506
- Author: admin
- Date: 1-11-2015
1-11-2015
Category: -
Hello admin! I need to restore my Lenovo laptop to factory settings, but I don't know how to do it. It’s very strange, but I didn’t find such an article on your site! Or was it a bad search?
Hello friends! What to do if: 1. The laptop starts working slowly. 2. Browsers open who knows what instead of classmates! 3. The antivirus was eaten by viruses 4. There is 1 MB of free space left on the disk (C:)!? 5. And finance sings romances and there is no money to call a computer technician. Of course, without hesitation, roll back the laptop to factory settings and after that it will function like new, because the state of your operating system will return to its original state. And if you have a Lenovo laptop, then this is as easy as shelling pears, you just need to press one small button - OneKey Rescue System. Was it worth writing an article about this?
OneKey Rescue System…
Page 32
- Image
- Text
28
Chapter 4. OneKey Rescue System
„
Using Lenovo OneKey Rescue (without Windows operating system)
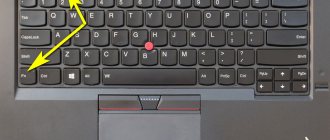
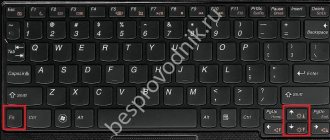
If you are unable to boot into your operating system, follow these steps to access the OneKey Rescue system. • Turn off your computer. • Press the key,
to launch the OneKey Rescue system.
Using this program, you can restore the factory settings of the system partition or return them to the state the data was saved during the last backup.
Note.
The recovery process is irreversible. Therefore, before
using the restore function, you must create a backup
a copy of particularly important data.
Reset settings on Lenovo ThinkPad
On laptops of this series, the recovery process is performed slightly differently. In order to restore factory settings, you need to complete several steps:
- While the system is booting, press the F11 button.
- In the window that appears, select the language and confirm using the “Next” button.
- Next, you need to select a user and enter a password (if necessary).
- A special menu should appear in which you need to select the last item “Lenovo Factory Recovery”.
- A program window will open where you need to select a language (we chose English) and click the “Next” button.
- Now you should accept the agreement and click “Next”.
- A message will appear stating that all data will be deleted during the recovery process. You need to confirm the decision using the “Next” button.
- After this, the settings will be reset to factory settings. Then the utility will prompt you to restart the laptop (you need to click “Yes”).
- After restarting the computer, a menu for setting parameters (country, time, keyboard layout) should appear. This confirms that the parameters have been restored successfully.
Resetting Lenovo laptops to their original settings is not difficult. To do this, you just need to use special utilities. If you have questions, write them in the comments.
How to log in to Recovery? The Recovery menu, as a rule, is found in all Samsung smartphones and tablets, but is absent in other brands of Android smartphones, but you can easily add it by flashing this section to your Android device.
If an Android smartphone has a Recovery menu and it has not been changed, then it is called STOCK, but if it did not have one or third-party Recovery menus were installed, it will be called CUSTOM.
Custom Recovery comes mainly in two types : CWM and TWRP , less common are 4ext , Philz CWM , (different development teams).
ATTENTION! If the Recovery menu is missing or not installed, then it is IMPOSSIBLE to enter it!
Advantages of Chinese tablets
Tablets are convenient, functional and practical gadgets that allow you to work, read books or play your favorite games. However, many people mistakenly believe that a device is considered to be of high quality only if it has the logo of a well-known company on its body. The times when Chinese technology was considered unreliable are a thing of the past, and today many Chinese manufacturers offer customers high-quality and durable devices at affordable prices.
Budget gadgets have numerous advantages and are great for:
- for children as a gadget for watching cartoons or preparing for school;
- for traveling or outdoor recreation, because even if you accidentally damage it or lose it on the road, you will not regret the money spent, as if you broke a more status gadget;
- for use as a GPS navigator. For these needs, you can safely use a Chinese-made tablet with a 7-inch screen.
Method for Samsung
Before transferring your smartphone or tablet to recovery, disconnect Samsung from the charger or USB cable!
New models
Turn off Android and hold down the Center Volume Up button + On/Off
Turn off Android and hold down the Center button + Volume Up button + On/Off button
If suddenly it doesn’t work out, use the universal method (read below).
For Samsung Galaxy S8 – S10
- Press and hold the dedicated Bixby button and Volume Up + Power
- After the splash screen appears on the screen, lower the power button, but continue to hold the Bixby button and Volume Up
- Hold these buttons until the Android logo appears on the screen with a blue background
- Release the buttons
- After a few seconds, the Galaxy S8 smartphone will boot into Recovery mode.
Older models and some tablets
- Turn off Android and hold down the Center button and the On/Off
- Turn off Android and hold down the Volume Up and the On/Off
or in a universal way (read below).
Lenovo A760
Lenovo A760 is a budget smartphone with very impressive specifications. The phone is equipped with a 4-core Qualcomm Snapdragon MSM8225Q processor, each of the cores operating at a frequency of 1.2 GHz, 1 GB of RAM and 4 GB of internal memory. If necessary, the smartphone can be equipped with a MicroSD memory card with a capacity of up to 32 GB, and a 2000 mAh battery.
Login to recovery for Lenovo a760
To enter recovery, do the following:
Then simultaneously hold down the “Power”, “Volume +” and “Volume -” buttons.
When the Lenovo logo appears on the screen and then the screen goes dark, release the buttons
Wait for the recovery to load.
Navigation using the “Volume +” and “Volume -” buttons, confirmation “Power”
Factory reset (wipe)
Resetting to factory settings is carried out through recovery.
Enter recovery
Select wipe data/factory reset
In the next menu - Yes - delete all user data
The phone will reset the phone and the first menu will be displayed. Now select reboot system now to reboot.
Reset to factory settings (Method No. 2)
Resetting your Lenovo A760 smartphone is as follows:
Press and hold the "Volume -" button and the "Power" button
After the backlight turns on, release the buttons
After a while a menu will appear
Use the volume buttons to select “5. Erase Userdata" and confirm the selection with the "Power on" button
In the next menu, click "Power" again
After formatting, select “8. Reboot". The smartphone will reboot with default settings
Comments
no comments
If some advice helped you or, on the contrary, did not help you, then do not be lazy - register and vote. By doing this you will help other users and us. Well, or just click on the advertisement, this will also make us happy and in this way you can thank us. Also, only registered users can leave comments and make changes to the database. By registering, you can add new devices or add notes to existing ones.
You can register or login on this page
Method for SONY
Turn off, turn on and when Sony logo appears on the screen or when the indicator lights up - HOLD/Press (possible options):
- Volume DOWN
- Volume Up
- Click on the logo
- Or turn off Sony, hold down the “Power” button, wait for a couple of vibrations, release the power button and hold down the “Volume Up” button
If you can’t use the universal method (read below).
A universal method for all Android devices using a PC and ADB tools
(Asus, HTC, Lenovo, Sony, HTC, LG, Samsung, Motorola and others, provided that recovery is available in this device)
Adb Run Program - Method 1
Using the site's proprietary Adb Run program (don't forget to enable USB Debugging)
ADB RUN working window
From the command line - Method 2
Another option is how to get to the Recovery menu using standard ADB tools and the ADB RUN program:
Connect Android to PC and type adb reboot recovery
Example in ADB RUN:
From the command line - Method 3
As practice shows on some devices (and more specifically on LG), it is not possible to transfer an Android device using the adb reboot recovery , in this case you should use the following command
adb shell
reboot recovery
There is also a command to switch to Recovery mode for LG, you need to enter the command
adb reboot —bnr_recovery
After which the device will begin to reboot in a few seconds!
Management in the Recovery menu
Volume Up and Down —move through the menu. On/Off key —select an item in the menu. There are some Android devices that do not have a volume key ,
in this case, you will need
an OTG cable and a computer mouse.
As soon as you start putting Android into Recovery mode, connect your mouse. This concludes the article. If you don’t know how to use it and what items in Recovery are responsible for, then read the article
- FAQ Clockwordmod or complete instructions for CWM
- How to use TWRP RECOVERY
- If errors occurred when installing the update - Status CWM
That's all! There is nothing complicated! Read more different articles and instructions in the section Articles and Android Hacks . Stay with the Android +1 , it will be even more interesting!
Sources used:
- https://fb.ru/article/418981/vosstanovlenie-sistemyi-lenovo-poshagovaya-instruktsiya-spisok-sochetaniya-klavish-dlya-vosstanovleniya-nastroek
- https://remontcompa.ru/913-kak-otkatit-noutbuk-lenovo-k-zavodskim-nastroykam.html
- https://remontka.pro/recovery-image-lenovo-laptop/
- https://lenovomania.org/otvety/kak-vosstanovit-zavodskie-nastroiki-na-noutbuke-lenovo
- https://androidp1.ru/kak-zayti-v-menyu-recovery/
SHARE Facebook
- tweet
Previous articleHow to block a Beeline SIM card yourself via the Internet or from another phone
Next articleHow to set up email on your Android and iOS phone