Are you the happy owner of a Lenovo tablet and want to take a screenshot, but don’t know how? Then we will try to help you with this, especially since not everyone knows how to take a screenshot on a tablet. Sometimes it is really necessary to capture the image, for example, if some kind of failure occurred in the program, you need to copy the image of the receipt for certain virtual financial transactions, etc.
But even if a person is an active tablet user, this does not mean that he understands how to capture an image on the screen. If you have at least Android version 4, then this procedure will be as easy as pie. Let's figure out how to take a screenshot on Lenovo tablets. There are several simple and popular ways to perform the manipulation in question.
Lenovo Tab 2
In order to create a screen on the device in question, you can use several options. Here are some of them.
Method 1:
- Press the power button and the volume down key at the same time;
- While holding the keys in the indicated position, listen. There should be a click as if the camera took a photo;
- If the screen “blinked”, it means that its image was saved in the “Gallery”.
Additionally, on Android, a shortcut to an image can be accessed through the top notification bar.
Method 2:
- Press and hold the power button until a window with options appears;
- Among the list there is an item “Screenshot”;
- By clicking on the indicated section, you need to wait for the camera to click and the screen to “blink”;
- In this case, the screenshot will also be saved in the “Gallery”, or it can be accessed through the top panel.
Method 3:
- First, you will have to install the themed application from Google Play;
- Using the instructions, launch the application and take a photo;
- The application can create a folder specifically for screenshots, or you will have to use the “Gallery”.
Method 4:
- A photo taken as a reaction to a special movement of the hands;
- Activate in the “Motion” menu;
- Perform the selected gesture;
- You should look for a screenshot on your tablet in the “Gallery”.
As you can see, all options are extremely accessible.
- Screenshot on MacBook Air or Pro - How to Take a Screenshot of MacBook Air and Pro?
Lenovo Tab 3
This tablet went on sale at the end of 2021, so not all users understand exactly how to take a screenshot of the screen on it. In many ways, these methods are similar to the previous option, but there are still some differences, so we will try to consider only those that are truly trouble-free and safe for technology, so that later, due to an unsuccessful screenshot, you don’t have to buy a new tablet.
- Pressing the Power and Volume Down button. It’s convenient, but in order to take a photo, you can accidentally turn off the tablet, which will result in the loss of the data the user wanted to get a screenshot of. So this method is suitable for a one-time manipulation, but not when you have to take pictures often and many times.
- Press only the power button until the system shutdown message appears. Taking a screenshot this way doesn't require much effort or settings. But not all tablets can provide the opportunity to use the “Screenshot” function in this way. Especially if some kind of software glitch occurred or something like that. As in the previous version, this manipulation is suitable for one-time use.
- With an application from Google Play. A lot of hassle. First, you need to enter the request “screenshot”, then install the application and only then use it. Although the application does all the “dirty” work.
- Gestures are a very convenient option. In order to activate this function, you will need to perform one simple manipulation, and then enjoy its benefits at least a hundred times a day. But be prepared for the fact that working on a tablet may cause your screenshots folder to soon be completely full.
If it is not possible to take a screenshot on the Lenovo tablet itself, you can connect a keyboard to it and work on it. Find the “Print Screen” key and press it.
For owners of Lenovo and Samsung tablet computers (Galaxy Tab 2, 3, 4.5, etc.), several different methods are available to take screenshots.
Method 3: Built-in function
Of course, you shouldn’t forget that programs sometimes also have functions for creating screenshots. In certain cases, this is much more convenient than using any program or saving a snapshot of the entire screen without the ability to cut out only the active window.
For example, taking screenshots is available in many game clients such as Steam. This way, players can screenshot important moments, match results or a beautiful cut-scene, and then post it to their profile or share it with the community. In addition to the availability of the feature, it can often be customized: change the hot key, save path. All this is done in the client settings.
Read more: How to take a screenshot on Steam
In various editors and all kinds of applications where it makes sense to take screenshots, the corresponding function has begun to appear more and more often. Check the settings of the program from which you want to capture the screen - it is quite possible that the built-in option will be sufficient.
Browsers
We’ll tell you separately about the web browsers in which many people spend the most time. In a situation where you need screenshots of the browser window, you can get by by installing a small extension. They are available in any extension store that your browser supports: Google Webstore, Opera Addons or Firefox Addons. For simple shots, Joxi or Lightshot will be enough (these add-ons are almost identical to their desktop versions, which we talked about above).
Some browsers even have their own function for creating a screenshot, eliminating the need to install a third-party solution. We'll demonstrate how to take screenshots in three popular web browsers.
Opera
In Opera, the process of taking screenshots is the most pleasant and convenient.
- The window snapshot icon is located right in the address bar - click on it.
- You will be asked to choose a capture method: a random selection of an area, the entire screen (meaning only the Opera window) or saving the page in PDF format.
- When selecting an area, you can scroll down the page, thereby creating a long screenshot. Once the area is in focus, click on "Copy and Close" to place the screenshot on the clipboard, or on "Capture" to save it as a file.
- Before saving the photo, the editor built into the browser will open, in which you can use various editing tools: arrow, sticker, highlight, blur. From here the image can again be copied to the clipboard or saved to the device.
Microsoft Edge
There is a proprietary browser for Windows 10, and the function we are interested in is also built into it.
- It is located in the web browser menu and is called “Web Page Snapshot”, and if you prefer to use a hotkey, press Ctrl + Shift + S.
- Two buttons will appear to choose from: “Free selection” and “Full page” - select one of the options. Free selection requires you to specify a specific section of the page. Once selected, click the Copy button to save to the clipboard or Add Note to edit the file in a small editor.
- The local editor here is equipped with practically nothing: there is only a marker and the ability to handwrite text (if the laptop supports this function). After/instead of editing, save the picture to the clipboard or to your hard drive - below you see a highlighted button for the second option.
Vivaldi
Vivaldi, a product of former Opera developers, has a completely different screenshot tool. It does not have any additional functions designed for editing.
- The screenshot button is located at the bottom of the browser window.
- When you click on it, a window with parameters will appear. Here you select the image type and file format. Mark the desired options with dots and click on “Take photo”.
- Select the area you want to capture and press the camera button located in the corner of the highlighted area.
- The file will automatically be saved to the downloads folder set through the browser settings.
Let’s add that not only the browsers reviewed have the ability to take a screenshot: owners of UC Browser, Maxthon and, probably, some other, less popular analogues can also find this function.
Online services
A rather strange, but still real way to take a screenshot using a web browser is to use special sites. They, like browser extensions or the function built into them, can take screenshots only within the browser window and are suitable in isolated cases. For example, when screenshots are taken extremely rarely, but they need to be beautifully processed without installing additional software.
We described in detail how to use such services in our other material at the link below.
Read more: How to take a screenshot online
We are glad that we were able to help you solve the problem. In addition to this article, there are 12,405 more instructions on the site. Add the Lumpics.ru website to your bookmarks (CTRL+D) and we will definitely be useful to you. Thank the author and share the article on social networks.
Describe what didn't work for you. Our specialists will try to answer as quickly as possible.
Method number 1. Using the Screenshot Easy app
If some tablet functions do not work, it does not matter. Special programs have been created to simplify working with screenshots. “Screenshot Easy” for Android OS has a user-friendly interface, its capabilities are quite enough for the average user.
There are several ways to take a screenshot of the screen on your tablet.
Standard:
- Hold down the “Power” and “Volume” keys for several seconds and wait until the tablet screen blinks;
- apply the Home and Power buttons.
Alternative:
- use your own combination of physical keys;
- the “Start Capture” button in the “Screenshot Easy” program menu;
- click on the icon in the notification line;
- shake the tablet;
- save screenshot via custom shortcut.
Method 2: Third Party Program
Not everyone is satisfied with the standard set of functions offered by different operating system applications. If you plan to work closely and constantly with screenshots and need to edit them for greater clarity, you will need more advanced software.
There are quite a lot of third-party solutions, so every user can choose the right one for themselves. We will consider three options: simple, for professional use and average. For application alternatives that will be presented below, please see our separate article.
Read more: Programs for creating screenshots
Lightshot
Lightshot is the most famous app for taking quick screenshots. It has a set of all the functions necessary for an ordinary user, but the program does not have any commercial component, so for professional activities you should choose a more advanced product.
Separately, we should highlight the ability to upload created screenshots to a proprietary server. In the future, a short link with this image can be sent to a social network or messenger.
- Follow the link above to read the review and download the program. Install it and then launch it. The tray icon indicates that it is currently running.
- If necessary, configure hotkeys by going to settings. There you can simply find out which keys are responsible for the capture modes.
- After pressing one of the hot keys, two panels will appear: the vertical one is used for visual processing of the image, and the horizontal one is for actions with the file. Thus, you can overlay shapes on an image, draw some object, add text, and then upload it to the cloud to copy the link, save it locally, and distribute the screenshot in other ways.
Ashampoo Snap
For constant work with screenshots and their attractive design, a simple Lightshot is not suitable. It is better to install a more functional application that provides a wide range of capabilities and allows you to customize the selection tools in every possible way. One such program is Ashampoo Snap. It is paid, but has a 30-day trial, which is enough to test the product.
- Install and run the program - a strip will appear in the upper right corner, which, when you hover the cursor, turns into a panel with image capture and screen video recording modes. Through the settings you can change the location of this panel.
- Of course, hotkeys are also supported for taking screenshots, but if you prefer graphical buttons for capturing, this panel will be very useful.
- The created screenshot will immediately open in the editor (the behavior of the program can also be changed in the settings). There are 3 panels here:
- The top panel contains basic control buttons: undoing and redoing changes, changing the scale (affects only the current view), rotating a file, adding a shadow, frame, cursor, copyright icon to a screenshot, working with its size and some minor functions.
- The left panel is designed for processing the file: selecting an area, pixelating, blurring, inserting shapes and icons, drawing, text overlay, numbering, eraser and additional tools.
- The right panel is used to select the action that will be performed with the file. Here you can save it, delete it, distribute it in different ways, and send it to other programs.
Joxi
Something in between the two programs reviewed is Joxi. In its implementation, it resembles Lightshot, only an improved version of it, and also provides the user with a personal account where screenshots can be stored and sorted, but with limited space. To increase the volume, you will have to buy the “plus” version or periodically clear the cloud of images, if, of course, you are interested in downloading for a link/storing online.
- After downloading and installing the screenshot, you will immediately need to create an account using your email and password or login through a social network.
- When Joxi is running, it will appear as a tray icon. If you click on it with the left mouse button, the screen area selection mode will immediately open.
- When you right-click you will see the following menu:
In the “Fragment” mode, a rectangular section of the screen is selected, after which the editing panel appears. Accordingly, the “Screen” mode captures it entirely and immediately displays the toolbar.
Of course, in the “Fragment” mode, you can adjust the borders at any time if you haven’t focused enough or too much. The panel itself has all the basic tools: underline, translucent marker, arrow, blur, overlaying text, geometric shapes, numbering, etc. The color of the elements can be changed.
- Once editing is complete, click LMB or the checkmark on the panel to automatically upload the screenshot to the cloud. The link to the file will be placed on the clipboard, which will be indicated by a pop-up message at the bottom right. All you have to do is share it with your friends and colleagues. If suddenly you copied something after the link and did not have time to send it, call the Joxi menu, where you will see the added “Open” and “Copy” tiles related to the last upload to the server. Use one of them.
- Next to the checkmark on the toolbar there is also a button with an arrow that displays additional options for distributing the screenshot: uploading to the cloud, copying to the clipboard, saving to a laptop, sending to a social network.
- Through the “History” section of the Joxi menu, you can go to your account. The application website will open in the browser with a login form - enter the data you provided during registration. After this, you will be taken to your personal account, which stores all images uploaded to the company server. Select some of them to assign a shortcut to them or delete them, thereby freeing up space in the cloud. Assigning shortcuts allows you to better navigate among a large number of files and perform a quick search through the corresponding field in the center of the page.
- The last section of the menu is “Settings”. They are worth mentioning separately, as there are several important parameters here. Firstly, active users can change the location where pictures will be uploaded: Joxi’s proprietary server, FTP server or Dropbox cloud storage. Secondly, the premium version of the application is immediately connected. Thirdly, you can change the quality of screenshots to low or high (medium is set by default), and customize the behavior of the program when performing certain actions. Well, fourthly, here you can view the list of available ones and change some hotkeys.
Method number 2. Standard method for Lenovo and Samsung
By holding down the volume down key and the screen off button for a couple of seconds, the user will hear a sound similar to the click of a lens when taking a photo. This means the screenshot is ready.
This option is suitable for most Lenovo tablets and Samsung models that do not have a mechanical Home button. It is not always possible to take a screenshot the first time; usually you have to try several times.
- How to take a screenshot on an Androin, IOS, Windows Phone tablet?
Pictures can be easily found in the gallery or in the Pictures/Screenshots, Pictures/ScreenCapture folders.
Taking a screenshot on a Lenovo tablet
A screenshot may be needed for many tasks, from saving an online receipt to sending snapshots of a conversation from a social network. All modern gadgets provide the ability to take a screenshot, and Lenovo devices are no exception. As on other tablets, you can use the standard combination of two buttons: “Power” + “Volume Down”.
Press these keys and hold them until the message “
Saving screenshot...
” appears. If this message does not pop up, you will have to try other ways to screen the tablet display.
Method 1: Top menu
It happens that the standard combination of two buttons does not help, in this case you can use the top menu, which is also called the “curtain”. Swipe your fingertip across the screen, from top to bottom, so that a “curtain” with icons for settings and tools pops up. For example, in this menu you can enable the “ Wi-Fi”
", "
Mobile networks
", "
Airplane mode
", "
Flashlight
".
Among them, find the “ Take a screenshot
” or “
Screenshot
” button, then click on it.
- How to take a screenshot on Windows 10? IN
Attention!
If this button is not in the “curtains” menu, then you need to configure it in the “
Manage switches
” section or in the “
Sharing menu
” settings.
This can be done in the device settings.
Method 2: Applications
Just like for a computer, you can download special screenshot utilities for Lenovo phones and tablets. They can be found in the official app store. Here is a small selection of utilities for taking screenshots:
- Super Screenshot
is a convenient application that allows you to edit screenshots, make inscriptions and drawings on them. - Screen Master
is a program that allows you to take a screenshot by clicking on a widget that is located in a convenient location on the screen. Also in the utility you can edit screenshots, make inscriptions and highlight individual parts of the picture with color. - Touchshot
is an application with wide functionality; separately, you can highlight the ability to record video from the screen using this utility. - Screenint
is a paid utility with a wide range of capabilities. In the application, you can apply various effects to a screenshot, make drawings, write text and insert stickers.
Method 3: Gestures and movements
Some Lenovo tablets have the ability to set a screenshot by “motion”, “gesture” or “special button”. To do this, study the corresponding sections in the settings menu. But these functions are implemented only on new models of gadgets with the latest version of the operating system. Try tapping your knuckle twice on the screen or drawing an "S" shape.
So you can try using a knuckle to highlight a certain area. These features are not available on all tablets!
Conclusion
The method for saving the display image should be selected according to the developer's recommendations. Different operating systems and different models have different methods available. But in any case, before trying different methods, you first need to try the standard one for tablets, hold down the combination of two buttons for 3 seconds: “Shutdown” and “ Volume Down ”.
Very often, owners of Lenovo devices are faced with the need to take a screenshot of the screen. For example, an error occurs in some program, the game does not start or something else. In such cases, a screenshot comes to the rescue, but the main problem is that not everyone knows how to take a screenshot of a desktop. Before updating the Android operating system version 4+, this procedure was too complicated, but now there is no difficulty in it.
The article will outline all known ways to take a screenshot on phones, tablets and laptops from the manufacturer Lenovo.
Content
What is an Android screenshot?
This is a useful function that allows you to capture information on your mobile phone display at the current moment in time. In this case, the screenshot is saved as a separate file, which can later be opened, copied or sent to another user. Screenshot is an important component of any modern phone and has several features and benefits.
Screenshot icon in the status bar on the Android operating system
Note! A screenshot can be taken by pressing a single button, which is usually located on the body of an Android device.
Screenshot on phone
There are several ways to take a screenshot on phones (it all depends on the device firmware). We will consider all known methods so that the user can choose the most convenient one.
Method number 1. Drop-down menu.
Some devices have a special button in the menu called “Take a screenshot.” If you press it, a screenshot will be taken and the photo will be saved to the appropriate folder. Below is a visual example of this button. This is the most convenient way that allows you to make a screenshot as quickly as possible.
Method number 2. Power button on the phone.
Another convenient way to take a screenshot is to hold down the phone's power off button, after which a special menu will appear. It may contain a “Screenshot” button, which performs the function we need.
It is worth noting that not all devices have such functionality, so if the button is missing, you will have to use the third option.
Method number 3. Simultaneously pressing two buttons.
To take a screenshot of your desktop, you need to hold down two buttons – “power off” and “volume down”. As soon as you complete this operation, a screenshot will be created. You can find it in the following path: ..SD cardPicturesScreenshots.
If you encounter any difficulties during this operation, watch the video below.
Where can I find the photo I took?
Users often encounter the fact that they cannot find a ready-made screenshot. The path where the screenshot is saved is standard: ..\SD card\Pictures\Screenshots. To quickly find a photo, first go to the Gallery application, then to the Today folder.
Common problems and solutions
A popular problem associated with finding a screenshot is the features of the Lenovo Vibe phone model. The smartphone does not have the usual “Gallery” program. To view photos, most users download additional programs or use File Explorer.
The methods for taking screenshots on Lenovo devices are simple and no different from other Android gadgets. For models a5000, s850, a536, a328, s660, as well as others from the Lenovo line, the methods for performing the screen are identical. It is enough to understand the basic principle of operation.
Screenshot on tablet
If you have a Lenovo tablet at your disposal, you can take a screenshot in several ways. There are 3 methods in total. Let's look at them in more detail.
Method number 1. Power button and volume control.
This method is identical to the one we described above. Try holding down the power button and the volume key at the same time. If everything goes well, you will hear the sound that usually accompanies the photography process.
Method number 2. Quick launch panel.
Open the Quick Launch panel (to do this, swipe your finger from top to bottom of the screen). Some Lenovo tablet models have a “screenshot” function in this menu. If it is not there, move on to the next method.
Method number 3. Special applications.
If the previous two methods did not help you take a picture of your desktop, then you should resort to the help of special programs. On the Play Market you can find many applications that have the necessary functionality. For example, you can use the Screenshot program from the developer lovekara. The number of installations of the application has exceeded 10 million, which means there is no doubt about its quality.
This program has many advantages:
- You can take a screenshot with one touch on the screen.
- You can choose the path to save files.
- It is possible to edit the photo.
Download the application on Play Market
Screenshot on laptop
Taking a screenshot on a laptop from the Lenovo manufacturer is not difficult. Here you can go two ways, choosing the most convenient one.
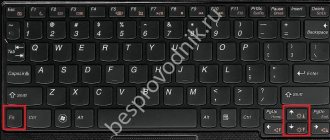
Method number 1. Print Screen button.
To take a screenshot, you need to press the special Print Screen (Prtscr) key on your laptop keyboard. After this, open the graphic editor Paint, press CTRL+V and a screenshot will be inserted into the work area. Next, all that remains is to save the image in the desired format.
Method number 2. Specialized software.
There are many applications that allow you to instantly take a screenshot on your laptop or desktop computer, such as Clip2Net. The user only needs to select a specific area of the desktop. The main advantage is that the screen can be instantly uploaded to a folder and shared with others.
Now you know how to take a screenshot of your desktop on a Lenovo laptop, phone or tablet. If you have any questions, write in the comments.
Source: gamesqa.ru
Situations often arise when you need to send someone a screenshot that captures, for example, part of a conversation, a work screen, or just a beautiful picture. It is not always possible to download the desired image and upload it in this format, and it is not always convenient. But knowing a quick way to take a screenshot on a Lenovo tablet is always useful. Today's article will be devoted to this.
A screenshot is an exact image of what the user sees on the screen.
The word itself is translated from English as “screenshot”. Why might it be needed? For example, you are talking with a friend and it becomes necessary to refer to correspondence with someone else. If you are chatting in a messenger that does not provide a message forwarding function, the task may not be easy. But having learned how to take a screenshot on Lenovo, you can easily take a photo of an open application and send the screenshot to your correspondence.
Method 1: Standard Windows tools
To take simple screenshots for personal needs, there is no need to install special software: Windows offers the user several options for how to do this. The most conveniences are found in the “top ten”, where they paid special attention to this procedure, making internal applications much more pleasant.
Print Screen key
Of course, the most popular and well-known option to everyone except complete beginners is the use of the Print Screen key (Lenovo shortens its name to PrtSc). The convenience of this method is that you can both instantly save the file and open it for editing.
Option 1: Quick Save
The easiest and fastest way to take a screenshot of the screen without opening it in any program is to press the key combination Win + PrtSc.
The screen will briefly go dark, indicating that the snapshot file has been successfully created. You will find the result in the Images > Screenshots folder. The picture will be saved with the JPG extension.
The downside of this approach is that you can only save a snapshot of the entire screen, but you still have to crop it to the desired part in some editor. However, if you just need to take a quick screenshot for personal use, no additional editing will be needed.
Option 2: Clipboard
When you press the Print Screen key, the screenshot goes to the system clipboard, but in this case you will not be able to save it immediately. You will need to use some application that supports working with pictures. The easiest way to do this is through the built-in Windows graphics editor Paint, but some people replace it with text editors like Word, which also allow you to insert images into documents and save them to your computer as separate files.
- Capture the entire area by pressing the PrtSc key, and capturing only the current window by pressing the Alt + PrtSc key combination.
- Call the program through which you want to edit or simply save the image. We'll look at the process in Paint.
- Click the "Paste" button or the Ctrl + V keys perform the same action.
- If you also use Paint for these purposes, pay attention to the size of the canvas - it may be larger than the inserted picture. If you save everything as is, the file will have part of the white background. Be sure to remove it by pulling the controls up and to the left.
- To highlight any elements of the screenshot or add information, overlay geometric shapes or text.
- Save the result in JPG format by calling the “File” menu and selecting the appropriate item. And through the “Save As” section you can specify a different file extension, if necessary.
- All you have to do is select the location where the file will be saved, enter its name (optional) and click the “Save” button.
Snipping Tool
The first full-fledged tool available in Windows, starting with Windows 7, is Snipping Tool. The developers plan to abandon it in new versions of Windows 10, since this version has a more functional and modern application. However, it is still available in current builds, and is definitely not going away from Win 7 and 8.
- Launch the application by finding it in Start.
- Now you can take a screenshot by clicking the “Create” button.
- However, before this, we recommend choosing the appropriate mode: “Freeform” and “Rectangle” require the user to independently select an area, while “Window” or “Full Screen” save only the specified area.
- To show some action that resets when you access the Scissors, set a delay of 1-5 seconds.
- After clicking the “Create” button, the screen will light up in white, which means you can capture the screen.
- The screenshot can be edited, but there are minimal tools: a colored pencil, a yellow marker and an eraser.
- After this, the image can be saved to a laptop, sent to the clipboard to paste the already edited version into another application, or sent by email, provided that the desktop email client is configured.
Screen Sketch tool (Windows 10 only)
Windows 10 has another, more advanced application - “Sketch on a fragment of screen”. It is more functional than “Scissors” and more pleasant to use.
- To take a screenshot using this program, you do not need to run it. Instead, you can press the Win + Shift + S key combination and, after darkening the screen, select the desired area.
- If you can’t remember the keyboard shortcut or if you need to create a screenshot using a timer, find the application by name in “Start”, then click on the arrow next to the “Create” button and select a time.
- After pressing the Win + Shift + S keys, a toolbar will appear at the top that will help you change the capture type from a rectangular area to a random selection of an area, the active window, or the entire screen.
- Once the snapshot is taken, Windows Notification Center will notify you of this. The screenshot will be saved to the clipboard, but when you click on the tile, you will be taken to editing and/or saving.
- The program has "Pen", "Pencil" and "Marker" for editing - they support changing the color and thickness of the line. On laptops with a touch screen, you can also enter text using a stylus and erase unsuccessful edits with an eraser. You can also add a ruler and protractor on top of the image to draw straight lines. The last action is canceled and returned using the standard hotkeys Ctrl + Z, Ctrl + Y, which cannot be done in the already discussed “Scissors”.
- Additional functions - adjusting the scale while editing, saving to a device, copying to the clipboard, editing through the proprietary Contacts application or another Microsoft application.
Game Bar (Windows 10 only)
Windows 10 has another application that helps you take screenshots, but this is not its main function. It makes sense to use Game Bar only if you are interested in other functions of this program, otherwise it is much more logical to resort to applications created specifically for working with screenshots.
- The Game Bar has the following keyboard shortcut for taking a screenshot: Win + Alt + PrtSc. Once clicked, the user will receive a notification that the screenshot has been successfully taken. You can find it in Windows in the Videos > Clips folder. Not only photos, but also videos created through this application will be stored here.
- Not everyone is comfortable frequently pressing three keys at once. Instead, you can display the screenshot button as a widget. To do this, press Win + G, click on the button to bring up the list of mini-applications and select “Record”.
- Now the added window will always appear when you press the Win + G keys. Using the first button, you can create a screenshot, and to go to all files, click on the “Show all entries” line.
- The “Collections” displays a list of images, there are buttons for going to the system “Explorer” and creating a meme by adding captions at the top and bottom. Additional functions include renaming, deleting, sending a publication to Twitter, copying to the clipboard.
- Unfortunately, you cannot edit the file: to cut out the desired area, change the size of the picture, or edit it in some way, you will need to use some program, at least Paint.
Options
There are several methods for creating a screenshot on Android. I suggest considering the simplest ones:
- using tablet/phone keys. This is a fairly simple method that does not require additional settings or downloading applications;
- via the drop-down menu. The method involves adding a button to the top menu - will be described in detail below;
- downloading additional software. Not the fastest method, but downloaded third-party software can make the job easier if you often need to take screenshots.
Let's start with the simplest method
The simplest method is often called a print screen - following the example of screenshots on a computer and laptop, which are taken with the PrintScreen key. On Android devices, of course, there is no such key, but a photo of the desktop can also be taken by pressing the keys, which is why, out of habit, they call it a print screen. But how to produce it?
It's very simple - different models of phones/tablets can have different versions of Android installed. They differ in what buttons the screen is photographed with. On Lenovo, this is most often done by a combination of the on/off key (Power) and the volume button (Volume, in the lower part, where volume down is Vol-). The buttons must be pressed simultaneously - you will hear a clicking sound as when taking a photograph. Ready! You will find the picture in the gallery or in the Pictures/Screenshots folder (may also be called Screens or something similar).
The second way is through the top drop-down menu
The second method is also simple, but still requires some actions in the settings area. But if you haven’t changed the settings in the quick access menu section since purchasing the device, then you can find a button that will allow you to make a screenshot on Lenovo in this very menu.
It opens with a swipe from the top (swipe from top to bottom) and contains many different useful functions: Wifi connection, Bluetooth, adjusting the screen backlight level and much more. Among them you can find a button with the image of scissors or something similar (in some models the signature is Screenshot). Click on it and get the desired picture in the Pictures/Screenshots folder.
It may be that the button will be missing. Go to the settings - the item “Quick Access Menu” or “Manage Switches” (may be located as a sub-item in the “Notification Panel”). There is no need to sound the alarm if you don’t find a button for taking photos - some models may simply not have such a function. There is nothing you can do about this (except perhaps ask the seller about it in advance), you need to make a screen in other ways.
Where are the screenshots stored?
To view the resulting screenshot, just open the “Gallery” application and go to the “Screenshots” or “Screenshots” album.
Another way to quickly find a screen looks like this:
- Launch Explorer or File Manager.
- Open the “Pictures” folder.
- Go to "Screenshots".
In the menu section that opens, screenshots that have been taken over the entire period of using the smartphone will appear.
Using additional software
Downloading and installing the program to take a screenshot on your tablet is easy. Of course, if you can use a button in a drop-down menu, it’s easier to click on it. But if you have a tablet without this feature, or the menu is full of functions you need, for which you cannot install another, third-party software can help.
Such programs that take a photo of the screen on a Lenovo tablet are called screenshots. For a similar request, you can find a bunch of applications and choose the most convenient one for yourself. Some tips on how to choose your software:
- the screenshot should be taken with one click;
- you need the ability to choose a “custom” location to save the image;
- The ability to edit the resulting image is desirable.
Third Party Applications
Well, the last way that will help you take a screenshot on a Lenovo tablet is third-party applications. There are quite a lot of different programs in the application store that are designed for one task - taking screenshots. The most popular applications are Screenshot Easy, Screenshot, Screenshot touch, Lightshot, Mobizen, etc.
All these programs are distributed completely free of charge, have a simple and intuitive interface, and also have different functionality. Some apps simply take screenshots, while others let you immediately edit your screenshots, add notes, text, stickers, and more.
That, in fact, is all that concerns screenshots on Lenovo tablets.