Lenovo A706 is excellent value for money. Lenovo has not been on the mobile device market for very long, however, it can boast a wide range of smartphones at an affordable price. Among all the devices, this model of the quad-core Lenovo A706 phone, made in an original case for a representative of a budget series of devices, with quite impressive parameters and a price of $130, will not go unnoticed. Let's take a closer look at this smartphone.
Characteristics
Lenovo A706 is equipped with a quad-core Snapdragon MSM8225Q processor with a frequency of 1.2 GHz. The manufacturer installed 1 GB of RAM and 4 GB of internal memory. The phone also supports MicroSD cards up to 32GB, so you can quickly expand the capacity. The battery in the device, with a capacity of 2000 mAh, is enough for about a day of battery life. Of course, if you turn on the energy saving mode and periodically turn off data transmission via Wi-Fi and 3G, the smartphone will work for 2 days. The thickness of the device body is 10.4 mm, which is an acceptable indicator for a budget device. The overall dimensions of the device are 136 x 69 x 10.4 mm.
The phone has 2 slots for SIM cards. One module operates in GSM and WCDMA modes, and the second SIM only in GSM. The device contains GPS, WI-FI and Bluetooth modules. In the Antutu Benchmark 3.3.2 performance test, Lenovo A706 scores 11,000 points, which is not the maximum value for a budget device of this class, but at the same time a fairly good result. The smartphone has a fairly modern Android 4.1 operating system preinstalled as an OS.
How to flash Lenovo A706
Installation and updating can be done with your own hands using programs for firmware, free of charge, the links contain both original, that is, stock, official (not modified), and custom firmware, that is, alternative, all with instructions.
- First you need to download the firmware by selecting one of the options below. Along with it in the archive is the necessary set of programs (TWRP and others).
- Then extract the file “instructions_rootgadget.txt” from the archive. Using the archiver program...
- The firmware file contained in the zip archive must be downloaded to a memory card or smartphone memory.
- For other information and sequence of actions, see the text instructions.
Lenovo A706 firmware
Choose what you like, we would recommend upgrading to the latest versions of Android.
- Android Pie 9.0 is a flagship OS, one might say, but still a little unfinished. URL: yourtopfile.info/android9pie
- 8.0 Oreo is an excellent option, with a minimum of bugs and rich functionality, but version 9 is certainly better. URL: yourtopfile.info/android8oreo
- 7.0 Nougat is a stable version in all respects, it works even on low-power hardware. URL: yourtopfile.info/android7nougat
- 6.0 Marshmallow - versions 5 and 6 are already really old, although they were once the pinnacle of progress. But if you switch to them from versions 3 or 4, then of course the difference is very noticeable. URL: yourtopfile.info/android6
- Android 10 URL: yourtopfile.info/android10
- Android 11 URL: yourtopfile.info/android11
Screen and sound
As for the display, it’s not bad at all. We have a good IPS matrix with a resolution of 480 x 854. The viewing angles of the screen are quite good, of course there is some inversion, but this is not at all critical for games and practically does not cause any inconvenience in work. And then, don’t forget that this is not a top-end device. The sound in the phone supports the Dolby Dgital Plus high-quality sound system.
Why update the firmware on your Android smartphone?
Everyone is motivated by different reasons.
- Problems with the camera, blurry macro photography, for example.
- Poor display response to touch.
- I would like to understand what the new Android is.
- I'm tired of the old version of Android and want to expand its functionality.
- The phone doesn't want to turn on.
- The phone battery has stopped charging.
Appearance
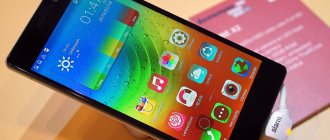
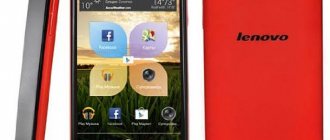
The appearance of the smartphone is quite unusual, as for a budget device from the Lenovo family. On the back panel, elements of the designers' creativity appear in the form of a silver insert on the top of the cover, which gives the phone its own style and will be difficult to confuse with another device in the lineup. The phone is available in two colors - white and pink, which primarily positions it as a women's smartphone. On the front of the device there is a Lenovo logo, a speaker grille, a 4.5-inch screen with an IPS matrix, a 0.3 MP camera, three touch navigation buttons, proximity and light sensors, and a microphone.
The rear part houses a 5 MP camera with flash, a speaker grille and the inscriptions: Lenovo and Dolby Dgital Plus.
On the top of the case are: a 3.5 mm headphone jack and a power button. The volume rocker is located on the left side. On the right side there is a connector for microUSB. There is a special gap on the bottom edge for easy removal of the back cover.
Video: smartphone review
Hard Reset for Lenovo IdeaPhone A706
Instructions on how to do a Hard Reset on Lenovo IdeaPhone A706 (factory reset). We recommend that you familiarize yourself with a visual guide called resetting settings on Android. .
Reset codes (open the dialer and enter them).
- *2767*3855#
- *#*#7780#*#*
- *#*#7378423#*#*
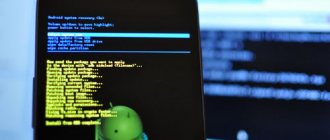
Hard Reset via Recovery
- Turn off your device -> go to Recovery
- "wipe data/factory reset"
- “yes - delete all user data” -> “Reboot System”
How to log into Recovery?
- hold down Vol(-) [volume down], or Vol(+) [volume up] and the Power button
- A menu with the Android logo will appear. That's it, you are in Recovery!
Resetting the Lenovo IdeaPhone A706 can be done in a very simple way:
- Settings->Backup and reset
- Reset settings (at the very bottom)
First of all!
There are no “left” links or unnecessary actions in this article! If you really need Root Rights, then read carefully and follow step by step, this is a guarantee that you will do everything right! This article on obtaining Root rights is divided into two parts: The first part is the Necessary components and conditions
, the second part is
Instructions
on how to get root rights using the received files and programs. If, in the process of obtaining root rights, Android constantly reboots or is in the process of eternal loading (happens extremely rarely, but still), then it’s worth it. Now let's start getting Root rights!
Android manufacturers sometimes release new firmware on which you cannot get Root using one of the suggested methods. If the article contains alternative methods, try them. Doesn't work anyway? Indicate the Android version and firmware version in the comments (don't write angry, shitty comments, it won't do you any good, or anyone else). Android is frozen (will not load), read and re-read from the very FIRST PARAGRAPH, all the necessary links are present in the article!
Root rights
If you want to get root access, you can use the universal program Rookthp Pro 3.2 , download here . Instructions for using the program can be found here. We can also recommend ZYKUroot version 2.2 among the universal ones. You can find out information about it at zykuroot.info We won’t talk about more popular programs, the same Kingo and Framaroot are always popular, although they are losing ground a little
Small update to the article dated February 23, 2022:
This update concerns universal options for unlocking the bootloader, flashing firmware and speeding up Android smartphones. It is important to remember that unlocking the bootloader is currently only possible using a PC; there are no .apk applications for such operations , no matter how some incompetent authors on the sites invent it.
FAQ in simple words:
What is a bootloader? The bootloader is responsible for starting and loading the operating system, as well as the Recovery Menu. That is, it is a very important element.
Why unlock the bootloader?
- Installing custom Recovery
- Patches and operating system updates.
- System backup and other features
Will the warranty be void if the bootloader is unlocked?
No, if the phone is in working condition.
Will OTA updates work after unlocking?
Yes, they will.
What to do if the “cannot request parameter” error appears?
Try using the old USB 2.0 instead of USB 3, this usually solves the problem, the reason is unknown.
- Unofficial unlocking of the bootloader without the manufacturer's permission through one-click software (without magisk and TWRP). All this can be accomplished in a couple of clicks; for this purpose, enthusiasts have created the appropriate software that is installed on the computer.
- Speed up Android without ads in the app.
Instructions
In this case, we will look at how to perform custom firmware for the Lenovo a706 smartphone. It is done through ClockworkMod Recovery. Some devices already have this extension in the previous firmware version. If not, you will have to install it.
So, the following actions are performed:
- Download the archive containing the firmware to your computer. After that, you should put it into the phone’s memory by connecting the USB cable. You should be careful, the archive is not transferred to the memory card, but to the smartphone itself.
- The transition to Recovery is carried out. To do this, you need to simultaneously hold down the Power and Volume keys (up and down). They are held for several seconds. Actions are performed with the phone turned off.
- The main Recovery menu appears on the screen. When using the volume rocker, items are selected, and pressing Power confirms the selection. You need to click wipe data/fastory reset and Yes in the window that appears.
- Then wipe cache partischions is selected, then the action is confirmed, as in the previous paragraph.
- After this, the choice falls on advanced.
6. Then the Advancer Menu will appear, where you should select wipe dalvik cache. When this is done, the choice is once again confirmed.
- Next, you need to return to the main Recovery menu and select the Install zip from sdcard section.
A window appears on the screen where you need to click on choose zip from sdcard.
When the file explorer is displayed, you should select the archive that contains the firmware. The action is confirmed. The firmware starts.
When the process is completed, you need to restart your smartphone. This is done through Recovery. You need to go back to the main menu, which is done using the Go Back item. Then you should select Reboot system now and confirm the action so that the phone reboots.
How to Flash
Step 1
: Download and extract the Lenovo A706 stock firmware package on your computer.
Step 2
: After extracting the package, you will be able to get the Firmware File, Flash Tool, Driver and How-to Flash Guide.
Step 3
: Install the provided USB Driver on your Computer, and if in case USB Driver is already installed, SKIP this step).
Step 4
: Follow the How-to Flash Manual to Flash the Firmware on your Lenovo A706 Device.
Readme Once
:
[*] Take a Backup
: If you are going to flash the above Firmware on your Lenovo A706 device, then take a backup of everything as because your personal data will be deleted after flashing the stock firmware.
[*]
The firmware shared on this page is officially released by the company and helps you to recover your device if you ever got bootloop, software error, update error, hanging and dead issue.
And the article getting Root Lenovo A706 will help you!