There are many reasons to change the firmware of Android devices. There are also many reasons to abandon this step. But if you have already decided to take this drastic action, then from this article you will learn how to flash a Lenovo tablet without dangerous consequences for yourself and your device.
After reading the detailed analysis of this article, you will know exactly how to flash a Lenovo tablet correctly and independently
IMPORTANT ! Be careful when flashing your tablet. Any mistake in this process can be fatal - from voiding the warranty to rendering the device unusable.
Preparatory actions
Before you start flashing your smartphone's firmware, you should take care of the device's charge level. It would be nice if it corresponded to 100 percent, for greater reliability, or at least 50 percent. Find the USB cable from your smartphone and look for the firmware driver on the manufacturer's official website. They are also sometimes called special mode drivers.
They need to be installed on your computer. Check that the drivers match your Lenovo model. By the way, unpacking must be done in a folder whose name consists exclusively of Latin characters.
QPST Flash Tool
And this is a complete utility, part of which is described above. It is recommended to be used by more experienced smartphone owners, otherwise there is a high probability of harming the Android smartphone and its software. The set includes the most necessary tools for managing and configuring the firmware. Use this software carefully and only according to the instructions.
The full QPST suite includes the following:
- QSPT Configuration;
- RF Calibration and TM Application;
- Software Download;
- RF NV Item Manager;
- EFS Explorer.
Advantages:
- variability of settings;
- many detailed and subtle parameters;
- Supports many smartphone models.
Flaws:
- difficulty to learn.
| Compatibility: | Any Qualcomm phones |
| License: | For free |
| Language: | English |
Firmware process
Turn off your smartphone and remove the battery - you won't need it yet. We took, for example, the Lenovo a319 smartphone, based on the Android OS.
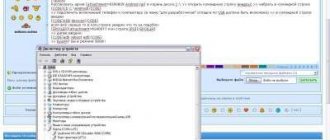
You need to unpack the downloaded archive with drivers and install them in a place convenient for you. Now launch Device Manager and connect your phone to your computer (laptop). It should remain turned off and without battery.
Now in the “Device Manager” you can see some unidentified device. It will flash for only a few seconds, so you need to quickly click on it. A new window will immediately appear in front of you, in which you should select the “Update driver” task. Here you need to specify the same folder where you saved the drivers. If you have not made any mistakes, the device name will change in the “Device Manager”.
If you cannot overcome this stage, contact specialists in setting up and repairing Lenovo smartphones.
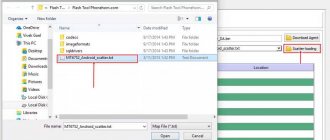
Now disconnect the phone from the PC, and then download the latest firmware to the computer and run the “Flash_tool.exe” utility, which also needs to be downloaded. The program window should contain the inscription Scatter-Loading. Click on it and open MT6577_Android_scatter_emmc.txt.
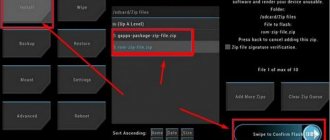
It is necessary to check the box next to the line “DA DL ALL WITH Cheksum”, otherwise the phone will not turn on after the procedure is completed. If you skip this step, you will have to do everything again.
Now click on “FirmwareUpgrade”.
You need to wait a little while the archive analysis process takes place. The utility will complete the operation and switch to standby mode. If an error message appears, you need to:
- download the archive again;
- send Checksum.ini., and then repeat the previous step (with installation).
Now you need to reconnect your smartphone to your PC. It should still be in the off state, but with the battery present. The firmware process will begin on its own, and you just need to wait. The procedure will be long, so try not to interrupt it and do not disconnect the smartphone from the computer.
After the operation is completed, you can disconnect the device and check the quality of the work done. If you made any mistake, you will have to repeat the above procedure from start to finish.
Sometimes our mobile gadgets begin to behave inappropriately. There may be several reasons for this. But most often this behavior is associated with the device’s firmware. For some reason it was damaged and therefore became unstable. In this case, a flashing is required. Gone are the days when you had to go to service centers for this procedure. Now any user can flash the device. Let's take a closer look at the firmware process. For example, let's look at how to flash
ASUS Flash Tool
The next computer utility also has a narrow specialization. The ASUS Flash Tool program supports most Android models of the company of the same name. Through it you can install or roll back firmware to older versions, as well as restore data from backups. No other functions are provided. On the left side of the main window is the smartphone itself, and below it is a battery charge indicator. Make sure that the device is charged at least 50% before starting the firmware.
Advantages:
- Only ASUS phones are supported;
- automatic search for connected devices.
Flaws:
- few settings and options.
| Compatibility: | ASUS |
| License: | For free |
| Language: | English |
Firmware via PC
Yes, if you install the official firmware from Lenovo, then you can’t do it without a computer. The first thing you need to do is download the entire driver package for this gadget. Then we download the firmware program, which is called SP FlashTool, and the firmware itself. First you need to install all the drivers and only then proceed to the next stages of the process. In some cases, you will have to disable digital signature verification in Windows. Now we will find out how
After installing the drivers, add the firmware file to the folder with the downloaded program. Turn off the device and remove the battery from it. Now launch SP Flashtool, in the window that opens, look for the “Scatter Loading” button and click on it. Select the firmware file with the extension .txt and the word “scatter” in the name. Next, click on the “Download” button. Now you can connect your turned off smartphone to your PC. The installation of the firmware will begin. The process will be completed when a green circle with the text “OK” appears on the monitor screen. Disconnect the gadget from the PC and reboot it. This is how you can flash Lenovo A319. The instructions are simple and clear.
FastbootFlasher
This tool is an automatic script for a computer that can flash your Android device without formatting or returning to the initial settings. Works in tandem with ADB Run if you need to restore from a data backup.
The script is constantly updated and updated with new functions. At the moment, FastbootFlasher can update smartphones via Fastboot, via Sideload, install firmware from the server, roll back Android versions and has a number of other options.
Advantages:
- has many functions;
- Russian interface;
- Possibility of flashing without data loss.
Flaws:
- difficulty in setting up.
| Compatibility: | Any devices |
| License: | For free |
| Language: | Russian |
Firmware without a computer
There are a number of unofficial (custom) firmware for this smartphone. They need to be installed using a different algorithm. A PC is only needed here to install a custom, unlocked recovery. Everything else is done using a Micro SD card. How to flash Lenovo A319 without a computer? First you need to download the custom recovery installation file. Then connect the device to the PC, turning it on first. Click on recovery and install it on the device. Now you can proceed to the firmware itself.
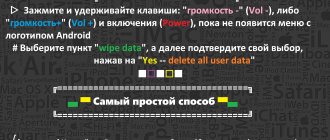
Before flashing the Lenovo A319, you need to download the firmware itself in ZIP format and put it in the root of the memory card. Then you need to turn off the phone and turn it on in recovery mode (volume up button plus power). Here you must first select the “Wipe data & factory reset” option to reset the gadget to factory settings. Then find the item “Install ZIP from SD Card” and click “OK”. The firmware process will begin, which may take quite a long time. After it is finished, you need to click on The first boot can last from 5 to 10 minutes. Now you know the answer to the question of how to flash Lenovo A319 without a computer.
How to enter "Recovery"
To flash a device through “Recovery”, you must first get into this very menu. This couldn’t be easier to do, especially since on many devices the input combination is exactly the same. So, if the smartphone has a physical central button or a “Home” button (most often found in older Samsung and LG devices, but it can also appear in more modern devices), you need to hold down the “Home” buttons with the gadget turned off. and “Volume +”, then, without releasing them, press the power button.
The device will turn on in the desired mode. If you have a more modern device without a physical Home button, you need to repeat the process described above, but using only the Volume + button and the Power button. If the desired result was not achieved, you should refer to the extended list of ways to enter the “Recovery” menu for different manufacturers.
Using custom
Many people love custom firmware for their performance and low demands on system resources. However, installing such an OS is fraught with serious consequences for the smartphone. The user is deprived of official updates. But that's not so bad. The fact is that such firmware is extremely unstable. In addition, they are in no way protected from outside invasion. While official versions receive patches and fixes for security problems, custom firmware does not have such support. And they are often assembled by crooked hackers who have only recently mastered Android. Therefore, if you change the firmware, then only to the official one. Because stability, security and timely updates are above all. It is not recommended to use firmware from third-party developers. Because the consequences can be unpredictable.
Sony PC Companion
Branded software from Sony for its own smartphones. Allows you to download firmware updates, install them, and restore the phone’s functionality. In addition, the software has diagnostic tools that will help eliminate performance problems.
In general, Sony PC Companion is a useful program for every owner of a mobile device from this company. The utility is capable of servicing not only the phone itself, but also branded accessories. There is also the possibility of backup, file transfer, and so on.
Additionally, Sony PC Companion allows you to transfer all personal data and settings from an old device from the same company to a new one.
Advantages:
- interface in Russian;
- update and recovery;
- file sharing;
- hints regarding all functions.
Flaws:
- Such convenient software is compatible only with Sony.
| Compatibility: | Sony devices |
| License: | For free |
| Language: | Russian |
Summary
Gadgets such as Lenovo A319 lend themselves well to flashing. And this is only a plus for the manufacturer. Because sometimes there are cases when the original firmware is buggy, and there is neither time nor money to contact a service center. All that remains is to flash the gadget yourself. Now you know everything about how to flash Lenovo A319 through a computer and without it.
Detailed instructions for installing official firmware on Lenovo A319 via SP Flash Tool.
- Drivers and programs
Attention!
Wileyfox Flash Tool
If you are the owner of a rather rare smartphone from Wileyfox, then pay attention to this program. The computer utility allows you to flash any partition of your Android phone quickly and without professional knowledge. In addition, Wileyfox Flash Tool is fully compatible with any models of this company if you install the necessary set of drivers.
When performing the procedure, the smartphone must be switched to Fastboot mode. However, you will have to search for the files for the firmware yourself, since, unfortunately, the application does not automatically select the required version.
Advantages:
- simple interface;
- fast work;
- stability.
Flaws:
- no additional features;
- suitable exclusively for
| Compatibility: | Wileyfox devices |
| License: | For free |
| Language: | English |
Installation instructions
- Make backup copies of necessary user data.
Disable driver authentication. Windows 7
When turning on the computer, after loading the BIOS, you must press the
F8
.
In the “ Additional boot options
” menu that appears, select “
Disable mandatory driver signing
.”
This method may not work the first time, so you should repeat the action or open the command line as an administrator and enter two commands: “ bcdedit.exe /set loadoptions DDISABLE_INTEGRITY_CHECKS
” “
bcdedit.exe /set TESTSIGNING ON
”
Windows 8
the Win
key combination +
I
, hold down the
Shift
and select “”.
When you turn on your computer, select Diagnostics
>
Advanced Options
>
Boot Options
>
Restart
.
When loading, select the “mode” by pressing the F7
.
Windows 10
You must hold down the
Shift
and select the “
Start
” menu > “”.
Once booted, select Troubleshooting
>
Advanced Options
>
Boot Options
>
Restart
.
Then select “ Disable mandatory driver signature verification
” by pressing
F7
.
Download the archive with the SP FlashTool utility and unpack it to any folder.
Download and install drivers for the SP Flash Tool to work correctly. To do this, you need to unpack the archive with drivers into a random folder. Then open Device Manager
", select the name of your computer in the list (the first item), then click "
Action
"\u003e "
Install an old device Next
".
Then select “ Install equipment manually selected from the list
” and click “
Next
” again.
Then select “ Show all devices
” and click “
Next
”.
Now click the “ Have from disk
” button, in the window that appears, click “
Browse
”, find and select the downloaded driver file, depending on the OS version, and click the “
Open
” button.
Then click " OK
".
In the new list, select “ MTK USB Port
” and click “
Next
”.
Agree to the warning by clicking “ Install this driver anyway
” and complete the installation by clicking “
Finish
”.
Now a new device with the name “ MTK USB Port (COM3)
” will appear in the list of devices in the “
Ports (COM and LPT)
” section, which needs to be removed, but the driver should remain.
Select a new device and right-click on it. Select “ Delete
” from the context menu.
In the window that appears, click “ OK
”, making sure that the “
Remove driver programs for this device
” item is inactive.
Download the archive with the firmware (for example, this one) and unpack it into a random folder. It is recommended to use the folder path without Cyrillic characters.
Turn off your smartphone and remove the battery.
Launch the SP Flash Tool utility and go to the “ Download”
».
In the program, specify the path to the Scatter-loading file (which is located in the same folder with the custom recovery) by clicking the “ choose”
».
Then click on the “ LOCATION”
» each line and select all required files if they were not selected automatically.
Select “ Options”
">"
Option...
".
Go to the “ Download
” tab and activate the “
USB Checksum
” and “
Storage Checksum
” items in the “
DA DL All with Checksum
” section.
If the smartphone was in the “perpetual boot” state, you need to format it before installing the firmware. To do this, go to the “ Format”
", activate the items "
Auto Format Flash
" and "
Format whole flash except Bootloader
".
Then press the “ Start
” button and connect the switched off device to the PC via a USB cable. After completing the operation, disconnect the smartphone from the PC.
After all the files are prepared, click the “ Download”
"at the top of the program.
Immediately connect the smartphone without a battery to the computer via a USB cable. It is recommended to use an original or good quality cable, as well as the USB 2.0 port located on the motherboard (for PC).
SP Flash Tool will recognize the device (if the drivers have been installed correctly) and the firmware installation process will begin.
After successful installation, insert the battery back into the smartphone and turn it on. After some time, the device will boot and be ready for further work. The initial startup usually takes a long time, but no more than five minutes. ATTENTION!
If error 4032 occurs during firmware installation, you should do the following.
Few users of fairly popular Lenovo smartphones are aware of the potential of their devices in terms of software replacement. Let's talk about one of the common models - the budget solution Lenovo A536, or more precisely, the methods of flashing the device.
Regardless of the purpose for which operations are performed on the device’s memory, it is important to understand the potential danger of the procedure, although working with the device in question is quite simple and almost all processes are reversible. It is only important to follow the instructions and do some preparation before seriously tampering with memory sections.
In this case, the user bears the responsibility for the consequences of manipulations with the phone! All the actions described below are performed by the owner of the device at his own peril and risk!
If a Lenovo A536 user is puzzled by the possibility of serious intervention in the software part of the device, it is highly recommended to complete all preparatory procedures. This will restore the functionality of the smartphone in critical cases and various failures, as well as save a lot of time if you need to return the device to its original state.
Step 1: Installing Drivers
A completely standard procedure before working with almost any Android device is to add drivers to the operating system of the PC used for manipulation, which will allow you to correctly pair the device and programs designed to write information to memory sections. The Lenovo A536 is a smartphone built on a Mediatek processor, which means that an application can be used to install software into it, and this in turn requires a specialized driver in the system.
The process of installing the necessary components is described in detail in the article:
If you have any difficulties finding drivers for the Lenovo A536 model, you can use the link to download the necessary packages:
Step 2: Getting root rights
When the purpose of manipulating the A536 software is to simply update the official software or return the smartphone to its “out of the box” state, you can skip this step and proceed to one of the methods for installing Lenovo factory firmware into the device.
If you want to try to customize the device’s software, as well as add some functions to the phone that were not provided by the manufacturer, obtaining root rights is a necessity. In addition, Superuser rights to the Lenovo A536 will be required to create a full backup, which is highly recommended before further intervention in the software part.
The smartphone in question can be easily rooted using the application. In order to obtain Superuser rights to the A536, you should use the instructions from the article:
Step 3: Create a system backup, NVRAM backup
As in many other cases, before writing software into memory when working with Lenovo A536, partitions will need to be cleared of the information they contain, which means that to restore it later it will be necessary to have a backup copy or a complete backup of the system. Manipulations that allow you to save information from memory sections of an Android device are described in the article:
In general, the instructions in this lesson are sufficient to ensure the safety of information. “NVRAM” partition before installing Android.
.
The fact is that erasing this section in the model under consideration is a fairly common situation leading to the inoperability of wireless networks. Without a backup, recovery can take a lot of time and require deep knowledge of working with the memory of MTK devices.
Let's take a look at the process of creating a copy of the “NVRAM”
more details.
Firmware of official software versions
Despite the fact that the software created by Lenovo programmers and intended by the manufacturer for use on the A536 is not particularly outstanding, in general, the factory firmware meets the needs of many users. In addition, installing official software is the only effective recovery method if any problems arise with the software part of the device.
There are three main ways to update/reinstall official Android versions for Lenovo A536. The choice of method is carried out depending on the state of the software part of the device and the goals set.
Method 1: Lenovo Smart Assistant
If the purpose of manipulating the A536 smartphone is to simply update the official software, probably the simplest method is to use the proprietary Lenovo MOTO Smart Assistant utility.
Method 2: Native recovery
Through the Lenovo A536 factory recovery environment, you can install official system updates and full firmware. In general, this may be somewhat simpler than using the Smart Assistant described above, because the method does not even require a PC for its implementation.
Method 3: SP Flash Tool
As with many other smartphones, flashing Lenovo A536 firmware using an application is the most radical and universal way to write system software, roll back to the previous version and update, and, importantly, restore MTK devices after software failures and other problems.
The first method is auto-update
Automatic update is the simplest and most secure solution. This eliminates the possibility of screwing up, because the device will carry out the entire procedure on its own. To run auto-update on the tablet, we need a fully charged battery and a stable Internet connection.
In the settings of almost every device running Android OS there is a corresponding function. It can be called differently, but as a rule it is hidden under the menu item “Software Update”, “Update Center” or similar. Having entered it, we check the availability of the current version of the software for our tablet. But it also happens: the menu does not contain the mentioned option, or the device refuses to search for an OS update. In this case, PlayMarket and one of the special update programs will help us.
IMPORTANT: in some cases, tablet product manufacturers do not provide users with the opportunity to update through a special function in the menu. Then the only thing we can do is a complete reinstallation of the operating system.
Custom firmware
The methods described above for installing software on a Lenovo A536 smartphone involve obtaining various official versions of Android as a result of their implementation.
In reality, it will not be possible to expand the functionality of the device and seriously update the OS version in this way. A serious change in the software requires customization, i.e., installation of modified unofficial solutions.
By installing custom, you can get the latest versions of Android, as well as install additional software components that are not available in official versions.
Due to the popularity of the device, a large number of custom and various solutions ported from other devices based on Android 4.4, 5, 6 and even the latest Android 7 Nougat have been created for the A536.
It should be noted that not all modified firmware are suitable for daily use, due to some “dampness” and various shortcomings. It is for these reasons that this article will not consider custom ones based on Android 7.
But among the unofficial firmware created on the basis of Android 4.4, 5.0 and 6.0, there are very interesting options that can be recommended for use on the device in question as used on an ongoing basis.
Let's go in order. According to user reviews, the highest level of stability and ample capabilities on Lenovo A536 are demonstrated by modified MIUI 7
(Android 4.4),
Lollipop
(Android 5.0),
CyanogenMod 13
(Android 6.0).
Switching from Android 4.4 to version 6.0 without erasing IMEI is impossible, so you should go step by step. It is assumed that before carrying out manipulations according to the instructions below, the official software version S186 is installed on the device and root rights are obtained.
Once again we emphasize! You should not proceed with the following without first creating a backup of the system in any available way!
Step 1: Modified recovery and MIUI 7
Installation of modified software is carried out using custom recovery. Environments from different teams have been ported for the A536; in principle, you can choose whatever you like.
- Install custom recovery via the Rashr Android application. You can download the program from the Play Market:
- After launching Rashr, we grant the application Superuser rights, select the “Recovery from catalog”
and indicate to the program the path to the image with the modified recovery environment. - We confirm the choice by clicking the “Yes”
in the request window, after which the installation of the environment will begin, and upon completion, a window will appear prompting you to reboot into the modified recovery. - Before rebooting, you need to copy the zip file with the firmware to the root of the MicroSD installed in the device. In the example under consideration, the MIUI 7 solution for Lenovo A536 from the miui.su team is used. You can download the latest stable or weekly custom versions from the link:
- We reboot into the modified recovery in the same way as into the factory recovery environment, or from Rashr.
- We do wipes, that is, clearing all sections of the device’s memory. In PhilzTouch recovery, to do this, select “Wipe and Format Options”
, then
“Clean to Install a New ROM”
.
Confirmation of the start of the cleaning procedure is the selection of the item “Yes – Wipe user & system data”
. - After the wipes, return to the main recovery screen and select “Install Zip”
, and then
“Choose zip from storage/sdcard1”
. And specify the path to the file with the firmware. - After confirmation (item “Yes – Install...”
), the process of installing the modified software will begin. - All that remains is to watch the progress bar and wait for the installation to complete. When the process is complete, the message “press any key to continue”
. We follow the instructions of the system, i.e., by clicking on the display we return to the main PhilzTouch screen.
Sometimes unexpected situations arise when the Lenovo tablet starts to slow down.
Sometimes in such cases you cannot do without firmware. It is usually used as a last resort when nothing else helps. The firmware will also help those users who want to get new features from their device. So, how to flash a Lenovo tablet? It is important to exercise extreme caution, since incorrect software that was installed as a result of the firmware can negatively affect the performance of the tablet. It is also necessary to save valuable data on removable media. Please understand that they will be erased from the device’s memory. There are two ways: flash the device using microSD or by connecting to a computer.
As for the firmware itself, there are official and custom ones. The first are presented by the manufacturer, and the second are created by the users themselves. Of course, the choice should be obvious, but the fact is that unofficial firmware versions have wider functionality. That is why many users choose them. However, they are not suitable for every device. A significant disadvantage is that if something goes wrong, it is almost impossible to correct the error.
Firmware from flash card
The circuit carrier is capable of providing a service and solving the issue of how to flash a Lenovo tablet. This method is attractive for its simplicity and time saving. You will need to do the following:
- The battery is charged to maximum. The selected firmware version is downloaded to the computer (zip format).
- The flash drive is formatted and the firmware is transferred to it.
- The tablet turns on, the memory card is installed in it.
- Press and hold the Home key or the volume control (if the Home button is touch sensitive) and the power key at the same time. After this, the Android logo will appear on the screen in white and then green. This means that the firmware process is starting.
- When the installation is complete, the Android logo will turn white again. After it, you can see the Lenovo inscription on the screen.
If the sewing is successful, after rebooting the tablet will work normally.
Firmware via computer
As in the previous case, you need to fully charge the tablet. Then you need to download the firmware version that is suitable for your specific model. You will also need to download and install the Flash Tool. USB drivers will also be required. When all the preparatory steps have been completed, you need to do the following:
- Go to Device Manager on your laptop or computer.
- Connect the USB cable, connecting the tablet and computer.
- When an unidentified device is displayed in the Device Manager, right-click on it. You need to specify “Install the driver from a specified location”, and then select the driver that was downloaded earlier.
- Disconnect the tablet from the computer and launch the Flash Tool. It is important to use the Scatter Loading option to specify the path to the file from the archive that contains the firmware.
- Check DA DL All With Check Sum.
- Click Firmware Upgrade.
- When this is done, you will have to wait until the system goes into standby mode. Then the disconnected tablet is reconnected to the computer. If the actions are performed correctly, you can see the activation of the process (the percentage will increase).
- At the end, a green circle will appear on the screen.
- The USB cable is disconnected and the tablet turns on.
How to flash a Lenovo tablet? All you need to do is follow the instructions exactly.
Smartphone improvement: firmware for Lenovo p780 Lenovo a 800 firmware: instructions Lenovo S60a firmware: instructions How does the Lenovo a536 firmware work? Firmware for Lenovo s890: video review
Preparation
Preparing your Lenovo tablet for flashing is an important step that needs to be taken seriously.
The most important preparation point, in the form of downloading a file with the operating system, is described in the next subheading.
How to prepare a gadget for reinstalling Android via a computer:
- Charge your device to at least 90%. This is important, since during flashing the gadget should not completely lose charge.
- Make a backup and move it to a memory card or another external drive. Thanks to backup, if the installation is unsuccessful, you will not lose previous data and can always restore it. You cannot save a backup file on the device’s memory, since it will be formatted before installing a new operating system.
- Save your user data. Using cloud storage, you can save user files such as videos, photos, music, documents, etc. Google Photos is suitable for photos and videos. Backup in Google settings
- Disable Windows Firewall and antivirus on your computer. Sometimes both of these services can interfere during flashing.
- Install USB drivers for Lenovo devices on your PC. For gadgets with MediaTek processors, you need to install the Mediatek Preloader drivers, here is the link. For devices with Qualcomm processors, there are also accompanying drivers at this link. Both links are taken from an extensive Russian-language site and forum dedicated to Lenovo.
- Use a good USB cable. The firmware will be installed via a USB cable, since this is what connects the computer and tablet. I recommend using original cords!
- The computer should not suddenly shut down during the installation process. To avoid this, connect it to an uninterruptible power supply or flash it through a laptop.
Don't forget to charge it before doing this!
The program through which the operating system will be installed depends on the device processor.
Lenovo may have MediaTek or Qualcomm processors. I provided download links for both programs in the firmware instructions.
Where to download firmware for Lenovo
You can download the file with the operating system on the website android-sklad.ru/index.php.
You can also select and download the appropriate firmware using this link. Be sure to download the exact operating system that is suitable for your Lenovo model.