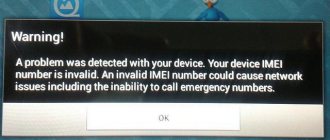
Let's look at the main reasons for the "Authentication error when connecting to Wi-Fi" message on Android tablets, phones and laptops running Windows 7.
Fixing WiFi authentication error:
The most popular reason. why the phone does not connect to Wi-Fi - the password was entered incorrectly when connecting to the router. Make sure to enter the password correctly, including capital letters and numbers, the password can only be in English!!!
If it doesn’t work, we’ll re-enter the password into the router. How to do this is below.
- At the end of the answer, we will consider the option when the password is entered correctly but Wi-Fi does not connect. In this case, you need to reconfigure the network settings in the router. This is interesting:
Connect to Wi-Fi on Android:
1. Click the “Settings” button on your tablet or phone - “Wireless Networks”. In the list of networks, find your connection that you cannot connect to and delete it.
2. Add the network a second time, carefully enter the password and try to connect. If the problem persists, we’ll re-enter the password into the router.
and carefully enter it when connecting to a wireless network.
Read more about setting up your router.
3. Go to your router's settings. To do this, type 192.168.0.1 (or 192.168.1.1 - it all depends on the router model) in the browser line. Enter your username and password.
4. We are interested in the Wireless Network Mode (Mode). Instead of “b/g/n” (usually the default), replace it with “b/g”. Save your settings.
5. If there is no result, set the encryption type - WPA/WPA2
and re-enter your Internet password.
This is interesting: 802.11b, 802.11g and 802.11n are WiFi radio signal transmission technologies.
- 802.11b is the most primitive in terms of transmission speed, but works with all networks and devices;
- 802.11g is a slightly more modern technology in terms of speed, it has been used since 2003;
- 802.11n is a “new” technology, speeds up to 600 Mb/s. Implemented only in September 2009. — now all modern phones and tablets support n-technology.
By default, your router provides speeds for all three bands, but your tablet or phone may not be designed for the maximum of them (802.11n) and display a WiFi authentication error.
To do this, we reduce the transmission mode in the settings.
5. Save the settings and reboot the router with the “Apply” button. Reconnect to the WiFi network.
kingdia team 12/29/2016 15:35
I quote valeravlasov: Hello. Technologies of wireless data networks (Wireless LAN or WLAN). WLAN - Wireless Local Area Network, which literally translates to wireless local area network. It is used in the same context. When talking about wireless networks, the abbreviation WLAN is used.
#23 hacker 01/03/2016 14:35
I quote asilbek:
Hello, I have a Lenovo tablet. everything worked very well, but today the tablet sees Wi-Fi but does not connect. says saved, WPA/WPA2 protection. what should I do please tell me. and others are working
go to any browser and in the address bar write 192.168.1.1 or 192.168.0.1 and the login and password admin/admin, for example for fast 2804vol 7 rev3 router models, wlan-basic - the default channel width is 20/40, set it to 20 mhz, and find a free channel, for example 8,9,10. and click apply, restart the wireless wifi point, download the tablet utility analizer wifi or optimizer wifi to optimize the free channel. And if the checkbox is to disable the wifi interface, then uncheck it and sleep peacefully, dear comrade.
Most mobile device users know firsthand what wifi authentication is on a phone or tablet - after all, “users” encounter connecting to a wireless network almost every day. However, why to go through this “procedure” and for what reasons the problem of Wi-Fi authentication arises is not understood by all owners of modern tablet computers.
Switch
There is another way to enable Wi-Fi on Lenovo.
As mentioned above, most often the developers of this brand place special switches. All that remains is to find them. First, you need to examine the side panel of the device. The network button will look like a slider that you can move either to the right or to the left.
It also often happens that the Wi-Fi button on a Lenovo laptop is located next to the power button. Then it is green and looks like a regular key with a computer icon. In this case, there will also be switches nearby to enter the BIOS and a button to completely reset the system to factory settings. But don’t be afraid to press it accidentally, for example, while transporting the device: the system won’t return everything to standard settings so quickly.
If such keys, which, by the way, make life very easy for users, are not available on your laptop, then the following method will help.
Using a special application from the developer
If the owner of a Lenovo laptop has reached this section of the instructions, then you will need to use special applications from the developer and launch the adapter.
The program that controls the module is called “Lenovo Energy Management”. It is always available for installation on the computer manufacturer's website. After installing the utility, you need to activate the module with a button on the laptop, and the application menu will immediately be displayed on the monitor.
You just need to put o.
No WiFi connections available in Windows 10/7
First of all, to rule out minor problems, turn off the modem and laptop for 1 minute. Then turn everything back on and check if Wi-Fi networks are available. If you have a phone, then try to find Wi-Fi networks, and if they are found, then most likely there is a hardware problem in the laptop or a software problem in Windows 10/7.
Network reset
Launch Command Prompt as an administrator and enter the following commands in order, pressing Enter after each one to reset the network.
WiFi adapter physical switch
Laptops have button combinations that can physically turn the hardware on and off. This may apply to desktop keyboards. To use the WiFI wireless adapter itself, you need to press the Fn+F2 button combination. Since keyboards are different, the combination may be different, but you are looking for an icon that resembles WiFi or a wireless network.
Checking network adapters
Press Win+R and enter ncpa.cpl to open network adapters. If there is a virtual network adapter created by the virtual machine, then disable it. Also, if the “Wireless Network” adapter is disabled, then turn it on by right-clicking on it. If the laptop does not see the Wi-Fi network, then move on to the next point.
Driver and adapter removal
Press Win+R and type devmgmt.msc to open Device Manager. Find and expand the “Network adapters” column. The list will contain all your network adapters, including virtual ones. You need a wireless WiFi adapter and it is designated as Wireless or Wlan. Right-click on it and do the following in order:
- Update driver. If this does not help and the adapter does not need the latest driver, then
- Remove the device and restart the laptop.
- After reboot, the driver will be installed automatically.
- If it is not installed, select “Update hardware configuration”.
Service check
If you used any optimizers, then most likely they disabled the Wlan service. Press Win+R and type services.msc to open Windows services. In the list, find “WLAN AutoConfig Service” and double-click on it. The startup type should be “Automatic” and it should run. Click "Run" if it is stopped. If a laptop or computer does not see the WiFI network, then we move on to the next point, which for some can be very effective.
Adapter region and frequency
The region settings of your Wi-Fi adapter must match those of your Wi-Fi router, otherwise your laptop will not be able to find the wireless network. You can also change the frequency parameters. Press Win+R and enter devmgmt.msc to open Device Manager again. Expand the list of network adapters and double-click on wireless. Next, go to the “Advanced” tab and let’s get started. If you have Bandwidth, then try setting it to 20 MHz Only. If you don’t have it, but have 802.11n channel width for 2.4GHz, then change it to 20 MHz Only.
If you have the column “Country and region (2.4GHz)” in English. (Country Region 2.4GHz), then set the value #5 (1-14), if that does not help, then set #1 (1-13).
Also, if the router itself is configured with the 802.11 / b band, and the adapter is set to 802.11 / n, then WiFi will not work with the modem and other networks that have a different band. For this reason, select the universal triple band IEEE 802.11 b/g/n.
Outdated VPN registry entry
Create a system restore point before executing the process. The WiFi problem is mainly caused by outdated VPN software. Launch Command Prompt as administrator and enter:
netcfg -sn
If you find DNI_DNE in a long list, then you need to delete it. It is associated with the legacy Cisco VPN client. Enter the command below to remove the registry entry:
reg delete HKCR\CLSID\{988248f3-a1ad-49bf-9170-676cbbc36ba3} /va /f
Enter the following command below:
netcfg -v -u dni_dne
See also:
- Can't connect to this WiFi network on Windows 10
- DHCP is not enabled on the WiFi or Ethernet network adapter
- WiFi won't connect after sleep or hibernation in Windows 10
- WiFi icon disappeared on Windows 10 laptop
- Phone as a webcam via USB, WiFi or Internet
comments powered by HyperComments
Why doesn't my laptop see wireless networks (not a single one)?
The most popular reasons:
- There are no available networks within the radius (we have already excluded this)
- The wireless adapter driver is not installed and therefore cannot find wireless networks. Or the driver is installed, but does not work correctly.
- Wi-Fi on the laptop is simply turned off.
- It happens that the Wi-Fi receiver is simply faulty or turned off (for example, while cleaning a laptop from dust).
But, most often, of course, the problem is a disabled wireless adapter, or the absence of the necessary driver. This is what we will consider now.
To begin with, I would advise you to simply try connecting your laptop to a wireless network using these instructions. And separate instructions for connecting in Windows 10. Perhaps everything will work out for you, and you won’t need to delve into the settings.
Checking the wireless adapter driver
If you see a connection icon in the form of a computer with a red cross on your notification panel, then the driver is most likely not installed.
To check, we need to go to the device manager. Open the Start menu, right-click Computer, and select Manage. In the new window, go to the Device Manager tab. Open the Network Adapters section and see if there is an adapter with the words “Wi-Fi” or “Wireless” in its name. It looks something like this:
If such an adapter is not there, as a rule, in this case only one adapter (network card) is displayed there, then it needs to be installed. If it is there, then it should be without any icons, like in my screenshot above. If there is an icon near the Wi-Fi adapter, right-click on it and select Enable. Most likely, you will have to install the necessary driver. We have separate installation instructions: https://help-wifi.com/raznye-sovety-dlya-windows/kak-ustanovit-drajvera-na-wi-fi-adapter-v-windows-7/.
If everything is fine with the driver, then let's check if Wi-Fi is turned on on your computer.
Right-click on the network connection icon, and select Network and Sharing Center. Then, select Change adapter settings.
Next, right-click on the Wireless Network Connection (or Wireless Network) adapter and select Enable.
After this, the computer should see wireless networks, and you can easily connect to your Wi-Fi network.
You may have wireless networks turned off by a keyboard shortcut on your laptop. You need to check, I wrote about this in more detail in the article: how to turn on Wi-Fi on a laptop with Windows 7? And if you have a “ten”: how to enable Wi-Fi in Windows 10.
After these steps, everything should work for you. The main thing is that the Wi-Fi network icon with a yellow asterisk appears, this means that there are networks available for connection.
Using standard Windows tools to automatically diagnose problems
If your Lenovo laptop does not connect to your wireless network, the easiest solution in this situation is to use Windows automatic diagnostic tools. This function works successfully in the eighth version of Windows and higher, on all Lenovo laptops.
Pay attention to the Windows tray (quick access to the main running services in the lower right corner of the desktop). There should be a wireless network icon located there, which will most likely be crossed out with a red cross - right-click on it and select the line “Diagnostics problems” (left mouse button)
Then wait until Windows resolves itself or, if this is not possible automatically, determines the nature of the problem.
If there is no wireless icon in the Windows tray, or troubleshooting does not find any problems, proceed to the following recommendations.
Software method through Windows settings
Another effective way to enable Wi-Fi on a Lenovo laptop is software. You can use it through Windows settings, and in particular “Mobility Center”. To open, use the key combination “Win+X”.
Note! The menu may appear differently, but often there is a “Work with wireless” block and a separate button called “Enable wireless”. The button must be active, only in this case, after pressing it, Wi-Fi will turn on
To find this center in Windows 10, you need to:
The button must be active, only in this case, after pressing it, Wi-Fi will turn on. To find this center in Windows 10, you need to:
- Open search.
- Type in “Windows Mobility Center”.
- Open the control panel and find the corresponding button.
If it is not there, then you need to go to “Settings”, select “Network and Internet”, find the Wi-Fi section in it, and move the wireless network switch if it is turned off. There you can set related parameters, study available networks, equipment properties and other items.
Connection using WPS
WPS stands for Wi-Fi Protected Setup and allows you to connect to an access point without having to enter a password. It can be activated on the router by pressing a special button. Almost all modern routers have it. The mode is activated by pressing the button for a couple of seconds, but no longer than five.
To connect your tablet to such a router, you need:
Note! This solution is suitable for a home network to simplify connection.
Device for LG TV
This is a WiFi USB adapter for LG TV, named AN-WF100. It is best suited for models that support wireless networking by default. The average cost of the device is 4,000 rubles.
The adapter expands the functionality of the designated devices. To properly configure the connection, you need to strictly follow the instructions or entrust this work to a specialist.
Adapter technical data:
- Complies with IEEE 802.11a/b/g/n standard.
- The optimal standard for streaming video is 802.11 n.
- Interface type: USB 2.0.
- Required current for consumption: 450 mA.
- Physical data: 6.7 (length) x 2.35 (width) x 0.9 (height) cm.
- Warranty – 1 year.
- The declared operational period is 3 years.
Operating frequency spectra (in hertz):
- 2.400~2.483.
- 5.150~5.250.
- 5.725~5.850.
Data transfer dynamics:
- 802.11a/g - 54 Mb/sec.
- 802.11b - 11 Mb/sec.
- 802.11n: 300 Mb/sec.
The device does not see any of the networks in the area
Problems like this happen quite often. This may occur due to the following reasons:
- lack of available wireless connections in a certain area;
- absence or malfunction of the network driver, which is responsible for the operation of the module. In this case, it will not be able to find any available connections;
- Wi-Fi function on the device is disabled;
- disconnection or failure of the network module.
Note! It is noteworthy that such an urgent problem most often occurs precisely because of incorrect operation or malfunction of the module. Software required for operation may be missing
Checking and fixing the problem can be divided into several stages.
Driver check
The absence of a driver or its failure can be indicated by a crossed out computer icon in the notification panel. This can be easily checked: you will need to open the device manager. Next you should perform the following sequence of steps:
- open the main Start menu;
- right-click on the “Computer” section;
- open the “Management” item;
- in the window that opens, find the special “Device Manager” tab;
- in it you can see the “Network adapters” subsection;
- Having gone into it, you need to find a device that would have a combination of Wireless or Wi-Fi in its name.
Often, the list should consist of at least two available devices: the network card will be indicated first, and the required module will be indicated second. If there is nothing like this in the list, then its installation is required.
Note! If an adapter is in the list, it should not have any additional icons next to its name. The found icon should be activated
To do this, right-click on the corresponding section of the pop-up menu. If the driver simply does not exist, then the system will need to install it. You can download firewood from the installation disk or download it from the Internet
The found icon should be activated. To do this, right-click on the corresponding section of the pop-up menu. If the driver simply does not exist, then the system will need to install it. You can download the firewood from the installation disk or by downloading it from the Internet.
Turning on the network
If there are no problems with the software, then you should check whether the driver itself is enabled. How to do it:
- right-click on the connection icon and go to “Network and Sharing Center”, where you will find “Change adapter settings”;
- select “Wireless network connection” - “Enable”.
After completing all the steps, the laptop will be able to find all available connections. You should select what you are looking for and make the connection. The availability of available networks will be indicated by the appearance of a Wi-Fi network icon with a yellow star.
So, wifi authentication: what is it?
Authentication is a security check when connecting a device to Wi-Fi over a secure connection. During the authentication process, the device tells the Wi-Fi equipment the secret code entered by the user.
If the password is correctly specified, the Wi-Fi router connects the device to the network, otherwise the connection is reset. Thus, only users who are part of the circle of “trusted persons” and who know can use Wi-Fi resources.
In other words, Wi-Fi authentication on an Android device is telling the router a password to enter the network and then checking it for a match with the password specified in the router settings.
If wi-fi does not work on your tablet, you can do the following:
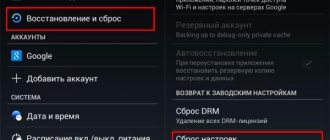
1. Unfortunately, it is highly undesirable for the average user to interfere with the operation of a high-tech gadget. However, a simple reset and return to factory settings can help get wifi back to work. If your tablet runs on Android OS, then this can be done through the device menu by going to the section: Settings -> Backup…. On the next screen, you need to click “Reset Data”, after which the tablet will return to its factory state.
2. You can reset the settings in another way. To do this, you need to turn off the tablet. Then, simultaneously press and hold the power key and volume down rocker. The device will then enter recovery mode. In the menu you need to select the “Wipe” section, after which the so-called “hard reset” will occur.
Of course, on the Internet you can find videos and descriptions of how the owners of a non-working device “baked” Wi-Fi modules in the oven, after which they came to life. But this method is not a panacea, and it cannot eliminate all problems. In practice, the average user creates even more damage when trying to disassemble the tablet, not to mention successful repairs using “folk methods.” So, if the hardware breaks down, a visit to the service center is necessary.
The main reasons why wifi does not work on a tablet
After the “opening”, the specialist will announce the cause of the breakdown. It could be:
- Natural wear and tear of the module: in this case, it is simply replaced with a similar one.
- The cable connecting the wireless communication module to the tablet’s motherboard is worn out. In this case, it must also be replaced.
- Water getting inside the housing. This is an extremely dangerous situation, since after Wi-Fi, other equipment may also fail.
All these problems can be easily resolved by service center employees. The sooner you seek help, the better it will be for you and for the tablet.
In this article we will talk about such a common problem, what to do if the tablet does not connect to a wireless WiFi network. This is a hot topic today, as tablets are widely used all over the world. In addition, problems with connecting to wireless networks appear quite often and not everyone is able to solve them on their own.
So, when talking about a wireless network, you should understand that we are talking about a WiFi router or other access point. It is worth noting that for security purposes, such connections require entering a key. This means that the first thing you should do if your tablet does not connect to the WiFi network is to check that you entered the password correctly.
However, there are other problems related directly to wireless equipment and its settings. These include the following:
- A MAC filter is installed in the router settings.
- The router is malfunctioning.
- Encryption type mismatch.
- Channel mismatch.
It’s worth noting that you don’t need to configure anything on the tablet itself. Everything that can affect the connection is contained in the router settings. This is where we will go to troubleshoot problems.
And first of all, you should pay attention to the fact that budget routers such as TP-Link, D-Link. Asus, Zyxel and so on are not highly stable
They have a tendency to freeze.
This can happen for many reasons, for example, due to power outages, heavy load (if you download large amounts of information at high speed), as a result of connecting a large number of subscribers, and so on. In any case, you should reboot the router. How it's done. It's simple. Unplug the device from the power supply and wait 7-10 minutes, then turn it on again.
Checking the installed driver
The first way to enable wireless communication on a Lenovo laptop if the adapter seems to work, but the Internet connection does not appear, is to check whether the required driver is installed. Let's look at how to enable Wi-Fi on Lenovo 560. The action plan is as follows:
- Check whether the necessary driver was on the device at all. To do this, you need to open the command line and enter the command “devmgmt.msc”. The system transfers to the list of drivers where you can control everything;
- Next, you need to select “Network adapters” from the list. In the list that appears, you need to find the “Ethernet” item; sometimes it may be called “Wireless”;
- If this item is missing at all or is displayed but with a triangle symbol, this means that the driver is not installed. It is possible that the system will display some unidentified device;
- In this case, to solve the problem, you will have to download a specialized driver from the official website for a specific laptop model (in our case, for the Lenovo V560).
Enabling services
Disabling necessary services can also be a common problem. Often, users deactivate many operating system components to speed up their computer, and this can really help. The fact is that Windows can perform many different tasks, and each of them requires certain tools, but the system cannot know which of them the user may need next, so it keeps most of them enabled. This results in slower performance, especially if your computer has little RAM installed.
For example, why do you need to keep the printer and fax services turned on if the owner does not need such devices and will not use them? Also, the computer wizard (or the user himself) can turn off services related to networking if an Internet connection is not expected, and this significantly speeds up the work.
How to connect to a Wi-Fi network
To connect a Lenovo laptop with Windows 10 installed to a wireless network, you must:
- Find the Wi-Fi icon in the taskbar in the form of outgoing waves (sometimes an Internet symbol in the form of a globe is displayed, or a conventional image of a computer screen).
- Click on the icon. The system will display a list of all wireless networks within the coverage area of which the laptop is located.
- Select your network and click “Connect” (if you wish, you can check the “Connect automatically” box).
- If you have not connected to this network before, you will have to enter a security key (in other words, your Wi-Fi password).
- After a few seconds the system will establish a connection.
If you are unable to connect, click the “Network and Internet settings” link, which is located below the list of available networks. (You can also go to: Start - Settings - Network and Internet).
Go to the Wi-Fi tab and make sure the wireless network option is turned on. Next, go to the “Status” tab and run the “Network Troubleshooter”. Often the system finds the cause of the problem and tells the user how to fix the problem.
Reboot the router
Let's say you've already figured out how to set up Wi-Fi and have successfully accessed the Internet several times, but when you try to connect again to a familiar connection, nothing happens. To resume the wireless connection, you will need to reboot the router.
To do this, unplug it from the power source and plug it back in after a few minutes.
Do not use the Reset button for this, otherwise you will reset all settings to the factory state.
Wi-Fi does not connect to the network or does not find it at all
The problem may lie in the software or physical part of the laptop, in the settings of the router, or in failures on the provider's side.
The reason is in the laptop or router
As noted, the first thing you need to do is run the troubleshooter. To do this, you don’t have to go into Windows settings: you can immediately right-click on the wireless network icon and go to diagnostics.
If the diagnostic module does not find any problems, examine the router. It must be in working order and Wi-Fi mode must be activated.
To configure the router, you need:
- Open any browser and enter in the address bar: 168.0.1 or 192.168.1.1
- Log in to the system (standard login and password – “admin”). If you can’t log in, look at the information on the bottom of the router or in its documentation.
- Change the name of the Wi-Fi network (must consist only of Latin letters and/or numbers).
- Check the Wireless Mode section. b/g/n should be set there.
Save your changes, log out and try connecting again.
The network is connected, but there is no Internet connection
Sometimes it happens that the laptop successfully connects to the network, but the Internet is still unavailable. In this case, it is recommended:
- make sure the router is working (refer to the previous point);
- check the integrity of the cable connecting your router to the Internet cables in the entrance (it is quite fragile and is often damaged by furniture or animals);
- call your provider and ask about the state of the Internet (perhaps your access is blocked, or there are technical failures on the line).
If there are problems with the router or cable, sometimes you have to call a specialist, for which you need to contact your provider again.
Device driver not installed
To check the driver status, you need to follow these steps:
- Press the Win + R key combination to bring up the Run menu
- Enter the command “devmgmt.msc” and press Enter.
- The device manager will open, among which you need to find the “Network adapters” item.
- In the list of devices, look for an item that contains the words “802.11n”, “Network” “Wireless”, or something similar.
- Right-click on it and go to the Driver tab.
- Look at the driver development date.
There are several scenarios in which the driver needs to be updated or reinstalled:
- it is not displayed at all among the network adapters, but there are unidentified devices;
- the driver is displayed, but is marked with a yellow triangle;
- The driver was released more than 5 years ago.
If the driver is still present in the system, right-click on it and select “Update Driver”.
In the second case you need:
- Enter your laptop model into the search bar.
- Select the required driver from the general list and download it.
- Go to the device manager, in the main menu select the “Actions” tab - “update driver”.
After installing or updating the wireless driver, the problem should go away.
List of services
Below is a list of the main services without which the Internet connection will not work or will not work correctly.
- DHCP Client: The service used when connecting. It should be set to enable automatically, not manually.
- DNS Client: Should also be set to "Enable Automatically".
- Network Connections: As the name suggests, it is responsible for these functions. You can set “Manual” even if the Internet is in use.